


Auto Glass Repair and Replacement: Complete Guide
Auto Glass Repair & Replacement — A Practical Guide to Windshields, Insurance, and ADAS Calibration
Your windshield does a lot more than keep the rain out — it helps protect passengers, supports the vehicle’s structure, and houses the cameras and sensors that power driver-assist features. This guide walks you through common types of glass damage, how our technicians decide between repair and replacement, the step-by-step workflows, and why ADAS calibration matters for lane assist, automatic emergency braking, and similar systems. You’ll also learn how insurance usually handles glass claims, what to expect for side and rear window service, and how to confirm OEM-compatible parts and proper procedures. Safety is our priority: we aim to protect structural integrity, preserve ADAS performance, and keep your out-of-pocket costs low by acting quickly. Keywords such as windshield repair, windshield replacement, ADAS calibration, OEM windshield, and auto glass insurance claim are included so you can find the practical guidance you need to protect yourself and your vehicle.
Common Types of Auto Glass Damage — When to Repair and When to Replace
Auto glass damage generally falls into a few clear categories—chips, star breaks, bullseyes, edge cracks, and long cracks—and those categories drive whether a repair will do or a replacement is needed. Small, shallow chips away from the driver’s sightline are often fixed with resin. Damage that is large, deep, starts at the edge, or interferes with sensors usually calls for replacement to restore structure and sensor alignment. Addressing damage quickly helps stop it from growing and preserves the windshield’s bonding surface if a future replacement becomes necessary. Knowing these categories helps you prioritize safety and avoid unnecessary work.
Quick decision cues for common damage types:
- Chips (bullseye or shallow): Surface blemish that’s often repairable when it meets size limits.
- Star breaks: Radiating fissures from an impact point; repairable if small and away from edges.
- Edge cracks: Start at the windshield edge and usually require replacement.
- Long cracks: Long or through-the-laminate cracks — replacement is typically the safe choice.
Use this checklist to get a quick sense of whether you should book a repair appointment or plan for a replacement.
Different damage factors affect repairability; the short table below summarizes the most common scenarios.
| Damage type | Key attribute | Typical recommendation |
|---|---|---|
| Bullseye / small chip | Under about 1 inch in diameter and shallow | Repair is usually effective |
| Star break / shallow spread | Several small fissures with center intact | Repair if outside the driver’s sightline |
| Edge crack | Originates at or near the windshield edge | Replacement recommended |
| Long crack | Extends several inches or crosses layers | Replacement required |
This quick reference helps drivers and technicians decide whether to schedule a repair or plan a replacement, with safety and ADAS compatibility in mind.
Which Windshield Chips and Cracks Can Be Repaired?
Repairable damage is usually small, surface-level, and contained so the laminated structure and sensors aren’t compromised. Our technicians assess the size, depth, location, how many impact points there are, and whether the damage crosses the lamination or sits in the driver’s field of view. Small chips under roughly one inch, shallow star breaks in a tight area, and impacts away from edges are commonly good candidates for resin injection that restores clarity and stabilizes the glass. Multiple impact sites, deep penetration through the interlayer, or damage that blocks ADAS cameras typically require replacement to keep systems accurate and safe.
Knowing what qualifies for repair helps avoid unnecessary replacements and keeps factory glass where it’s safe to do so. If repair is the right option, scheduling it quickly lowers the risk that the damage will spread and increases the chance of a good outcome.
How Do We Decide Between Repair and Replacement?
The repair vs. replace decision centers on structural safety, the integrity of the lamination, sensor function, and legal or industry standards. The main factors are size, depth, location relative to the driver’s sightline, and whether the interlayer is breached. Repair works when the laminated layers and spacer film remain intact and ADAS cameras and rain sensors keep their original alignment. Replacement is recommended when the interlayer delaminates, cracks reach the edge, or sensors are obstructed. Industry guidance stresses restoring original fit and adhesive integrity to preserve crash energy management, so technicians check bonding surfaces and run post-installation tests when replacing a windshield.
The compact summary below shows the checks we perform and the recommended actions.
| Damage Attribute | Diagnostic Check | Actionable Recommendation |
|---|---|---|
| Size (diameter/length) | Measure against repair thresholds | Repair small damage; replace long cracks |
| Location (sightline/edge) | Visual check and sensor proximity | Don’t repair in driver sightline; replace near edges |
| Depth (laminate breach) | Check for interlayer compromise | Replace if lamination is damaged |
| ADAS impact | Is a camera or sensor blocked or misaligned? | Replace and calibrate if affected |
When ADAS or structural concerns are present, replacement is often the safer route despite the higher immediate cost.
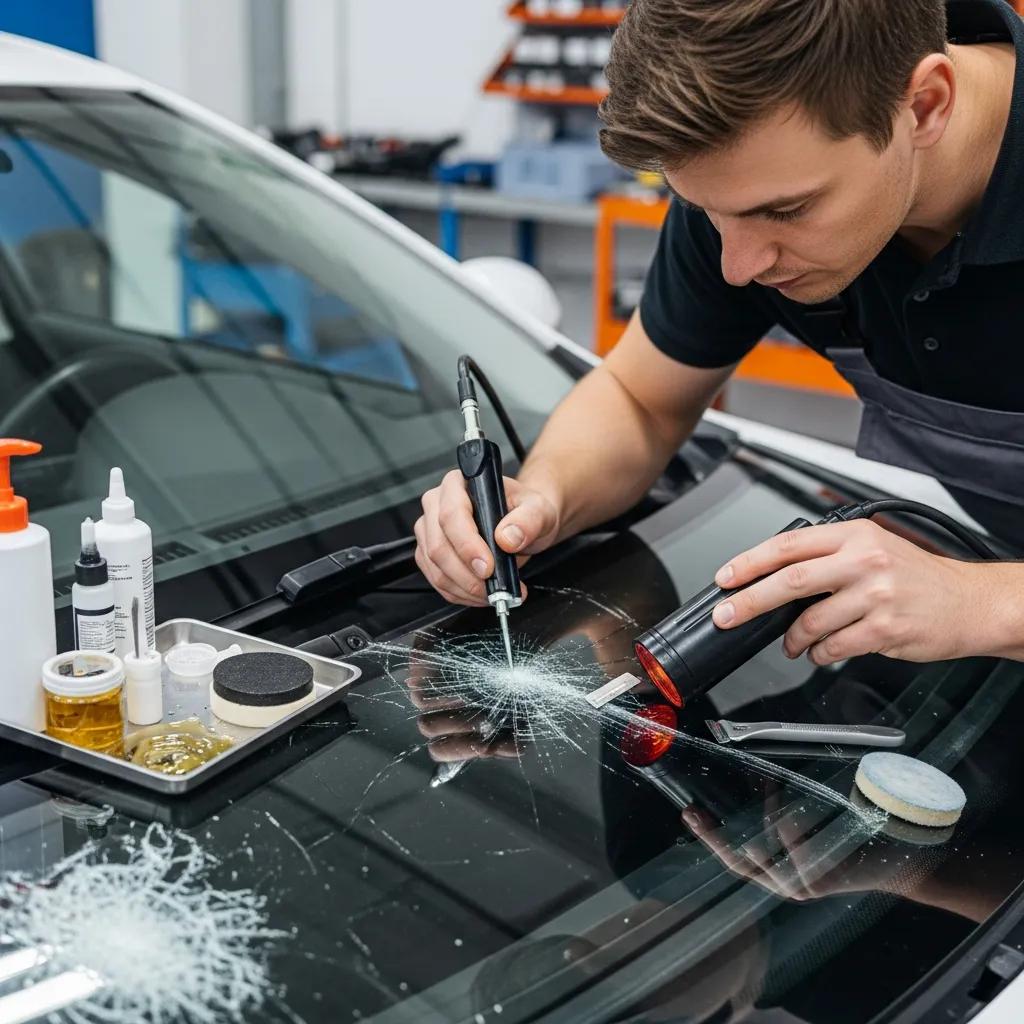
How Windshield Repair Works

Windshield repair fixes localized damage by cleaning, injecting resin, curing, and finishing to stabilize the glass and improve visibility without a full replacement. A technician inspects the damage, records dimensions and its position relative to the driver and any sensors, and cleans the area so the resin can bond. Using a vacuum/pressure bridge, they remove air and inject resin into the fracture, then cure it (usually with UV light) and polish the surface. Repair is faster than replacement and can help preserve the factory seal when it’s appropriate to do so.
Understanding the steps helps set expectations and improves the chances of a good result.
Here’s a concise step-by-step for a standard chip repair so you know what to expect.
- Inspect and document the damage, including photos and measurements.
- Clean and prepare the area, removing loose glass and contaminants.
- Attach a vacuum/pressure bridge and inject repair resin into the fracture.
- Cure the resin with UV light, remove the tooling, and polish the surface.
These steps highlight where technicians control the outcome and why prompt repair limits spread and preserves adhesive areas for future replacement if needed.
Detailed Procedure for Chip and Crack Repair
Technicians use a repeatable sequence: inspect, prepare, inject, cure, finish, and verify. Each stage reduces the chance the crack will spread and helps restore optical clarity. During inspection they note sensor locations and measure damage, then clean with solvents and mechanical methods to remove debris that would block resin bonding. The resin is injected under controlled pressure to fill voids, UV-cured to harden, and finally polished and checked to confirm the repair meets safety and aesthetic expectations.
We document every repair and give drivers simple aftercare guidance — avoid aggressive cleaning and allow curing time — to prevent premature stress on the repair and support long-term durability.
Why Prompt Windshield Repair Pays Off
Fixing a chip quickly stops cracks from spreading, preserves factory adhesives, lowers total cost compared with replacement, and often avoids insurance deductibles for small glass repairs. Early repair reduces water intrusion and the risk of lamination delamination, helps the windshield keep contributing to roof-crush resistance, and prevents ADAS camera obstruction. Fast service also minimizes downtime and the chance that a small problem becomes a full replacement. For both safety and cost reasons, timely repair is a smart move.
Quick repairs also improve the likelihood that OEM glass and sensor calibration remain usable, which simplifies things if replacement becomes necessary later.
Windshield Replacement — Why OEM-Certified Glass Matters
Replacement restores original structural performance, correct sensor geometry, and the manufacturer’s optical specs. The process removes the damaged unit, prepares the bonding surfaces, installs new glass with the right urethane adhesive, and validates fit and seal. A professional replacement involves trimming old adhesive, protecting interior components, applying the specified urethane, and allowing proper cure time before testing. Choosing OEM or OEM-certified glass helps ensure correct sensor mounts, camera alignment, and warranty compatibility. Some aftermarket options may need extra adjustments or differ in optical properties. When lamination integrity or sensor alignment is compromised, replacement is the safer choice.
The comparison below outlines OEM versus aftermarket options to help you decide.
| Glass Type | Safety & Fit | Warranty | Cost / Tradeoffs |
|---|---|---|---|
| OEM windshield | Exact sensor mounts and factory optical specs | Matches manufacturer expectations | Higher upfront cost; best ADAS compatibility |
| Aftermarket glass | Fit and sensor geometry can vary | Vendor-specific warranty | Lower cost but may need extra calibration |
| OEM-certified equivalent | Built to match OEM specs in most cases | Installer-backed warranty | Good balance of safety and cost |
Choosing OEM or an OEM-certified equivalent usually reduces calibration headaches and helps protect vehicle safety systems.
Prime Time Collision Center uses OEM-certified replacement processes carried out by trained technicians who focus on restoring factory fit and sensor alignment. You can schedule a free estimate or request an on-site evaluation to confirm the right glass and the work we recommend. We work with all insurance companies to help manage approvals and scheduling. Opting for OEM-certified parts and a technician who verifies adhesive and seal integrity is the safest path for preserving structure and ADAS performance.
Steps in a Professional Windshield Replacement
A professional replacement follows a clear sequence: vehicle assessment, careful removal of the damaged windshield, substrate cleaning, adhesive application, precise placement of the new glass, adhesive cure, and a final inspection that includes leak and sensor checks. Technicians protect trim and airbags during removal, apply the specified adhesive with a controlled bead to match manufacturer requirements, and allow the proper cure time before road testing. After curing, we run water tests, visual checks for fit and finish, and verify ADAS camera sightlines when cameras are present. This methodical process restores occupant protection and ensures safety systems work as intended.
Post-installation verification lowers the chance of post-repair issues and confirms the windshield functions as an integrated structural component once cured.
OEM Glass vs. Aftermarket — What to Know
OEM glass is made to the vehicle maker’s optical and dimensional specs, including sensor mount locations and edge geometry — details that affect ADAS camera alignment and sealing performance. Aftermarket pieces can be close but sometimes differ in sensor bosses, tint, or laminate layers, which may require extra adjustments or recalibration and can affect warranty transfer. OEM-certified equivalents aim to match original specs while offering installer-backed guarantees; choosing these options reduces the risk of sensor misalignment and preserves crash-performance characteristics. For vehicles with ADAS, keeping OEM compatibility is especially important for features like automatic braking and lane-keep assist.
Research further highlights potential performance differences between OEM and aftermarket components, especially where critical safety systems are involved.
Aftermarket vs. OEM Windshield ADAS Performance
An evaluation compared the performance of four low-cost aftermarket windshield-mounted forward-collision warning systems against previously tested OEM systems using IIHS rear-end and pedestrian crash-avoidance tests.
Do Aftermarket and Original Equipment Forward Collision Warning Systems Respond the Same to Vehicles and Pedestrians?, D Kidd, 2025
Looking at glass choice through the lens of ADAS compatibility and adhesive specifications helps owners make safe, cost-effective replacement decisions.
Why ADAS Calibration Is Essential After Windshield Replacement
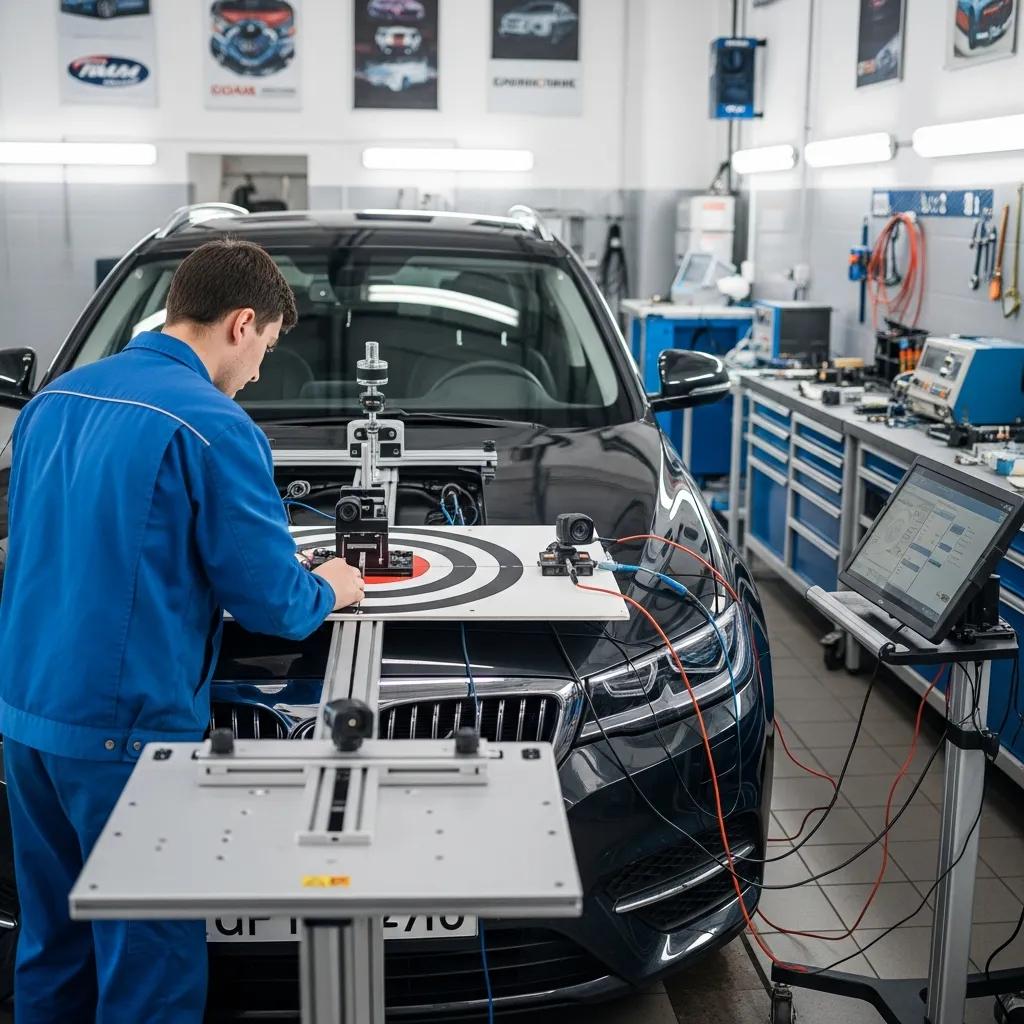
Yes — calibration matters. When a replacement affects camera or sensor position, ADAS systems need precise optical alignment and calibration to interpret the road correctly. Forward-facing cameras, lane-departure sensors, rain sensors, and forward-collision sensors all rely on a fixed relationship to the windshield; changes in glass geometry, sensor mounts, or mirror alignment can alter system behavior. Calibration restores the system’s spatial references so features like adaptive cruise control and automatic emergency braking work within manufacturer tolerances. Without proper static or dynamic calibration, system accuracy and safety can be compromised.
Because ADAS plays a major role in modern vehicle safety, recalibration after any repair or modification that affects these systems is essential — not optional.
ADAS Recalibration for Post-Repair Safety
After a collision or modification, ADAS functionality must be preserved to protect passengers and other road users. That is why recalibration of sensors and cameras after repair is required.
Unsettled Issues on Sensor Calibration for Automotive Aftermarket Advanced Driver-Assistance Systems, 2021
Knowing the types of calibration and the verification steps helps prevent unsafe operation and ensures your vehicle keeps the intended level of automated assistance.
What ADAS Is and How It Affects Auto Glass Work
ADAS — Advanced Driver Assistance Systems — covers camera– and sensor-driven features like lane-keep assist, automatic emergency braking, adaptive cruise control, and auto high beams. Many of these components mount to or reference the windshield, so any glass replacement or repair that changes camera position or lens clarity can affect calibration. Technicians evaluate ADAS components during repair planning and decide whether static (target-based, while the vehicle is stationary) or dynamic (road test and sensor-driven) calibration is needed to meet manufacturer tolerances. As ADAS becomes standard on more vehicles, sensor checks and calibration are now routine parts of comprehensive glass service.
We integrate sensor checks and calibration into standard replacement protocols to keep systems reliable and safe.
How Prime Time Collision Center Handles ADAS Calibration
At Prime Time Collision Center we use industry-grade equipment and trained technicians to meet both static and dynamic calibration requirements as part of our post-replacement checks. Our team documents camera mounting, performs target-based static calibrations when required, and conducts dynamic verification drives to confirm lane-assist and automatic-braking performance. Our certified technicians coordinate calibration with repair and insurance workflows so ADAS function is restored reliably. Equipment checks, verification logs, and sensor tests ensure calibration meets safety expectations and aligns with manufacturer guidance.
This integrated approach reduces the chance of post-repair system faults and gets you back on the road with confidence.
Navigating Auto Glass Insurance Claims — Practical Steps
Filing an auto glass claim usually follows a straightforward path: document the damage, contact your insurer, get an estimate, schedule the repair, and confirm approvals. Knowing common coverage patterns and deductible rules sets realistic expectations. Many policies cover small glass repairs with little or no deductible, while full replacements are often part of comprehensive coverage and may involve a deductible. Preparing photos, repair estimates, and vehicle details speeds up processing. Working with a shop that offers direct billing, free estimates, and insurer coordination makes the process easier and reduces your administrative load.
Here are practical steps to move a claim forward with minimal downtime.
- Photograph the damage from several angles and note the date and time of the impact.
- Check your policy or call your insurer to confirm glass coverage and deductible rules.
- Get a written estimate from a qualified shop and submit the documentation to the insurer.
- Schedule repair or replacement after insurer approval or once you’ve arranged payment.
Following these steps helps manage expectations and moves you from claim to repair with less friction.
The table below summarizes common claim items and typical coverage tendencies so you know what to expect.
| Claim item | Common coverage | Typical outcome / shop assistance |
|---|---|---|
| Small chip repair | Often covered with no deductible | Shop can provide a free estimate and bill the insurer directly |
| Windshield replacement | Usually covered under comprehensive | Deductible may apply; shop assists with the claim |
| Side/rear glass | Varies by policy | Confirm coverage; shop documents damage and provides an estimate |
| ADAS calibration | Sometimes billed separately | Shop coordinates authorization and documents the need |
How to File an Auto Glass Insurance Claim
Begin by documenting the damage thoroughly and contacting your insurer to confirm coverage and claim steps. Then get a written estimate from a reputable shop to submit for approval. Include photos, your vehicle identification number, and a short damage description to speed adjudication — many insurers accept digital submissions. After approval, schedule the work with the shop and check whether they offer direct billing to limit out-of-pocket costs. Keep copies of all communications and estimates until the job is complete and post-repair validation (including ADAS checks) is done.
Having a complete file and working with a shop familiar with insurer workflows reduces delays and helps ensure repairs proceed with the required authorizations.
Prime Time Collision Center helps customers with insurance claims by offering free estimates, working with every insurer, and providing direct-billing where available. Call or visit the shop to start the process and schedule an estimate. This hands-on support helps drivers in Glendale, Burbank, Pasadena, and Los Angeles navigate insurer requirements and get repairs scheduled quickly.
What Coverage and Deductibles Should You Expect?
Coverage varies by carrier. Many comprehensive policies cover windshield repair with little or no deductible, while full replacements are usually filed under comprehensive and may require the deductible. ADAS calibration costs sometimes need separate authorization. Since policy language differs, confirm whether glass work will be handled without a deductible or rolled into a comprehensive claim before scheduling. If you’re unsure, request a written estimate and ask the shop to submit it for pre-authorization to avoid surprises. Keep any pre-approval codes and insurer responses on file.
Clarifying common deductible scenarios upfront helps align the repair plan with your policy terms.
Typical coverage scenarios include:
- Many insurers waive deductibles for small windshield repairs.
- Replacements usually fall under comprehensive and may apply your deductible.
- ADAS calibration or reprogramming can require separate insurer approval.
- Shops that provide free estimates and direct billing make the claims process simpler.
Confirm these details with both your insurer and the shop to reduce confusion during scheduling.
Side and Rear Window Replacement — What to Expect
Side and rear windows are usually tempered glass and are handled differently than laminated windshields. Replacement focuses on safely removing broken glass, protecting interior trim and airbags, seating the new tempered unit correctly, and checking power window operation and seals. Tempered glass shatters into small fragments and needs careful containment during removal. Technicians inspect window regulators and weatherstrips before final installation. Common services include regulator or motor repairs, seal replacement, and privacy glass replacement to restore watertightness and smooth operation. Proper replacement preserves interior components and ensures the vehicle meets safety expectations.
After installation, technicians test window travel, locks, and seals to make sure there are no leaks or unwanted noise.
Safe Replacement of Tempered Side and Rear Glass
Replacing tempered glass safely means controlled removal, protecting the interior, checking the regulator and motor, precise glass placement, and seal verification to prevent leaks or rattles. Technicians isolate and remove broken pieces using protective covers and vacuuming, inspect channels and regulators for damage, and fit the new glass within factory tolerances. They test power operation, secure clips and run channels, then install weatherstrips and perform water and wind checks to confirm a proper seal. Following these steps reduces the risk of trim damage and ensures reliable window operation.
These practices preserve in-cabin safety and prevent secondary issues like wind noise or water intrusion after service.
Additional Auto Glass Services We Offer
Prime Time Collision Center provides several ancillary auto glass services beyond windshield and tempered-glass replacement to help with lease returns, privacy glass restoration, and related repairs. Services include seal-integrity inspections, documentation for insurance claims, and coordination of ADAS calibration when required after glass work. We emphasize OEM-quality repairs by certified technicians and offer free estimates to help drivers weigh repair versus replacement. For special requests, schedule an assessment so we can recommend the right path and any additional mechanical work needed.
These services guide you through the repair and claims process while keeping safety and OEM compatibility front and center.
For drivers in Glendale, Burbank, Pasadena, and greater Los Angeles, Prime Time Collision Center is a local resource for OEM-quality glass work and insurance coordination to simplify repairs and calibration scheduling.
We are committed to OEM-quality repairs, staffed by trained technicians, work with every insurance company, and provide free estimates and claim assistance. If you value safety and ADAS integrity, schedule an estimate or visit our shop to begin a guided repair and calibration process. Our certified technicians and hands-on service make professional repair and replacement the safest choice for preserving your vehicle’s safety systems.
- Schedule an estimate: Bring photos or stop by for a free damage assessment.
- Verify coverage: Ask about direct billing and insurance coordination.
- Confirm OEM compatibility: Request OEM-certified glass and ADAS checks.
Frequently Asked Questions
What should I do if my windshield gets damaged while driving?
If your windshield is damaged while driving, pull over safely and assess the situation. If the damage is small, you can usually drive carefully to a repair shop. If the crack blocks your view or the windshield is badly damaged, avoid driving and call for a tow. Take photos, note the time and location, and contact a professional auto glass service to discuss repair or replacement and possible insurance claims.
How can I tell if my windshield needs to be replaced instead of repaired?
Consider the size, location, and type of damage. Cracks longer than a few inches, edge cracks, or damage in the driver’s line of sight typically require replacement. If the damage affects structural integrity or interferes with ADAS sensors, replacement is necessary. A qualified technician can inspect the damage and recommend the safest option.
What is the average cost of windshield repair and replacement?
Windshield repair usually runs between about $50 and $150, depending on location and severity. Replacement typically ranges from roughly $200 to $1,000, depending on make, model, and whether OEM glass is used. Insurance coverage and deductibles will affect your out-of-pocket cost, so check your policy before scheduling service.
How long does the windshield replacement process take?
Replacement typically takes one to two hours for the physical install, depending on the vehicle and complexity. Technicians also need to allow adhesive cure time before the vehicle is driven — that can add several hours. Follow your technician’s advice on safe drive-away time and avoid washing or exposing the vehicle to extreme temperatures for at least 24 hours if recommended.
What are the risks of not repairing a damaged windshield promptly?
Delaying repair increases the risk that cracks will spread, which can force a full replacement. A compromised windshield can reduce structural integrity in a crash and increase the risk of injury. Damage that obscures the driver’s view also raises the chance of an accident. Timely repairs help keep the windshield functioning with airbags and ADAS systems as intended.
Can I drive my car immediately after a windshield replacement?
We typically recommend waiting at least one hour before driving after a replacement to let the adhesive set. Depending on adhesive type and weather, your technician may advise a longer wait. Always follow their guidance, and avoid washing the vehicle or exposing it to severe temperatures for the first 24 hours if instructed.
What should I look for when choosing an auto glass repair service?
Look for experienced technicians, positive customer reviews, and use of OEM or OEM-certified glass. Confirm that the shop offers a warranty on work, coordinates with your insurer, and provides ADAS calibration services when needed. Clear communication and transparent pricing are also important when choosing a reliable provider.
Conclusion
Knowing how auto glass repair and replacement affect safety, structure, and ADAS systems helps you make smarter decisions when damage happens. Prioritize quick repairs when appropriate, choose OEM-certified glass for replacements when possible, and verify ADAS calibration to protect performance. Handling insurance claims properly can reduce your out-of-pocket cost. For expert help and a free estimate, schedule an appointment with Prime Time Collision Center — we’ll guide you through repairs, parts selection, and calibration so you get back on the road safely.


