


Scratch and Scuff Repair: Professional Solutions
Precision Scratch & Scuff Repair — Restore Your Car’s Factory Finish
At Prime Time Collision we bring trained assessment, exact color matching, and industry-grade finishing to every scratch and scuff repair so the result blends into the surrounding panels and holds up over time. This guide explains why professional repair beats DIY attempts, walks you through the standard repair workflow, breaks down scratch categories and the right fixes for each, and shows how OEM-aligned methods protect safety and resale value. We also cover common owner concerns—cost, insurance, and lease-return penalties—and how damage depth, paint codes, and repair technique shape the outcome. You’ll read how technicians assess damage, use advanced color-matching tools, and rebuild paint layers (primer, base coat, clear coat) to prevent rust and restore a factory look. The sections below explain why to choose qualified repair, offer a concise step-by-step workflow, compare scratch types with recommended solutions, outline OEM benefits, and give practical advice on costs, insurance, and lease returns.
Why Trust Professional Scratch and Scuff Repair?
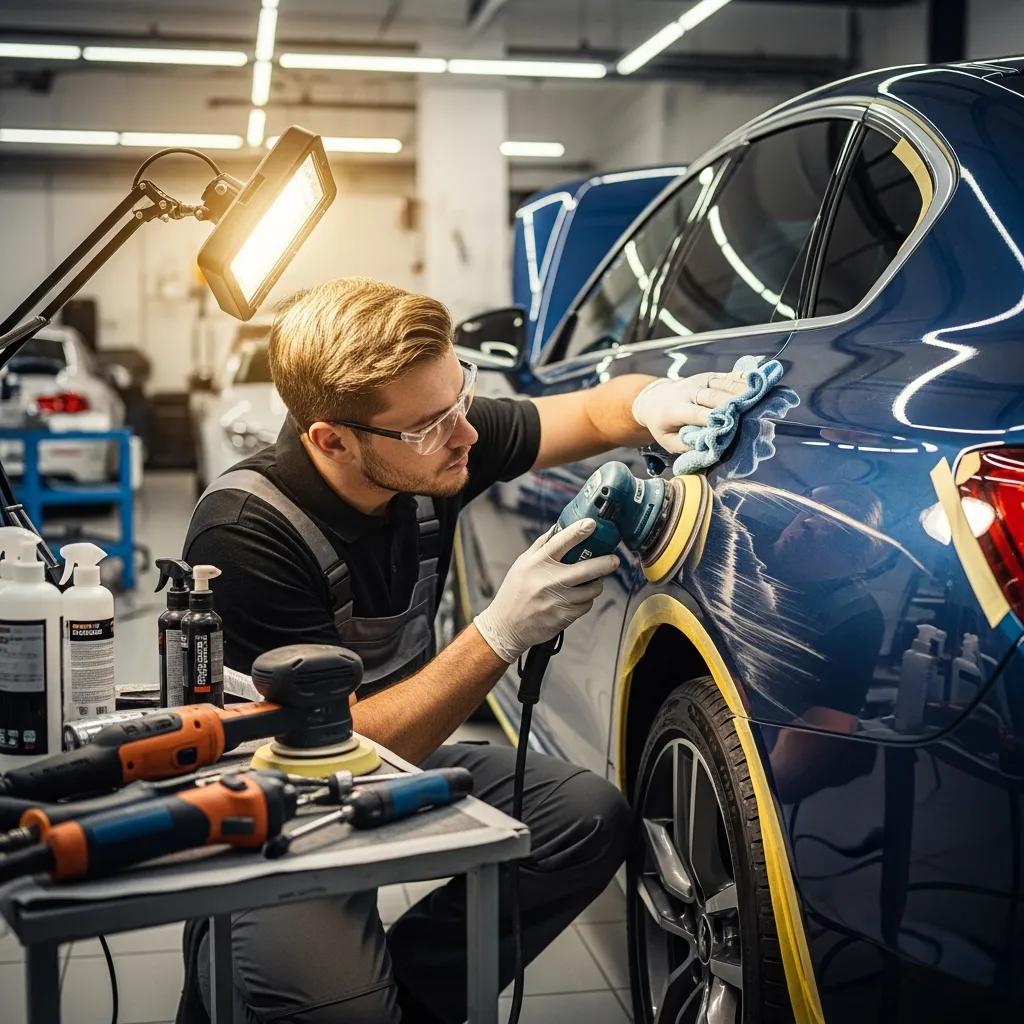
Professional scratch repair delivers durable, factory-like results because trained technicians measure damage depth, choose compatible materials, and follow repair sequences that rebuild the paint-layer structure. That repeatable approach minimizes color mismatch, early peeling, and corrosion that can follow amateur fixes—and it helps maintain resale value because repairs are documented and performed to a high standard. The main benefits are improved appearance, long-term protection, and paperwork that insurers and lease inspectors accept more readily. Below are the core advantages of choosing a professional shop over quick DIY or aftermarket patches.
Key advantages of professional repair include:
- Thorough assessment and repair planning that match your vehicle’s paint code and layer structure.
- Precision color matching and blending using spectrophotometers and OEM paint formulas.
- Durable finishes applied in the correct sequence—primer, base coat, and clear coat—to prevent corrosion.
Hiring professionals also cuts the chance of secondary damage and smooths warranty and insurance processes. That’s why certified teams and clear guarantees matter when you want reliable, long-lasting repairs.
How Do I-CAR Platinum Certified Technicians Deliver Factory-Quality Results?
I-CAR Platinum certification shows technicians have advanced training in collision repair and refinishing and that the shop keeps up with manufacturer repair practices. Certification means technicians follow safe, proven repair sequences and use methods and materials that support paint adhesion, correct panel fit, and finish longevity.
Certified teams use a structured workflow—damage analysis, OEM paint selection, careful masking, and controlled curing—to recreate the factory finish and avoid common problems like color mismatch or early clear coat failure. That training also produces the documentation insurers and manufacturers expect, so repairs are safer and more predictable.
What Does a Lifetime Warranty Cover for Scratch Repairs?
A lifetime warranty signals that the shop stands behind its workmanship and the materials used. Typically it covers defects tied to the repair—peeling, flaking, or paint failures that originate from the job—giving owners long-term protection and a clear path to make a claim if issues arise.
Warranties encourage technicians to follow OEM-aligned procedures that reduce rework. When a claim is needed, repair records and photos speed validation. Knowing what the warranty covers and how to file a claim gives owners added confidence and helps plan ownership costs over time.
What Is the Professional Scratch and Scuff Repair Process?
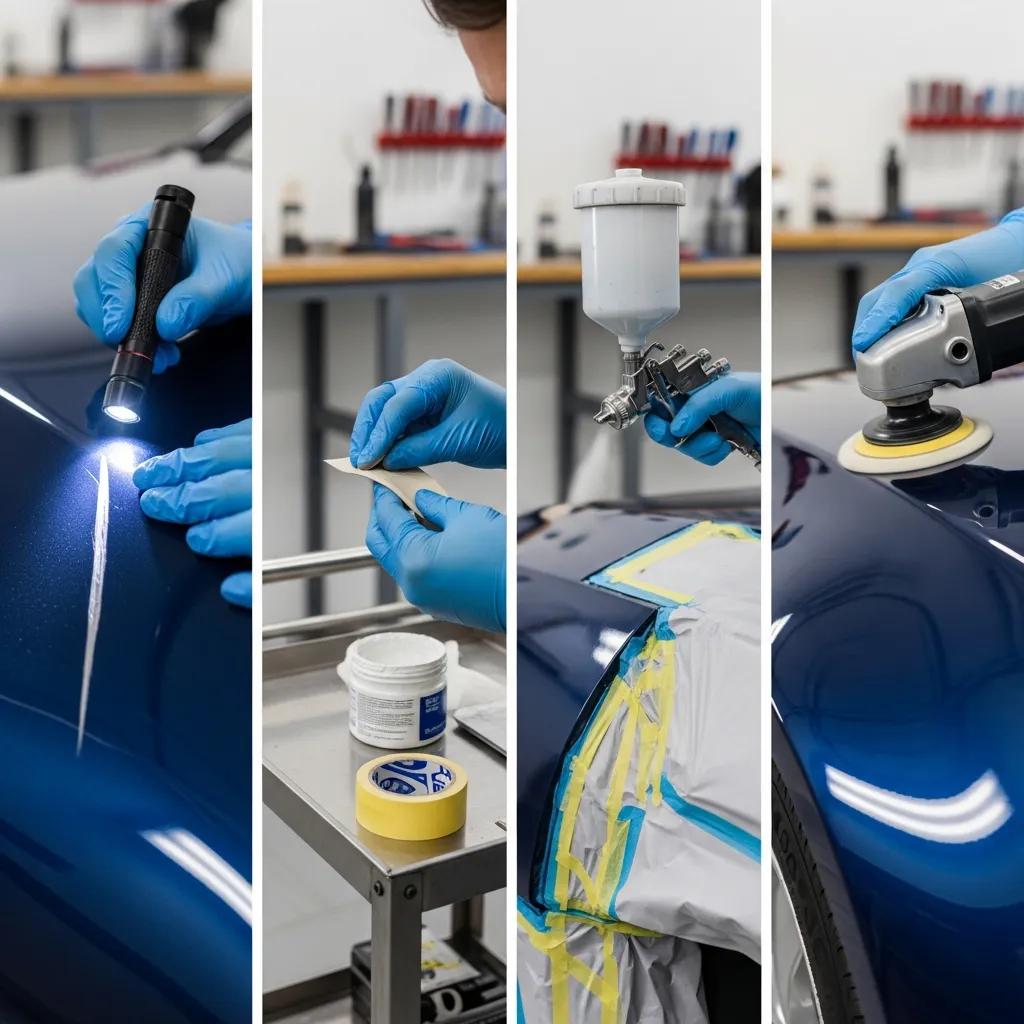
Professional scratch repair follows a clear, repeatable workflow to diagnose damage, pick the right materials, and control the paint and finishing steps so the result looks and performs like the original. The process starts with a full inspection and documentation, moves through surface prep and the repair method chosen for the scratch depth, and finishes with quality checks and paperwork. Here’s a concise, step-by-step workflow you can use as a quick reference.
- Inspection and documentation: determine scratch depth, substrate (metal or plastic), and paint code.
- Prep and masking: clean the area, sand affected layers, and mask adjacent panels to protect surrounding finishes.
- Repair or filler work: apply filler where needed, then prime and level the surface correctly.
- Paint application and blending: mix the base coat to the paint code and blend into neighboring panels when required.
- Clear coat and finishing: apply clear coat, cure under controlled conditions, then sand, buff, and polish to match gloss.
- Quality control and documentation: inspect under varied lighting, photograph the repair, and provide paperwork for warranties and insurance.
Every choice—from filler type to blending radius—is driven by the initial assessment and the goal of restoring the original surface structure and appearance. That assessment also determines which advanced paint-matching tools and techniques are needed.
How Is Damage Assessed for Accurate Repair?
Assessment starts by identifying how deep the scratch goes through the paint layers: clear coat-only, into the base coat, or down to primer or metal. Each level needs a different solution.
Technicians use focused lighting, magnification, paint code lookups, and sometimes moisture checks to verify substrate exposure, rust risk, and whether plastic or metal is involved.
This diagnostic step decides whether the job is polishing, a localized repaint, a full-panel repair, or panel replacement, and it sets labor and materials expectations.
Documenting findings with photos and notes is essential for insurance estimates and warranty records and keeps owners informed about likely outcomes.
A precise assessment reduces surprises and guides the exact repair method chosen.
What Advanced Techniques Improve Paint Matching and Blending?
Advanced paint matching pairs color measurement tools, manufacturer paint codes, and experienced technicians to create a seamless finish that holds up under different lighting conditions.
Spectrophotometers read the target color and deliver base formulas, while technicians adjust for metamerism—color shifts between light sources—using controlled blending and test spray panels.
Local repaint methods like feathering and panel blending limit the need for full-panel repaints by extending the repair into adjacent areas for an invisible transition.
Finishing includes the correct clear coat application, proper curing, sanding through progressive grits, and careful polishing to restore gloss and uniformity.
These combined techniques minimize visible transitions and protect the vehicle from corrosion and future paint failure.
Which Types of Scratches and Scuffs Can Be Repaired Professionally?
Shops classify scratches by how many paint layers are affected—clear coat only, base coat involvement, or full-depth primer/metal exposure—and match each to an appropriate repair. Correct categorization determines whether polishing, spot painting, or full-panel repainting is needed, which in turn affects cost and turnaround. The table below links type, symptom, and the professional solution so you can set realistic expectations before booking.
| Scratch Type | Symptom | Recommended Professional Solution |
|---|---|---|
| Clear coat scratch | White or dull lines that don’t cut the color layer | Paint correction: compounding, polishing, and clear coat refinement |
| Base coat scratch | Color missing with primer or white showing beneath | Localized repaint: base coat and clear coat with blending into adjacent panels |
| Deep / primer or metal exposure | Primer or bare metal visible; possible rust | Full repair: rust treatment, filler and primer, base coat, and full clear coat repaint |
That table helps explain why some scratches are fixed quickly while others need multi-step paint and corrosion prevention work.
With those categories in mind, here’s how clear coat scratches are handled.
How Are Clear Coat Scratches Corrected?
Clear coat scratches often respond to paint correction because the damage sits in the outer protective layer rather than the colored base coat. Proper compounding and polishing can remove or dramatically reduce these defects.
Technicians start with a mild abrasive polish to level the clear coat, move through finer compounds to recover gloss, and finish with a quality polish or sealant to protect the area.
The process requires skill to avoid taking off too much clear coat and to match the surrounding gloss; incorrect compounding can create low spots or uneven shine.
When done correctly, clear coat correction is durable, and routine aftercare—wax or ceramic sealant—helps prolong the results.
Knowing these limits makes it easier to see when repainting, rather than polishing, is the right choice.
What Are the Steps for Repairing Deep Scratches?
Deep scratches that go through primer or expose metal need a multi-step repair: corrosion control, filler to rebuild the surface, priming for adhesion, precise base coat application, and a controlled clear coat finish to match adjacent panels.
When metal is exposed, rust prevention is critical: technicians treat the area, apply corrosion inhibitors, and rebuild layers to manufacturer sequences to preserve structural and aesthetic integrity.
Depending on severity and panel location, repairs can require partial or full-panel repainting and occasionally panel replacement if structural damage exists.
Deeper work increases turnaround because of drying and curing times between layers, but it yields a permanent restoration that prevents future deterioration.
Accurate documentation and following OEM-aligned methods reduce rework and improve long-term results.
How Does OEM-Aligned Repair Improve Outcomes?
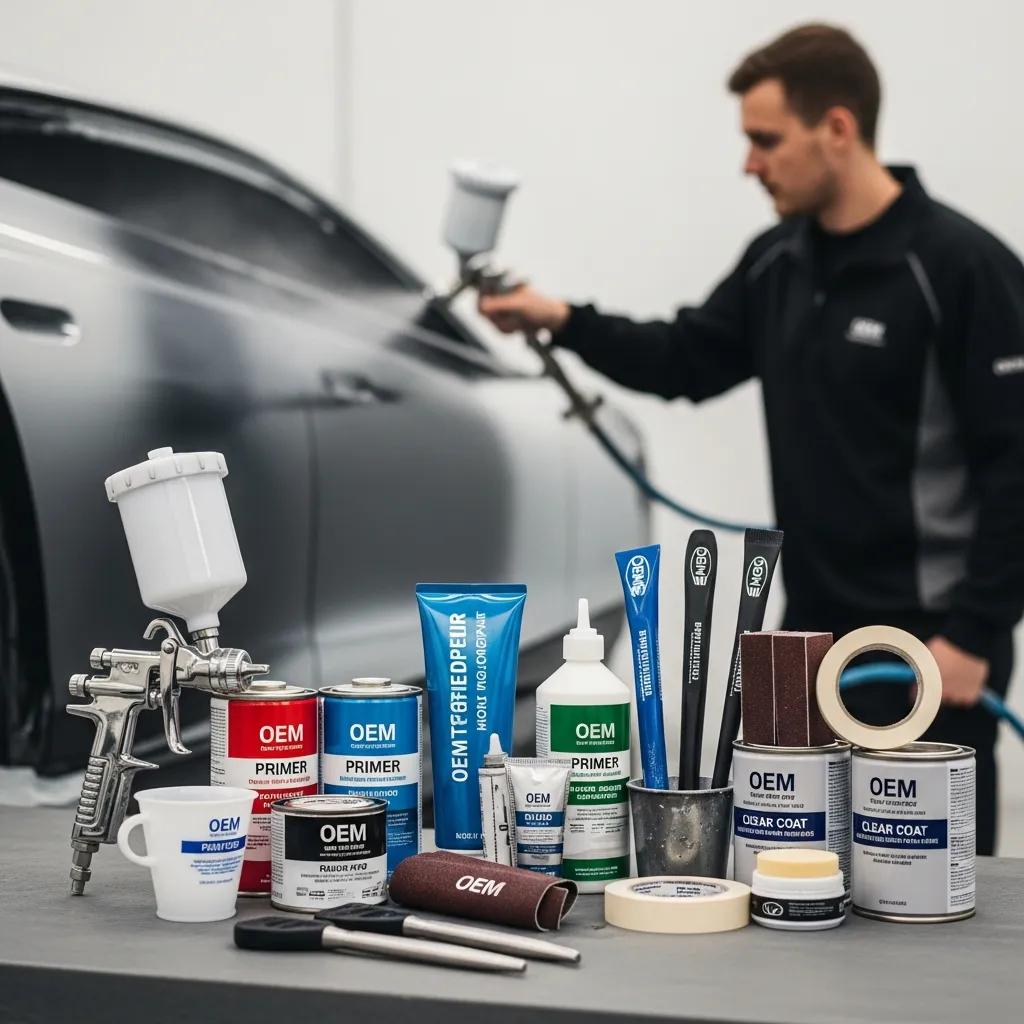
OEM-aligned repair uses manufacturer-approved materials, parts, and procedures so repairs protect safety systems, keep panel fit consistent, and preserve factory finish standards.
This matters because modern vehicles include sensor calibrations and adhesive systems that require specific repair sequences; OEM-aligned work keeps those systems functioning as intended.
Primary benefits of OEM-aligned repairs include:
- Safety preservation: repairs follow sequences that respect structural and sensor systems.
- Fit and finish consistency: using recommended materials and parts delivers reliable panel alignment and color match.
- Warranty and resale protection: documented OEM-aligned repairs simplify later disputes with manufacturers or buyers.
Below is a simple mapping that connects common process steps to owner benefits so you can see why OEM alignment matters in practice.
| Process Step | OEM-Aligned Attribute | Benefit to Owner |
|---|---|---|
| Use of manufacturer paint formulas | Exact color and material match | Less visible difference and lower metamerism risk |
| Following prescribed repair sequences | Proper adhesion and structural integrity | Preserves safety systems and panel fit |
| Documentation and OEM parts | Traceability and part compatibility | Easier warranty and resale verification |
That mapping shows OEM-aligned methods are practical—each step translates to measurable owner advantages.
What Does OEM Certification Mean for Paint Repair Quality?
OEM-level paint repair requires using specified materials, application practices, and environmental controls so adhesion, gloss, and durability meet manufacturer expectations.
Certified painters select approved primers, base coats, and clear coats and follow manufacturer mixing and application rates so the repaired finish behaves like the original.
Keeping records—paint codes, batch numbers, and photos—provides traceability and proves the correct materials were used, which matters for warranty and resale.
OEM-aligned approaches also account for sensor recalibration and adhesive cure times when panels are removed or replaced, tying cosmetic work to vehicle safety systems.
Altogether, these practices improve predictability and longevity of the repair.
How Prime Time Collision Center Meets OEM Repair Standards
We center our work on factory-quality repair principles, combining certified technician training and shop processes that align with OEM expectations.
Our team includes I-CAR Platinum technicians and we back repairs with a lifetime warranty—both signals that we prioritize durable, documented workmanship.
Services include collision repairs, paintless dent repair, auto painting, and insurance-claim assistance, which together support comprehensive, traceable repairs done to manufacturer guidance.
For owners in Glendale, CA and the greater Los Angeles area (including Burbank and Pasadena), that alignment means repairs focus on accurate color matching, correct material choices, and clear quality documentation. If you want OEM-standard results, ask for documented paint codes and repair records as part of your estimate.
What Should Vehicle Owners Know About Costs and Insurance?
Price depends mainly on scratch depth, part replacement needs, color complexity, and labor—variables that explain why estimates vary and why an inspection is required for an accurate quote.
Clear coat corrections are usually the least expensive. Localized base coat blends and full-panel repaints cost more because of paint, materials, and extra labor for sanding and blending.
The table below links common cost drivers to their pricing impact and why each factor matters. After the table we offer practical tips to help decide whether to file an insurance claim or pay out of pocket.
| Cost Driver | Typical Price Impact | Why It Affects Cost |
|---|---|---|
| Scratch depth (clear/base/deep) | Low to high | Deeper repairs require more materials and labor, plus filler and rust prevention |
| Panel size and location | Moderate to high | Larger panels or those that require removal add labor and materials |
| Color complexity (metallic/pearlescent) | High | Complex finishes need more mixing, blending, and multiple coats |
| Insurance deductible and claims | Variable | Filing a claim may trigger a deductible and affect premiums; small jobs can be cheaper OOP |
Understanding these drivers helps you weigh paying out of pocket versus filing a claim. Below are realistic cost considerations and insurance tips.
How Much Does Professional Scratch Repair Typically Cost?
Costs vary by category: clear coat corrections are typically the least expensive and can often be completed in one session, while base coat blends and full-panel repaints rise in price due to paint, material, and labor needs—especially with metallic or pearlescent colors.
Exact pricing needs an inspection because technicians must measure depth, check for hidden damage, and evaluate paint-match difficulty. Free estimates give the best guidance and help you decide whether to use insurance or pay out of pocket to avoid possible premium impacts.
Will Insurance Cover Scratch and Scuff Repairs?
Coverage depends on your policy and the incident: comprehensive often covers vandalism and animal damage, while collision applies when another vehicle or object causes the damage. In both cases deductibles and claim history matter.
Compare the repair estimate to your deductible to see if filing makes sense—small repairs can be cheaper to pay for personally and may avoid premium changes.
Shops that help with insurance claims can supply detailed estimates and documentation that streamline approvals and ensure work is coded for OEM-aligned repair. Ask for a written plan and estimate when you need help with claims.
How Can Lease-Return Clients Benefit from Professional Repair?
Lease inspections use commercial standards for “excessive wear” and charge for visible paint damage that exceeds allowed thresholds. Repairing scratches before return is often the most cost-effective route for lessees.
Professional repair restores the finish, provides documentation, and lowers dispute risk because inspectors see a completed, factory-like surface rather than partial or amateur fixes.
Use this practical checklist to prepare for lease inspection and prioritize common trouble spots:
- Lease guidelines usually flag gouges, bare metal exposure, and large scratches.
- Bumper scuffs, rocker-panel scrapes, and door-edge damage are commonly penalized.
- Small clear coat abrasions may pass, but color loss or primer exposure typically leads to charges.
Professional repairs plus documentation make it easier to resolve questions and show defects were addressed using proper methods that match factory finishes.
Why Repair Scratches Before Your Lease Return?
Fixing scratches before lease return reduces the risk of administrative fees by addressing visible defects inspectors count during final evaluation—and it usually costs less than the combined charges a leasing company may levy for multiple small issues.
Starting early allows time for multi-step repairs—primer, base coat, clear coat, and proper curing—so you avoid rushed jobs that might fail inspection standards.
Keep photos and receipts as proof the work was done professionally; that evidence can help if a leasing company disputes repair quality.
Book an inspection and schedule repairs with enough lead time to recheck the work before turn-in to minimize surprises.
How Professional Repair Helps Avoid Lease Penalties
Professionally restored finishes with clear documentation—detailed estimates, before-and-after photos, and warranty statements—are easier for leasing companies to accept than DIY fixes or uninsured work.
Using OEM-aligned methods lowers the chance a leasing agent will find issues that lead to penalty charges, because the finish, fit, and paperwork reflect manufacturer expectations.
For lessees in Glendale, Burbank, Pasadena and the greater Los Angeles area, choosing a provider that offers free estimates, insurance help, and a lifetime warranty gives practical protection: an accurate pre-return estimate and documented workmanship often reduce settlement amounts.
To protect against lease penalties, request a pre-return estimate and a documented repair plan well before your lease end date, and keep that paperwork with your return packet.
Frequently Asked Questions
What causes most car scratches and scuffs?
Scratches come from many sources: minor collisions, contact with other cars, shopping carts, tree branches, road debris, and gravel. Harsh weather and poor washing technique—like using dirty sponges or abrasive towels—can also create clear coat marks. Knowing the usual causes helps you take practical steps to protect your finish.
How do I protect my car’s finish after a professional repair?
To protect a repaired area, avoid washing for about two weeks so the paint can fully cure. When you do wash, use a gentle car soap and clean microfiber towels. Regularly apply a quality wax or sealant to shield the surface, and park in shade or use a cover to limit UV and environmental wear.
Can I do touch-up work myself after a professional repair?
You can perform small touch-ups, but only if you have the right materials and steady technique. DIY touch-ups risk color mismatch or uneven texture. If you’re unsure, ask your technician for touch-up paint matched to your vehicle’s code and follow their recommended method.
What should I do if my car gets scratched again after a repair?
Assess the damage. Minor clear coat marks may respond to polishing, while deeper scratches that reach the base coat or primer need professional attention. Contact your repair shop to evaluate the new damage and recommend the right next step to avoid compromising prior work.
How do I choose the right repair shop?
Look for shops with strong reviews, clear before-and-after photos, and recognized certifications like I-CAR Platinum. Confirm they use OEM materials and follow manufacturer guidelines, and ask about warranties. A good shop will give transparent estimates, welcome questions, and show clean, organized facilities.
What are signs a scratch repair was done poorly?
Warning signs include visible color mismatch, rough or uneven surface texture, peeling paint, or rapid rusting near the repaired area. If the gloss looks inconsistent or you notice flaking, get a second opinion—proper documentation and warranty coverage should address poor workmanship.
Conclusion
Professional scratch and scuff repair restores your car’s appearance and helps protect its value. With careful assessment, precise techniques, and OEM-aligned practices, our certified technicians deliver repairs that last. Don’t leave your finish to chance—schedule a consultation with our team and see the difference quality repair makes for your vehicle’s look and longevity.


