


Your Prime Time Collision Repair Roadmap: OEM‑Certified Repairs, Insurance Help, and What to Expect from Tow to Delivery
A collision repair should be predictable, safety‑first, and follow factory standards so your car performs correctly and holds its value. This guide walks you through each stage — from the accident scene to keys in your hand — explaining the immediate steps to take, how technicians document and assess damage, the structural and finish repairs that restore crashworthiness, and the final quality checks like ADAS calibration that confirm it’s safe to drive. We highlight the benefits of OEM‑level repairs, how we work with insurance, and realistic timelines so you can make clear decisions when it matters most. Each section uses plain language, practical checklists, and inspection tools to show why specific procedures matter for safety, warranty preservation, and long‑term reliability. Along the way we explain how a local Glendale shop using I‑CAR practices supports drivers with towing, estimates, and warranty coverage without skipping the technical details. Read on for a straightforward roadmap of the repair process and what to expect at every step.
What Are the Initial Steps After a Car Accident?
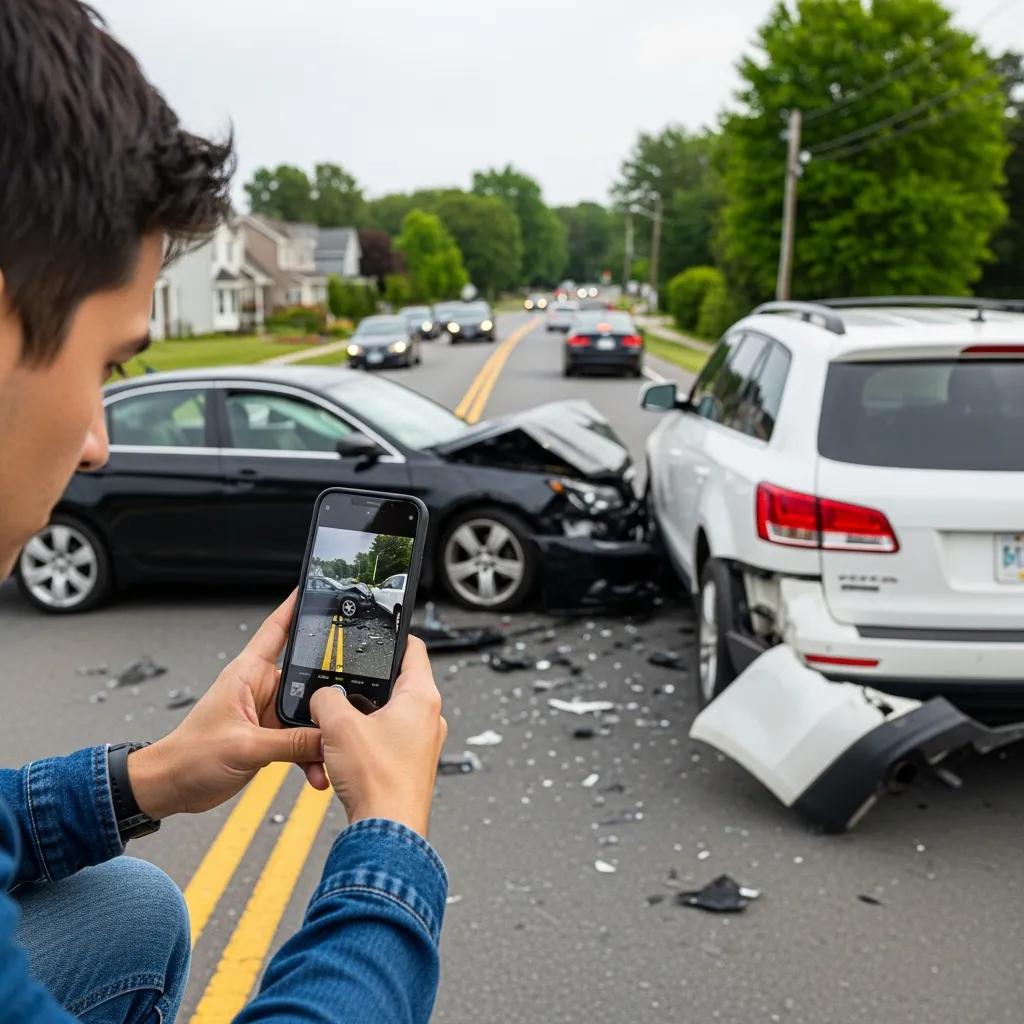
Right after a crash, focus on safety, collecting evidence, and notifying the proper parties. Check for injuries and move to a safe spot if you can. Take photos and notes that capture vehicle positions, visible damage, and road conditions — these details make estimates and insurance reviews faster and clearer. Quick, accurate documentation protects you legally and financially and speeds the next steps: getting the vehicle to a shop and starting repairs.
The numbered list below covers the most important actions to take right away:
- Check for injuries and call emergency services if anyone needs help.
- Move to a safe location if possible and keep the scene secure to prevent further hazards.
- Photograph all vehicles, close‑ups of damage, and the surrounding scene for a clear record.
- Exchange names, contact and insurance information, and obtain a police report when required.
These items form the factual record insurers and repair shops use to begin the claim and repair process. Next, we explain how local support like towing and scheduling an estimate typically work for drivers wanting OEM‑level repairs.
How Does Prime Time Collision Assist with Free 24/7 Towing and Scheduling Estimates?
We offer free, 24/7 towing to bring your vehicle to our facility so technicians can do a proper damage evaluation and begin intake immediately. At arrival we photograph the vehicle, note visible damage, and collect ownership and insurance details to prepare a free estimate and initial inspection. This tow‑to‑intake workflow reduces stress by combining safe transport with an early assessment at a shop that follows factory repair standards — preserving components and giving an accurate starting point for diagnosis.
After towing and intake we schedule a full estimate and assemble the documentation your insurer needs. That helps speed claim review and avoids delays that happen when vehicles sit in unsafe locations or lack proper photos. From there your car is ready for the structural and cosmetic evaluations described below.
What Should Vehicle Owners Know About Reporting Accidents and Starting Repairs?
Report the accident to your insurer as soon as you can and keep copies of the documents they ask for — photos, the police report, and any witness information. Save intake photos and the initial estimate from the repair shop; those records help if hidden damage appears during disassembly and a supplement is required. Typically, the shop prepares an initial estimate, submits it to the insurer, and waits for approval or an adjuster conversation before work begins. Rental coverage and authorization windows vary by policy, so knowing that timeline helps you plan transportation while repairs proceed.
We help customers by preparing clear documentation for adjusters and walking you through next steps so you can choose parts and procedures with confidence. That coordination reduces uncertainty and supports OEM repair options when dealing with insurers.
How Is Vehicle Damage Assessed and Repair Estimates Prepared?
Damage assessment starts with a careful visual inspection, diagnostic scans, and measurements to find both visible and hidden issues that affect safety. Technicians remove panels as needed to inspect underlying structure, use frame measurement rigs to check alignment, and run diagnostics to uncover electrical or ADAS faults that aren’t apparent from the outside. A clear, line‑item estimate separates parts, labor, required procedures, and special processes — like ADAS calibration — so you and your insurer understand the full scope and safety implications. Thorough assessment and documentation reduce the chance of later supplements and help keep repairs aligned with factory standards.
Different inspection tools generate different outputs; combining those results creates a complete picture of needed repairs, as shown below.
Inspection tools clarify issues and produce actionable outputs that shape repair plans and safety checks.
| Tool | Purpose | Output |
|---|---|---|
| Diagnostic Scanner | Reads fault codes and live data from vehicle modules | Identifies electrical faults and ADAS errors that need repair or calibration |
| Frame Measurement System | Verifies frame/unibody alignment against factory specs | Dimensional reports that guide frame straightening and alignment |
| Paint Thickness Gauge | Measures coating thickness across panels | Reveals prior repairs and the extent of surface damage |
| Camera‑Based Imaging | Documents damage and records before/after conditions | High‑resolution photos used in estimates and insurer communications |
What Technologies Are Used for Thorough Damage Inspection?
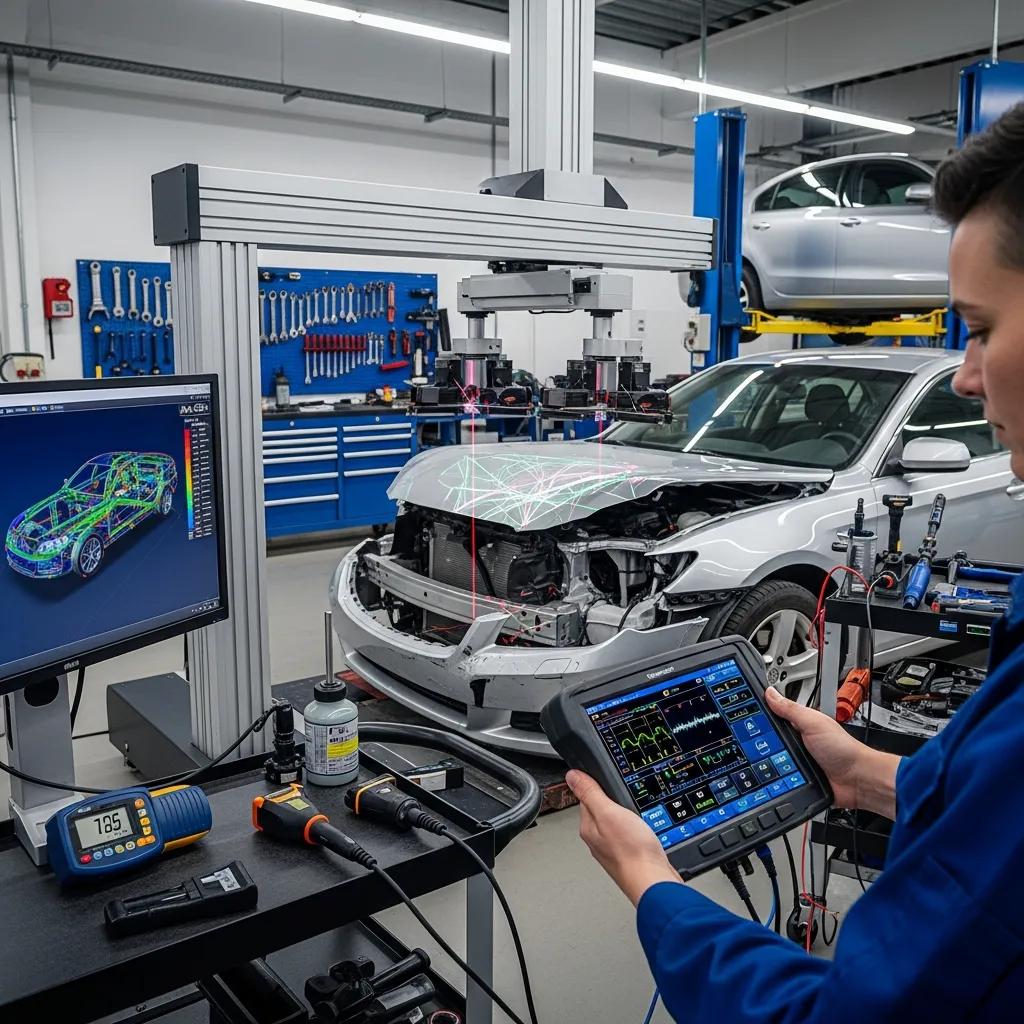
Comprehensive inspection pairs electronic diagnostics with structural measurement and surface‑analysis tools to find hidden problems that affect safety and performance. Diagnostic scanners connect to vehicle modules to read codes and live data, exposing ADAS faults that will need repair or recalibration. Frame rigs and laser measurement systems confirm the chassis and unibody dimensions meet manufacturer tolerances — critical for restoring crash performance and handling. Paint thickness gauges and imaging help determine whether panels can be repaired or must be replaced to meet OEM appearance standards.
Together, these technologies produce a layered, evidence‑based repair plan that follows factory procedures and reduces the risk of overlooked issues harming safety or resale value. Next we cover how we share these findings with insurers to support accurate claim outcomes.
How Does Prime Time Collision Work with Insurance Companies for Claims?
We advocate for OEM repair methods by preparing detailed, line‑item estimates and submitting supporting documentation to adjusters. Our estimates typically include photos, diagnostic reports, and measurement data that explain why certain repairs, OEM parts, or calibrations are necessary to protect safety and warranty coverage. If hidden damage appears during disassembly we document and submit supplements promptly so adjusters can approve additional work without unnecessary delays. This proactive approach reduces friction during approvals and helps customers avoid shortcuts that could compromise safety.
By handling estimate submission and supplement workflow, we keep customers out of technical negotiations while preserving OEM repair paths and a clear audit trail for insurers. That transparency makes it easier to understand repair choices and timelines.
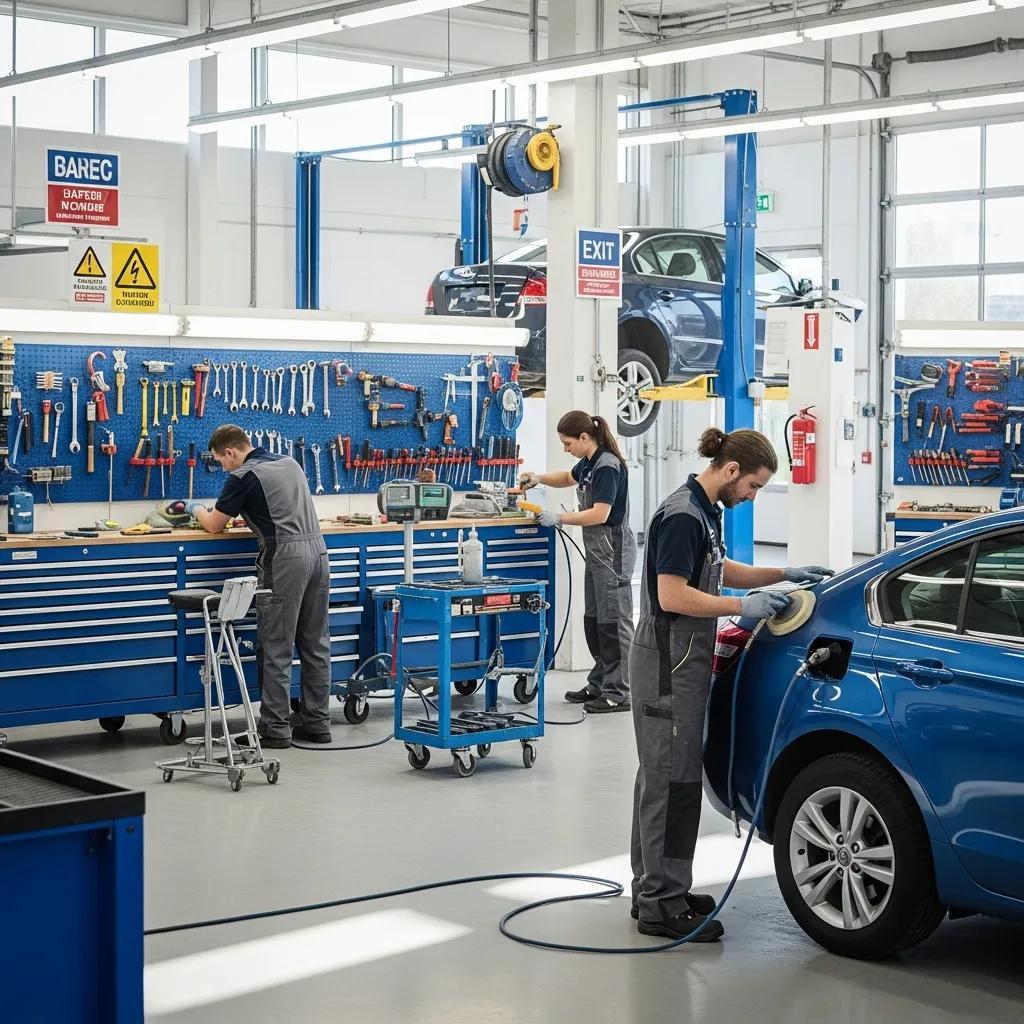
What Happens During Structural and Body Repair?
Structural and body repair restores the vehicle’s load paths, energy‑management parts, and attachment points through careful disassembly, measurement, and repair to manufacturer procedures. Technicians start with controlled disassembly to expose hidden damage, then use frame machines and alignment systems to pull or reset structural members to factory dimensions before repairing or replacing damaged components. The choice between repairing a panel and replacing it depends on safety, corrosion protection, and the ability to meet OEM tolerances — the priority is restoring engineered crash performance, not just appearance. This work sets the foundation for paint and refinishing steps that complete fit and corrosion protection.
The table below compares common repair approaches and typical methods so you can see how technicians choose the safest path back to OEM condition.
Common damage types require different structural approaches; the table maps typical repairs to methods and outcomes.
| Damage Type | Repair Method | Outcome |
|---|---|---|
| Front frame damage | Frame‑machine alignment plus OEM part replacement | Restores dimensional integrity and crash performance |
| Rear unibody deformation | Measured straightening and section replacement | Preserves attachment points and load distribution |
| Outer panel dents | Paintless dent repair when applicable | Maintains factory finish and reduces repainting |
| Corroded rocker or inner panels | Section replacement with corrosion protection | Restores structural strength and long‑term durability |
Why Are OEM Certified Parts Important for Frame and Body Repairs?
OEM parts restore original fit, material properties, and corrosion protection so the vehicle’s engineered crash performance and long‑term durability are preserved. They ensure proper mating surfaces, correct sensor fitment, and manufacturer corrosion measures that reduce the chance of premature failures and help safety systems stay aligned. For owners, OEM components help protect resale value and support warranty compliance because they match the vehicle’s original design. When alternatives are considered, understanding these safety and longevity trade‑offs helps you choose repairs that prioritize occupant protection.
That’s why shops committed to factory‑quality repairs use OEM parts and procedures rather than cost‑cutting shortcuts that can increase long‑term risk. The next section contrasts repair techniques like paintless dent repair and panel replacement.
How Are Paintless Dent Repair and Panel Replacement Performed?
Paintless dent repair (PDR) fixes small deformations by accessing the back of a panel and gently working the metal back to its original contour, preserving the factory paint and often avoiding repainting. PDR is fast and keeps the OEM finish, but it’s suitable only when there’s no paint cracking, severe creasing, or underlying structural damage. Technicians assess access, metal stretch, and paint condition before choosing PDR. Panel replacement is needed when panels are bent beyond repair, corrosion weakens the structure, or sensor mounting surfaces are damaged; replacement follows OEM attachment and corrosion‑protection procedures. The decision balances safety, finish quality, and long‑term durability rather than short‑term cosmetic fixes.
Picking the right approach early prevents rework and helps ensure your vehicle leaves the shop with correct fit, finish, and safety function.
How Is Expert Paint and Refinishing Completed?
Professional paint and refinishing combine careful surface prep, precise color matching, multi‑stage coating, and controlled curing to deliver a factory‑grade finish that resists the elements. Technicians prepare repaired panels by cleaning, protecting against corrosion, and applying primer to ensure proper adhesion. Color matching uses spectrophotometers and software to create a formula, then technicians verify and tweak it on test panels under controlled lighting. The base coat provides the color and the clear coat gives protection and gloss; after curing, sanding and polishing remove imperfections and produce depth and shine consistent with OEM standards.
Below is a concise table that outlines painting stages, their purpose, and the benefits to finish quality and longevity.
Painting stages break down into defined steps that each contribute to appearance and protective performance.
| Stage | Function | Benefit |
|---|---|---|
| Surface Prep & Primer | Create a uniform base and corrosion barrier | Improves adhesion and long‑term durability |
| Base Coat | Apply the visible color layer | Ensures color accuracy and even coverage |
| Clear Coat | Protect the color with a glossy finish | Adds UV resistance and scratch protection |
| Curing & Polishing | Harden and refine the finish | Produces smooth gloss and a consistent appearance |
What Technologies Ensure Accurate Paint Matching?
Accurate color matching starts with a spectrophotometer that reads the panel’s color values and creates a baseline formula. Paint‑mixing software suggests pigment blends, then a technician sprays test panels and verifies matches under controlled lighting, adjusting as needed to avoid metamerism. Combining instrument precision with human checks reduces rework and helps the repaired area blend seamlessly with factory paint. Showing test panels to customers builds confidence and sets realistic expectations for the final result.
These tools cut down guesswork and speed up quality outcomes, letting refinishing meet both aesthetic and durability standards tied to OEM repair practices.
What Is the Multi-Stage Painting and Clear Coat Process?
The multi‑stage process starts with meticulous surface prep and primer to seal repairs and create a uniform surface for color. The base coat is applied in controlled passes to achieve consistent coverage, then clear coat is added to protect the color from UV and environmental wear. After curing, technicians sand and polish to remove minor imperfections and achieve the desired gloss and depth. Each step happens in a proper paint booth with environmental controls so contaminants are minimized and cure conditions are optimized for long‑term durability.
Following this sequence helps the repaired finish match original factory characteristics and withstand weather, road grime, and time.
What Quality Control Measures Ensure Safe Vehicle Reassembly?
Quality control during reassembly confirms that every component is installed to manufacturer torque and fit specifications, that electrical systems are error‑free, and that ADAS features operate correctly after calibration. Technicians use torque tools, diagnostic checks, and documented checklists to verify mechanical integrity and alignment so critical fasteners and attachment points meet factory standards. ADAS recalibration — done with specialized equipment using static targets or dynamic procedures depending on the vehicle — restores sensor geometry for systems like automatic braking and lane‑keeping. Finally, a supervised road test checks steering, braking, sensor behavior, and NVH (noise, vibration, harshness) to ensure the vehicle performs to pre‑accident levels.
All inspections and test results are recorded in the vehicle’s repair file, giving owners and insurers a clear trail that safety‑critical systems were restored and verified. The following subsections go into reassembly and final testing in more detail.
How Are Components Reassembled and ADAS Systems Calibrated?
Reassembly follows manufacturer sequences, torque specs, and fit tolerances so structural integrity and sensor alignment are correct. ADAS components — cameras, radar, and ultrasonic sensors — are calibrated using static targets or dynamic road procedures as required by the vehicle maker. Calibration tools communicate with vehicle modules to clear and verify diagnostic codes, and technicians run functional tests to confirm features work reliably in real conditions. Proper reassembly and calibration link structural repairs to verified system performance.
We keep calibration logs and diagnostic printouts as proof that safety systems were restored and tested before you take the vehicle home. The next section covers the final inspections and road tests we perform.
What Final Inspections and Road Tests Are Conducted?
Final inspection uses a multi‑point checklist that covers mechanical components, electrical systems, lighting, fluid levels, and the operation of infotainment and safety systems to ensure nothing was missed. Technicians run system function tests for lights, sensors, and connected modules, then conduct a supervised road test to evaluate steering response, braking, and ADAS behavior in real‑world scenarios. Any issues found during the road test are corrected and re‑verified until the vehicle meets the shop’s factory‑based acceptance criteria. The documented inspection and road test results give you and your insurer confidence the vehicle is safe and roadworthy.
This final verification ties structural repair, diagnostics, and calibration together so the car meets both cosmetic and safety expectations before delivery.
How Does Prime Time Collision Deliver Your Vehicle and Support You Post-Repair?
When we deliver your vehicle we walk you through the repairs, show before‑and‑after photos, hand over the final invoice and calibration reports, and explain the warranty and any follow‑up procedures. Prime Time Collision offers a lifetime warranty on qualifying workmanship and, when applicable, on OEM parts installation; we explain coverage, exclusions, and how to request service during handover so you know what to expect. This transparent handoff demonstrates the work performed, the parts used, and the tests completed so you can be confident OEM practices were followed. Post‑repair support includes scheduling follow‑up inspections, addressing minor touchups, and answering questions about system behavior after the vehicle returns to daily use.
Clear documentation and easy access to post‑repair support make it simple to resolve any issues and reinforce our commitment to safety and lasting workmanship. The subsections below summarize what you receive at delivery and how to get continued support.
What Does the Final Walk-Through and Lifetime Warranty Include?
During the final walk‑through you’ll receive a summary of the repairs performed, pre‑ and post‑repair photos, diagnostic and calibration reports, and a final invoice that itemizes parts and procedures. The lifetime warranty covers qualifying workmanship and, where noted, OEM parts installation; we’ll explain exclusions and the claim process so you understand how warranty service is handled. This paperwork documents OEM‑focused repairs and serves as a helpful reference for future service or resale, tying repair decisions to safety and value preservation. Keeping these materials on hand makes follow‑up questions simpler and provides insurers with verified repair records if needed.
Transparent warranty terms and documented evidence reduce uncertainty and show the shop stands behind its work.
How Can Customers Access Post-Repair Support and Service?
You can schedule follow‑up appointments or report concerns through our local contact channels listed on the site and our Google Business Profile. During handover we outline expected response times and emergency procedures. Recommended follow‑up actions include routine visual checks of repaired areas, monitoring ADAS functions, and returning to the shop for unusual noises or dashboard warnings that might need re‑inspection. We document all follow‑up interactions and coordinate any additional approvals or supplements with your insurer when necessary to resolve outstanding issues. Clear guidance on scheduling and response windows helps customers feel supported after their vehicle returns to service.
This structured post‑repair process completes the repair lifecycle by combining documented workmanship, warranty protection, and accessible customer service to preserve safety and value after a collision.
Frequently Asked Questions
What should I do if I discover hidden damage after repairs are completed?
If you notice hidden damage after the repairs, contact the repair facility right away. Reputable shops, including Prime Time Collision, keep records of inspections and repairs, which helps us evaluate the issue. Provide photos or a description of what you found; depending on warranty terms, we’ll help coordinate any supplemental repairs with your insurer so the vehicle remains safe and compliant with OEM standards.
How can I ensure my vehicle’s safety systems are functioning correctly after repairs?
Ask for a written inspection report that lists recalibrations performed on ADAS and other safety features. A supervised road test should also be included to confirm system function. If you notice any odd behavior after you drive the car home, contact the repair shop for a follow‑up inspection or adjustment — prompt reporting helps keep systems performing as intended.
What are the benefits of choosing OEM parts for repairs?
OEM parts match your vehicle’s original fit and material specifications, helping preserve structural integrity and crash performance. They also support warranty compliance and protect resale value. Because OEM parts are designed for your exact model, they reduce the risk of fit or sensor‑mounting issues that can affect safety and long‑term reliability.
How does the repair process differ for electric vehicles compared to traditional vehicles?
Repairing electric vehicles adds specific considerations: technicians need specialized training and tools to safely handle high‑voltage systems, battery packs, and electric drivetrains. Safety protocols differ for EV batteries and power electronics, and diagnostics for battery management and electric motors require dedicated equipment and procedures to ensure safe, reliable repairs.
What should I look for in a collision repair shop?
Look for certifications, customer reviews, and experience with your vehicle make. I‑CAR training indicates advanced technician education in collision repair. Ask about warranties, the use of OEM parts, and how the shop works with insurance companies. A transparent shop that provides detailed estimates and clear communication will make the repair experience smoother and safer.
How can I prepare for the vehicle delivery process after repairs?
Bring your insurance information and any prior repair records if available. Review the repair details provided by the shop and note warranty terms and follow‑up procedures. At delivery, request a walk‑through of the repairs, before‑and‑after photos, and calibration reports so you understand what was done and can confirm it meets your expectations and safety standards.
What are the common signs that my vehicle may need a follow-up inspection after repairs?
Signs that a follow‑up is needed include unusual noises, dashboard warning lights, changes in handling or braking, or ADAS features not behaving as expected (for example, lane‑keeping assist or adaptive cruise control acting strangely). If your car pulls to one side or any performance changes occur, return to the shop for a full check.
Conclusion
Knowing the collision repair process helps you make choices that put safety, quality, and long‑term value first. By choosing a certified, OEM‑focused facility like Prime Time Collision, you give your vehicle the best chance to be restored to factory standards — preserving performance and resale potential. From towing and estimates to final calibration and warranty support, we guide you through the repair journey so you can move forward with confidence. Contact us today to learn how we can help with your repair.


