


Understanding the Paint Curing Process: How to Get a Durable, Flawless Finish
Paint curing is the chemical change that turns liquid coatings into the hard, protective finish your vehicle needs. When a paint job is properly cured, it holds gloss, resists peeling and scratches, and shields the metal underneath. This guide walks through how curing differs from surface drying, the common curing methods used in collision repair, the environmental and material factors that change cure time, and why following OEM repair standards matters. Owners and technicians should understand curing because paint that only looks dry can still be weak—this affects when a car can be handled, washed, or returned to the road. You’ll find realistic timelines for washing and waxing, how infrared and oven bakes speed cross-linking, signs of incomplete cures, and simple post-repair care tips. We’ll use clear terms like paint hardening, paint curing process, and clearcoat curing time so you know what to expect after a repair and can spot issues early.
What’s the Difference Between Paint Drying and Paint Curing?
“Drying” means solvents evaporate so the surface no longer feels tacky. “Curing” is a chemical process—polymers cross-link and the coating gains real hardness. Drying can happen in minutes or hours; curing takes longer and is what gives the finish its strength and durability. Mixing the two up is risky: handling or washing paint that’s only surface-dry can trap solvents or deform a not-yet-cured clearcoat. The table below breaks down the key differences and what to expect during a repair.
Each stage of finishing affects how the paint performs now and over time.
| Process | How it works | When it happens |
|---|---|---|
| Surface drying | Solvents evaporate from the basecoat/clearcoat | Minutes to hours until tack-free |
| Curing (chemical) | Polymer chains cross-link and hardeners activate | Hours to days to gain usable hardness |
| Full functional hardness | Stable, bonded clearcoat resists wear and UV | Often reaches long-term resistance over days to weeks |
Knowing these differences helps you avoid premature contact that can harm adhesion or gloss, and it helps shops choose the right curing method. At Prime Time Collision, we follow OEM-recommended cure procedures so repairs perform like the factory intended.
How Is Surface Drying Different from Chemical Curing?
Surface drying forms a thin skin as solvents leave the film, but deeper layers can still contain solvent and reactive ingredients that need time or heat to finish curing. Chemical curing—like isocyanate-driven cross-linking in urethane systems—creates strong covalent bonds between polymer chains, which raises hardness and resistance to chemicals and UV. Think of drying as the bread crust forming and curing as the inside setting so the loaf holds its shape: the outside may feel firm while the center is still soft. Technicians use cues like tack, solvent smell, and abrasion resistance to judge progress, but manufacturer timelines or tests confirm a full cure. Understanding the process prevents premature polishing or stress that can cause solvent popping, blush, or a soft clearcoat.
Why Does Proper Curing Matter for Durability and Look?
A full cure turns a fragile film into a durable, bonded coating that stands up to scratches, chemicals, and sun exposure. Without it, paint can peel, chip, or dull prematurely. Proper cross-linking distributes force across the film instead of letting it deform under pressure, and it stabilizes gloss so the finish keeps looking right. Incomplete cures can also affect warranties or insurance claims if a repair fails early. For vehicle owners, a correct cure means predictable long-term appearance and better resale value. Technicians must confirm cure stages before returning a vehicle so follow-up detailing bonds to a stable surface rather than trapping solvents.
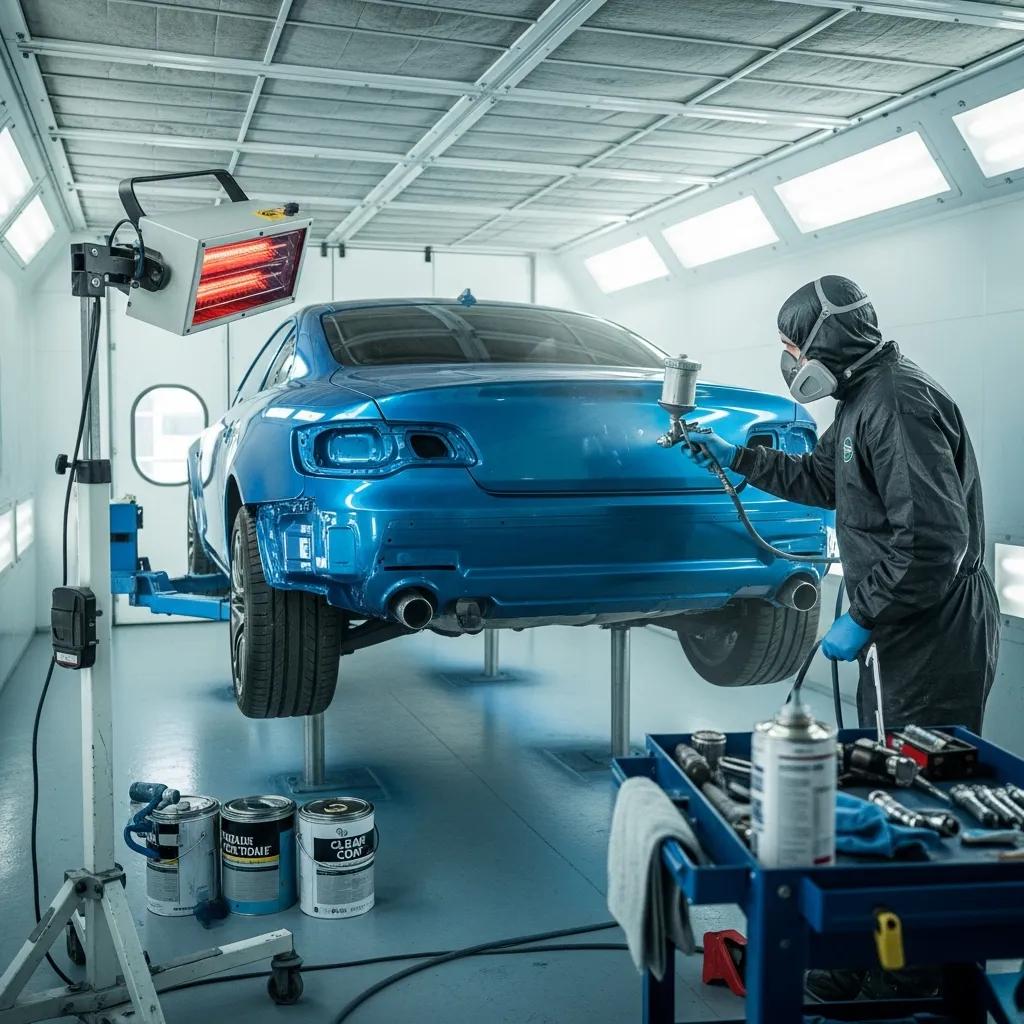
Which Methods Do Shops Use to Cure Automotive Paint?
Collision shops commonly use infrared lamps, convection ovens, UV systems (when the paint allows), and controlled ambient drying. Infrared delivers radiant energy that helps molecules move and react faster; convection ovens raise and circulate booth air for even bakes; UV systems cure specially formulated coatings almost instantly. Many shops mix methods—controlled heat, airflow, and time—to reach the required clearcoat cure while avoiding trapped solvents and orange peel. The short comparison below shows when each method fits best.
Each curing approach has different speed, practicality, and trade-offs for repair work.
| Method | Speed | Best use / limitation |
|---|---|---|
| Infrared lamps | Fast for spot or panel work | Great for localized repairs; needs correct distance and wattage |
| Convection ovens | Moderate to fast for larger areas | Best for whole-vehicle or big panels; follow proper bake cycles |
| UV curing | Very fast with compatible coatings | Only for UV-formulated paints; not universal for all OEM finishes |
| Ambient/air cure | Slowest, natural method | Used for sensitive substrates or when heat isn’t allowed; weather-dependent |
Choosing the right method balances speed with finish quality. At Prime Time Collision, we match the curing approach to the paint chemistry and OEM guidance to protect both appearance and performance.
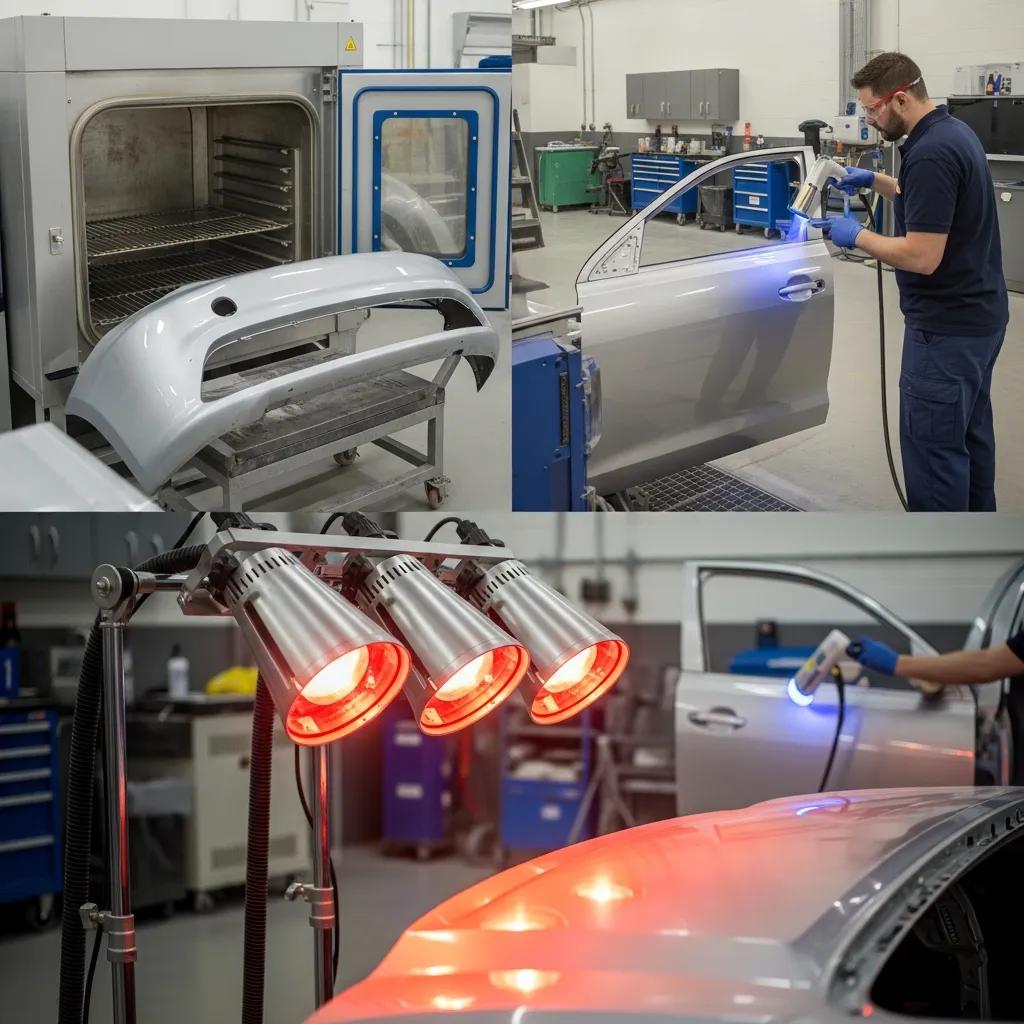
How Does Infrared Curing Speed Up Hardening?
Infrared lamps heat the paint film directly, increasing molecular motion and promoting faster cross-linking in urethane and clearcoat systems. Because the energy concentrates on the film instead of heating the whole booth, infrared shortens cycle times for spot repairs and helps prevent trapped solvents that cause popping or blush. It’s ideal for localized panels where you need to reach manufacturer-specified hardness without stressing nearby parts. Technicians must follow lamp power, distance, and timing specs to avoid over-baking, and infrared is often paired with controlled airflow for an even cure.
What Other Curing Techniques Do Shops Use?
Convection baking uses warm, circulated air to cure full panels or entire vehicles evenly. UV curing gives near-instant results but only with the right coatings. Portable heaters and careful shop climate control work for smaller jobs or when ovens aren’t available, although they require careful scheduling to prevent premature handling. All methods carry safety and quality demands—ventilation, temperature monitoring, and following paint manufacturer instructions reduce fire and emissions risks and protect the finish. Shops choose techniques based on paint chemistry (for example, urethane clearcoat needs) and repair size, balancing throughput with OEM-prescribed cure cycles.
What Affects How Long Paint Takes to Cure?
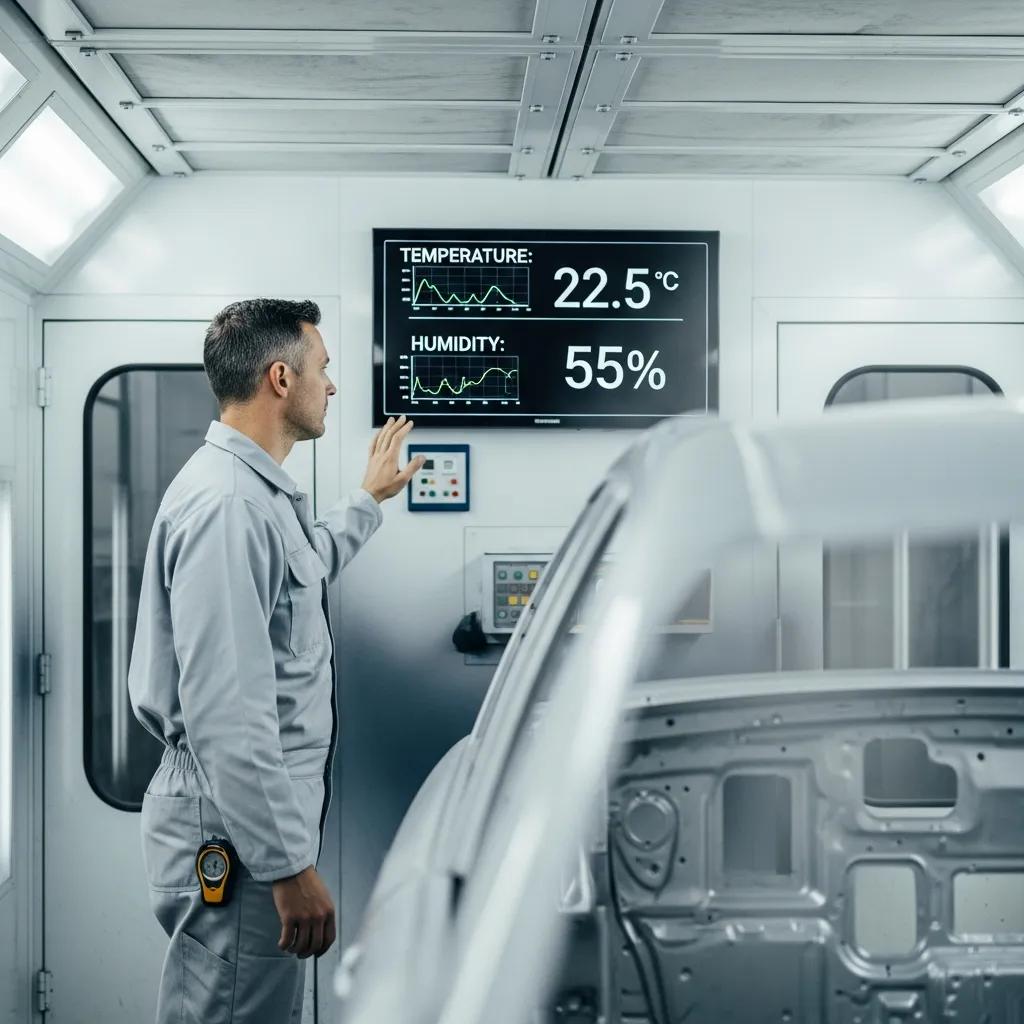
Cure time depends on several linked factors: shop environment, paint chemistry, film thickness, and process controls. Temperature and humidity change solvent evaporation and reaction speed; different resins (urethane, acrylic, epoxy) cure by different mechanisms and need different conditions; thicker layers and multiple coats take longer because heat and reactive species must penetrate. Shops use climate-controlled booths, bake cycles, and the right equipment to meet manufacturer technical data sheets. The table below summarizes key factors, how they influence cure time, and practical guidance technicians and owners can use.
Environmental and material variables each shift cure behavior and need targeted controls for consistent results.
| Factor | Effect on cure | Practical advice |
|---|---|---|
| Temperature | Warmer conditions speed chemical reactions | Keep booth temps in the paint maker’s recommended range (often 60–70°C when specified) |
| Humidity | High humidity slows evaporation and can cause blush | Use dehumidifiers or schedule jobs when humidity is lower |
| Paint chemistry | Different resins cure by different mechanisms | Follow manufacturer cure schedules for urethane vs. acrylic systems |
| Coat thickness | Thicker films hold solvents and slow cross-linking | Limit thickness per pass and allow extra dwell time between layers |
How Do Temperature and Humidity Change Cure Time?
Higher temperatures boost molecular activity and speed both solvent evaporation and cross-linking; high humidity slows evaporation and can cause water-related defects in some systems. Too-low temperatures leave coatings soft longer, while high humidity can cause blush or adhesion problems in solvent-borne paints. Good shop practice uses climate-controlled booths, proper bake cycles, and dehumidifiers to keep conditions within paint-maker and OEM specs. Controlling these variables shortens cure windows and makes delivery times more reliable without sacrificing finish durability.
How Do Paint Type and Film Thickness Change Requirements?
Urethane systems often need chemical cross-linkers and may require heat to reach full hardness, while some acrylics or enamels can cure at ambient temps but need more time. Clearcoats must fully cure to gain abrasion resistance and UV stability; multiple basecoat/clearcoat passes increase thermal mass and solvent load that must be driven off or reacted. Thicker coats usually mean longer dwell times or staged curing to avoid trapping solvents, so technicians commonly thin coats or limit film build per pass to meet manufacturer limits. For owners, this means larger or multi-layer repairs typically need more time before aggressive cleaning or detailing.
What Are OEM Paint Repair Standards and Why Do They Matter?
OEM paint repair standards list approved materials, surface prep, application steps, and cure cycles meant to protect safety systems, color match, and warranty status. These standards are based on paint makers’ technical data and often give specific temperatures, dwell times, and testing steps that restore adhesion and corrosion protection. Following OEM guidance cuts the risk of color mismatch, adhesion failures, and premature wear—and it documents that repairs met factory expectations. Below are the main areas OEM standards cover and why they matter for shops and owners.
OEM instructions combine material choices, process controls, and verification steps to deliver factory-level refinishing results.
- Materials and formulations: OEMs list approved primers, basecoats, and clearcoats compatible with the factory finish.
- Application procedures: OEMs spell out surface prep, film build, and mixing ratios to ensure consistent performance.
- Cure and validation: OEMs specify bake cycles, temperature ranges, and test methods to confirm a full cure.
Following these standards preserves resale value and safety, and it reduces later failures—important when insurers review repair quality. Prime Time Collision employs I-CAR-trained technicians, works with major insurance companies, and offers free estimates and 24/7 towing as part of our commitment to OEM-quality repairs and clear documentation of how we followed manufacturer protocols.
How Do I-CAR Certifications Help Ensure Quality Paint Repairs?
I-CAR training keeps technicians current on repair procedures, materials, and collision technologies, including proper curing protocols. Certified techs learn paint system behaviors, correct mixing and activator selection, and how to follow manufacturer bake cycles and shop environmental controls. That cuts variation and human error during refinishing. The practical result is documented, repeatable processes and better ability to spot cure-related issues before we hand the car back. For owners, I-CAR-trained staff is a reliable sign the shop follows industry-standard procedures that protect the finish.
Why Is Following OEM Standards Critical for Long-Term Paint Performance?
OEM standards set curing parameters that match the vehicle’s original paint system so repairs perform like the factory finish—good adhesion, corrosion protection, and color stability. Deviating from those guidelines increases the chance of peeling, mismatched color, or early fading. When shops follow OEM guidance, materials and cure cycles are compatible and problems from mismatched chemistries or incorrect bake cycles are less likely. Skipping those steps can lead to costly cosmetic failures and can complicate insurance claims or warranty coverage if the documented process wasn’t followed. In short, following OEM standards is the best way to restore factory-level durability and appearance.
How Should You Care for Your Car After a Paint Repair?
After a repair, follow a simple staged care plan that protects the coating while it finishes curing: limit contact, keep the car shaded, and delay aggressive cleaning until the finish reaches usable hardness. Immediate actions include parking out of direct sun, avoiding slamming doors on newly painted panels, and resisting the urge to polish or wax until the shop advises it’s safe. Washing, waxing, and polishing timelines depend on paint type, cure method, and coat thickness—your technician will give a job-specific recommendation. The checklist below outlines practical actions for the first hours, days, and weeks after a repair.
Use a staged approach to protect the new finish as it converts from dry to fully cured.
- First 24 hours: Keep the vehicle dry and don’t touch repaired areas; park in shade when possible.
- Days 1–7: Avoid automated washes and high-pressure rinses; gentle hand rinses at low pressure are OK.
- Weeks 1–4: Delay waxing or polishing until the shop confirms the clearcoat has reached the recommended cure level.
Following these steps reduces the chance of embedded contaminants, swirl marks, or solvent entrapment while the coating finishes curing. If you have questions or need to reschedule a follow-up, contact the repair shop—Prime Time Collision can advise on timelines and set inspections based on the repair’s materials and cure method.
Best Practices for Caring for Repaired Paint
Good post-repair care mixes gentle handling, environmental protection, and delayed detailing so you don’t disrupt curing or create surface defects. Avoid automated or high-pressure car washes for at least one to two weeks after a small repair, and longer after an extensive or multi-layer job. When cleaning is needed, use a low-pressure hand rinse with pH-neutral soap. Parking in shade reduces rapid temperature swings that can stress uncured films, and staying off gravel or brushy roads prevents chips while the coating matures. If you notice tackiness, discoloration, or other oddities, photograph and document them and contact the shop right away so we can assess next steps.
- Avoid high-pressure washing: Strong jets can lift or mark paint that hasn’t fully hardened.
- Use pH-neutral cleaners: Harsh chemicals may soften an incompletely cured clearcoat.
- Keep the vehicle shaded: Reduce temperature swings that affect solvent movement and cure uniformity.
These measures protect the finish while it transitions from a drying surface to a stable, protective layer, preserving long-term look and function.
When Is It Safe to Wash or Wax New Paint?
Wait times depend on cure method and paint chemistry. For spot repairs cured with infrared, light washing is often safe after 24–48 hours, while waxing is typically delayed one to three weeks. For full-vehicle bakes, light washing may be allowed after 48–72 hours, with waxing only after the shop confirms the clearcoat is fully cured. Clearcoat cure is usually described in ranges—surface dry in hours, initial hardness in days, and full hardness in two to four weeks—so conservative timing helps avoid trapping solvents or marring the film. Fast-cure UV systems may allow earlier detailing, but always follow the paint data sheet or your repair shop’s advice. When in doubt, check with the repairer for the expected clearcoat curing time for your specific job.
What Problems Happen When Paint Doesn’t Cure Properly?
Incomplete curing shows up as several common failures: a soft or gummy clearcoat, peeling or flaking, orange peel texture, solvent popping, and early dulling. Each symptom points to likely causes—incorrect temperature, wrong activator ratios, or trapped solvents. Catching issues early makes them easier to fix, so owners and techs should watch gloss consistency, tackiness, and edge adhesion. The list below describes common failures, how they appear, and quick steps owners can take before bringing the car back for evaluation.
- Peeling or flaking: Clearcoat lifts or flakes off, often at edges where adhesion failed.
- Soft or gummy finish: Surface feels tacky or marks easily, indicating incomplete cross-linking.
- Solvent popping: Small crater-like defects from trapped solvent vapor expanding during heat exposure.
Documenting issues and contacting the shop quickly lets us choose the right fix—from a re-bake to localized rework or a full panel refinish—depending on severity.
How to Spot Peeling, Chipping, or Cure-Related Scratches
Quick checks are visual and tactile: run a clean finger lightly over the repaired area to feel for tackiness, inspect edges for lifting or color difference, and look under good light for texture problems like orange peel or solvent-popped craters. Photograph any defects with a ruler or coin for scale and don’t try aggressive polishing—buffing a soft finish can make it worse or remove thin clearcoat. New chips after a single drive suggest impact damage, while broad soft areas or adhesion loss point to cure issues. If you see a problem, contact the repair shop and your insurer with the evidence so we can diagnose and fix it quickly.
How Can Shops Prevent or Fix Curing Problems?
Prevention starts with tight shop controls: accurate mixing ratios, following paint manufacturer bake cycles, stable shop environments, and validation testing reduce cure failures. Owners help by following post-repair care instructions and reporting anomalies promptly. Fixes depend on the issue—options include extended re-bakes, solvent removal and recoat for trapped-solvent cases, localized rework, or full-panel refinishes for adhesion failures. Timelines vary from same-day re-bakes to several days for rework that requires sanding and recoating; the chosen solution follows OEM guidance and material compatibility to get the best, lasting result.
- Prevent: Shops must control environment and follow technical data sheets to avoid cure problems.
- Detect: Owners should inspect, document early signs, and avoid DIY fixes.
- Remediate: Shops may re-bake, buff, or recoat depending on diagnosis, following OEM protocols.
Quick, standards-driven responses minimize long-term damage and restore finish durability while protecting the vehicle’s appearance and value.
Frequently Asked Questions
What are the signs that paint curing is incomplete?
Signs include a soft or gummy feel, clearcoat peeling or flaking, and solvent popping (small crater-like marks). If the surface is tacky or easily marked, the chemical cross-linking likely isn’t finished. You may also see texture variations like orange peel. If you notice any of these, document the issue and contact the repair shop for an evaluation.
How can environmental conditions affect curing?
Temperature and humidity strongly affect curing. Higher temperatures speed chemical reactions and solvent evaporation, shortening cure time. High humidity slows evaporation and can cause defects like blush. Shops use climate-controlled booths to keep conditions within the paint maker’s recommended ranges—deviations can lead to incomplete curing and weaker finishes.
What should I do if I notice defects after a repair?
Document defects with photos and notes, and avoid trying to fix them yourself. Contact the repair shop promptly so they can assess the problem. Depending on the issue, the shop may re-bake, perform localized refinishing, or recommend a different corrective action.
How does paint layer thickness affect cure time?
Thicker films trap solvents and slow chemical cross-linking, so multiple layers or heavy builds usually need longer cure times or staged curing. Technicians typically limit coat thickness per pass and allow proper dwell time between layers to prevent trapped solvents and ensure a complete cure.
What role do I-CAR certifications play in quality repairs?
I-CAR certification shows technicians are trained on current repair methods, materials, and technologies—including correct curing protocols. Certified techs follow manufacturer directions for mixing, application, and baking, which reduces errors and delivers more consistent, high-quality results. For owners, I-CAR-trained staff is a sign the shop follows industry standards.
Can I wash my car right after a paint repair?
Not usually. Wait times depend on the cure method and paint chemistry. For an infrared spot cure, light washing may be OK after 24–48 hours, with waxing delayed one to three weeks. For full-vehicle bakes, light washing is often allowed after 48–72 hours, but waxing should wait until the shop confirms the clearcoat is fully cured. Always follow the shop’s guidance for your specific repair.
Conclusion
Knowing how paint cures helps protect your repair and keeps your vehicle looking its best. Distinguishing drying from curing, following OEM and paint-maker guidance, and following simple post-repair care steps all contribute to a long-lasting finish. If you want expert advice or need a high-quality repair done right, contact Prime Time Collision—we’ll make sure the job meets factory standards and stays looking great.


