


Step-by-Step: How to Jump-Start a Car Safely — Clear, Expert Guidance
A jump start temporarily supplies electrical current from another vehicle or a portable jump starter to a discharged battery so the engine can crank and the charging system can begin recharging. Safety matters: wrong connections or a damaged battery can spark, cause burns, or harm vehicle electronics. This guide gives you practical, safety-first steps so you can get moving without creating new problems. You’ll find essential precautions, the correct cable-connection sequence, how to start and disconnect vehicles safely, and what to do after a successful jump to reduce the chance of a repeat failure. We also explain common battery-failure signs and when to call in professional diagnostics or OEM replacement. If you’re in Glendale and want follow-up service, Prime Time Collision Center — a local auto body and collision repair shop focused on OEM-quality work, battery testing and replacement, 24/7 towing, free estimates, and I-CAR Platinum–certified technicians — can perform deeper electrical checks after a jump. Read on for concise, actionable steps and clear cues for when to call a pro.
What safety steps should you take before jump-starting a car?

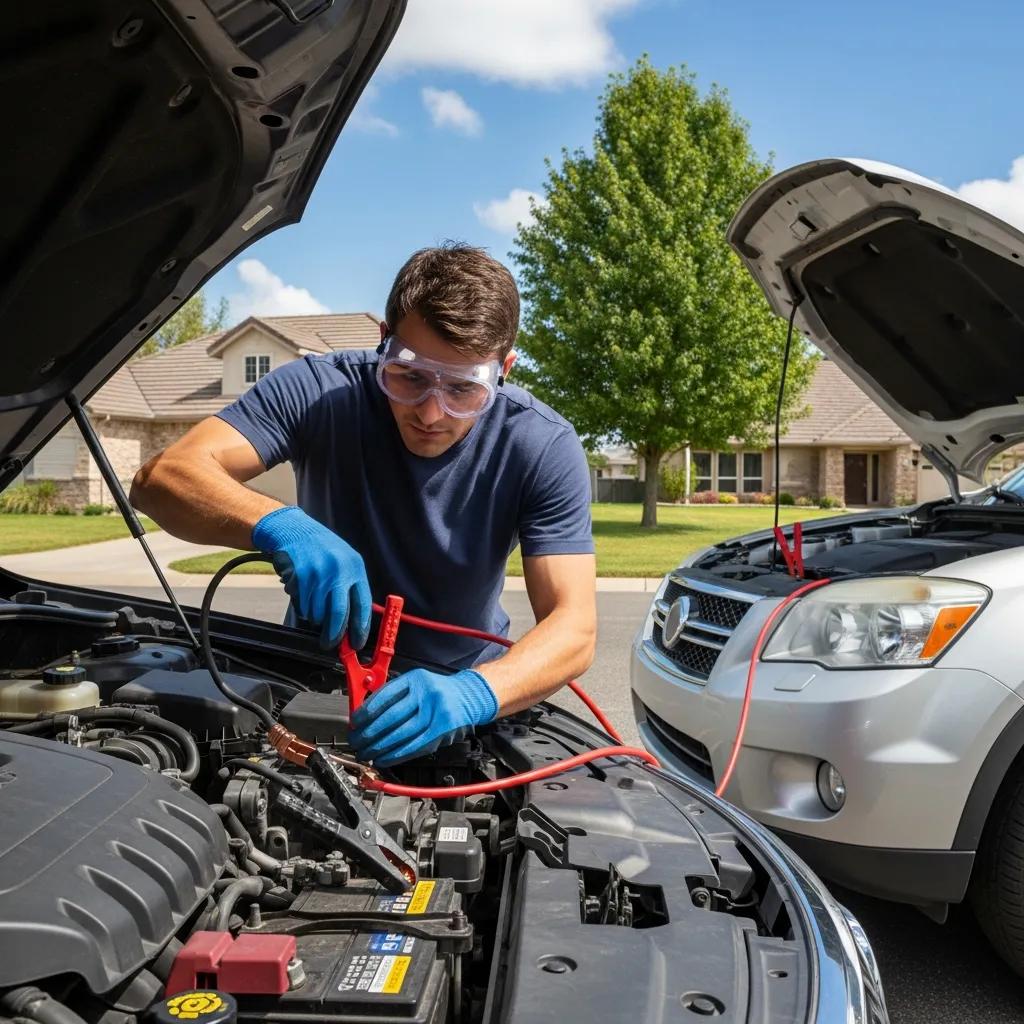
Before you begin, do a quick visual and safety check: look for cracked or leaking battery cases, heavy corrosion on the terminals, and make sure both vehicles sit on level ground with parking brakes set. These checks cut the risk of acid exposure, electrical shorts, and unwanted movement while cables are attached. Wear insulated gloves and safety goggles, and keep sparks, open flames, and smoking well away from the battery area — charged batteries can emit hydrogen gas that’s flammable. Once the scene is safe, gather your tools and position the donor vehicle so you can attach the cables in the correct order without rushing.
Which tools and safety gear should you have on hand?
Keep a small kit ready: heavy-gauge jumper cables (4–6 AWG for most modern cars) or a portable jump starter rated for your vehicle, insulated gloves, and safety goggles to guard against sparks or splashes. A portable jump starter is often safer when you’re alone because it removes the need for a second car; jumper cables are useful when another vehicle is available and terminals are easy to access. Also carry a rag for light corrosion, a flashlight for low-light situations, and a reflective vest if you’re roadside. If you find a cracked or swollen battery case or active acid leakage, stop and arrange professional help instead of attempting a jump.
How should you position the vehicles for a safe jump start?
Park the donor and dead vehicles close enough so the jumper cables reach without stretching, but don’t let the vehicles touch — leave a few inches of clearance to avoid unintended electrical contact. Use a flat, stable surface and put both vehicles in Park or Neutral with parking brakes set to prevent movement while you work. Don’t jump-start in a closed garage: batteries can emit hydrogen gas, and running engines produce carbon monoxide. Open doors or work outside for ventilation. After vehicles are in position and powered off, you’re ready to identify the battery terminals and connect the cables in the proper sequence.
What is the correct sequence for connecting jumper cables?
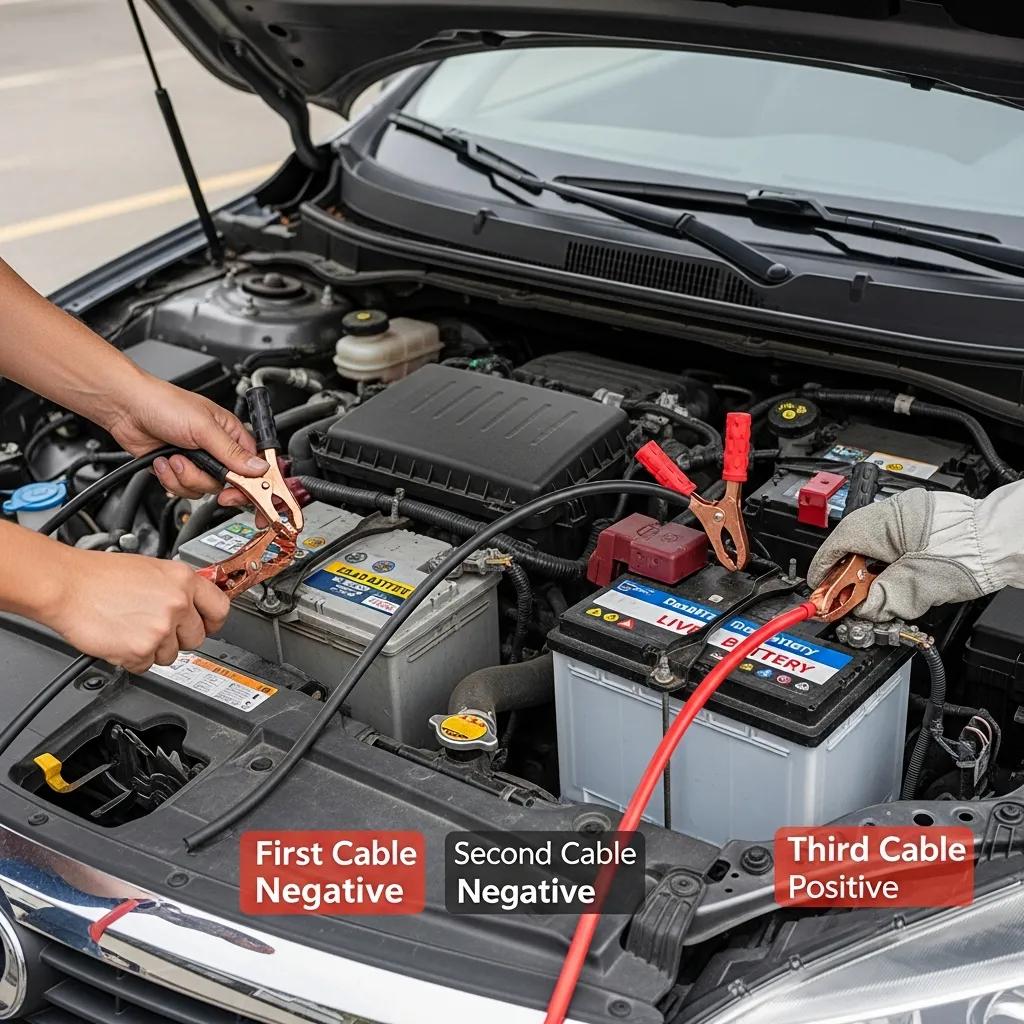
Follow the correct sequence to reduce spark risk and protect vehicle electronics: attach positive-to-positive first, then the donor negative, and finally the grounded negative on the dead vehicle away from the battery. That last ground reduces the chance of igniting any hydrogen around the battery and gives current a safe return path through the engine block or chassis. Use insulated clamps, make sure you have solid metal-to-metal contact, and keep cables clear of belts and fans. Incorrect polarity or loose clamps can damage sensitive electrical components. With clamps secure, you’re ready to start the donor vehicle and proceed with the startup steps below.
How do you identify car battery terminals?
The positive terminal is usually marked with a plus sign and red coloring; the negative terminal is marked with a minus sign and is often black or bare metal. Some modern cars hide the battery under covers or use remote jump posts — check the owner’s manual if you can’t find direct access. If the negative terminal is hard to reach, use a clean, solid metal grounding point such as the engine block or a designated chassis ground. Light corrosion can be wiped away with a rag while wearing gloves; heavily corroded, fused, or damaged terminals reduce conductivity and should be inspected by a technician. If the battery casing is bulging or cracked, do not proceed with a jump.
Step-by-step: how to connect jumper cables safely
Follow these four steps exactly:
- Attach the red clamp to the dead battery’s positive (+) terminal.
- Attach the other red clamp to the donor battery’s positive (+) terminal.
- Attach the black clamp to the donor battery’s negative (–) terminal.
- Attach the remaining black clamp to a grounded metal point on the dead vehicle (engine block or chassis) away from the battery.
This orders the connections to prevent sparks near the battery and to create a safe ground path. Before starting either vehicle, double-check that clamps are tight, not touching moving parts, and that cable routing is clear. If anything looks off, pause and reassess or call for help.
How to Start and Disconnect Vehicles Safely After Jump-Starting
Correct startup and disconnection sequencing protects both vehicles and lowers the risk of sparks or voltage spikes. Start the donor vehicle and let it run briefly so its alternator can supply current to the discharged battery, then try to start the dead vehicle while watching the starter and dash lights. If the dead vehicle starts, let both idle and watch charging indicators. If it won’t start after a couple attempts, stop to check connections and battery condition — repeated tries can overheat the starter. When you’re done, remove the cables in reverse order to avoid arcing: ground clamp from the dead vehicle first, then donor negative, and finally the positive clamps.
How should you start the donor and the dead vehicle?
Start the donor vehicle first and let it idle for about 2–5 minutes so the alternator can stabilize charging current and raise the dead battery’s voltage. Then try to start the dead vehicle. If it fires and runs, let both vehicles idle for several minutes while you listen for unusual noises, watch for smoke, and check for warning lights. If the dead vehicle won’t start after two or three attempts, wait about a minute between tries to avoid stressing the starter and double-check connections and terminal contact. Continued failure usually means a bad battery, alternator problem, or parasitic drain that needs professional testing.
What is the safe order to disconnect jumper cables?
Remove cables in the reverse order of how you hooked them up to reduce spark risk and avoid shorting: first remove the black clamp from the grounded point on the previously dead vehicle, then remove the black clamp from the donor negative. Next, remove the red clamp from the donor positive, and lastly remove the red clamp from the previously dead vehicle’s positive terminal. Keep clamps separated and don’t touch both clamps to metal at the same time. If you see arcing, stop and get professional help. After disconnecting, let the restarted vehicle run so the alternator can recharge the battery, then follow the post-jump checks below.
What should you do after a successful jump start?
Right after a jump, your priorities are to recharge the battery, watch electrical behavior for recurring issues, and decide whether to schedule professional battery or charging-system diagnostics. Drive at steady speeds for a while so the alternator can replenish the battery — if you can’t drive, use a proper battery charger or maintainer rather than relying on short trips. Watch for dashboard warning lights, dim headlights, or a battery light that stays on — repeated jumps usually point to battery age, sulfation, or alternator problems. If any of these signs appear, arrange diagnostic testing or OEM battery replacement to avoid getting stranded again.
Quick post-jump checklist to run while driving or at your next stop:
- Check the battery warning light: It should turn off after the engine runs for a few minutes.
- Test electrical accessories: Confirm lights, radio, and HVAC work normally.
- Listen for abnormal alternator noise: Squealing or grinding suggests a belt or alternator issue.
| System Element | What to Check | Recommended Action |
|---|---|---|
| Alternator output | Charging voltage should be ~13.5–14.5V while running | If low or fluctuating, schedule diagnostics to test the alternator and regulator |
| Battery age/condition | Look for swelling, corrosion, or repeated low-voltage events | Consider battery testing and OEM replacement if capacity is low |
| Electrical loads | Accessories left on can drain charge quickly | Turn off nonessential loads and test for parasitic drain if problems persist |
How long should you drive to recharge your car battery?
Drive continuously at moderate speed for at least 15–30 minutes to let the alternator deliver a meaningful recharge; steady highway driving is more effective than short stop-and-go trips. Exact time depends on the battery’s state-of-charge, alternator health, and battery type (AGM batteries may need a specific charge profile). If the battery was deeply discharged, a longer drive or a dedicated charger is best. Short trips after a jump can leave the battery undercharged and encourage sulfation, increasing the chance of another no-start. If you can’t complete a sustained drive, schedule a battery diagnostic or use a smart charger for a controlled recharge.
| Component | Attribute | Recommended Action |
|---|---|---|
| Alternator | Output stability under load | Test alternator output with diagnostic equipment; repair or replace if unstable |
| Battery | Age and capacity | If old or failing a load test, replace with an OEM-certified battery |
| Electrical loads | Parasitic draw level | Conduct a parasitic draw test to find and fix excessive drains |
When should you seek professional battery diagnostics and repair?
Bring the vehicle in for professional diagnostics if it needs repeated jump starts, won’t hold charge after a reasonable recharge, or shows physical battery damage like swelling, heavy corrosion, or leaks. Those signs point to deeper issues such as sulfation, internal cell failure, alternator trouble, or parasitic drains that require specialized tools and electrical expertise. Technicians can run load tests, alternator output checks, and parasitic current measurements to find the root cause and recommend OEM battery replacement when needed. If you want certified service and help with insurance after collision-related electrical damage, a reputable local shop can handle diagnostics, OEM parts fitment, and replacement.
What are common signs of a failing car battery?
Spotting battery problems early avoids being stranded and helps you choose the right repair: slow cranking, dim or flickering lights, frequent jump starts, and a steady battery warning light are classic indicators. These happen because batteries lose capacity with age, sulfation reduces active material, and corrosion at the posts raises resistance so components perform poorly under load. Extreme temperatures accelerate chemical breakdown, so seasonal checks help. When you recognize these symptoms, take practical next steps like cleaning terminals, load testing, or scheduling OEM replacement.
| Symptom | Probable Cause | Recommended Action |
|---|---|---|
| Slow engine crank | Low battery charge or weak cells | Attempt recharge, then test battery capacity and replace if failing |
| Dim/flickering lights | Voltage drop under load or alternator issues | Test alternator output and battery under load; repair charging system if needed |
| Corroded terminals | Oxidation causing poor contact | Clean minor corrosion and retest; if severe, replace terminals or battery |
How can you recognize slow cranking and other electrical symptoms?
Slow cranking feels like the starter turns more slowly than usual or the engine takes longer to catch. Dim headlights or dashboard lights that brighten after you rev the engine often mean the battery is weak and the alternator is compensating. A steady battery warning light typically indicates a charging-system fault. Quick checks you can do: turn on headlights with the engine off to check brightness, then start the engine and see if lights change. If accessories fail while the engine runs, schedule diagnostics — these observations help decide whether a jump start will temporarily help or if professional testing is needed.
What causes battery failure and how does corrosion affect terminals?
Batteries fail because of chemical changes like sulfation (lead sulfate crystals reducing active material), repeated deep discharges that shorten life, and heat or cold that speeds degradation. Corrosion on posts and clamps increases resistance at the connection, causing voltage drop and poor charging even if the battery itself is reasonably healthy. Light corrosion can be wiped away with gloves and a rag; extensive post damage, a cracked case, or heavy swelling calls for battery replacement and professional handling because of acid hazards. Fixing both chemical and connection issues improves reliability and reduces repeat jump starts.
How can Prime Time Collision Center help with battery replacement and repairs in Glendale, CA?
Prime Time Collision Center offers OEM-quality battery replacement, electrical diagnostics, and full repair services performed by I-CAR Platinum–certified technicians who follow manufacturer procedures to protect vehicle systems and warranties. Our services include battery testing and replacement, alternator and charging-system checks, and coordinated insurance handling for collision-related electrical damage. We also provide 24/7 towing for vehicles disabled by battery or accident issues and free estimates to help you plan repairs. Choosing technicians who use OEM parts and proper diagnostic equipment lowers the risk of repeat failures and protects vehicle safety systems and resale value. If you need follow-up after a jump start or suspect charging-system trouble, schedule a diagnostic with our certified team.
| Service | What it includes | When to choose |
|---|---|---|
| Battery diagnostics | Load testing, state-of-charge check, battery health report | When jump starts recur or the battery shows weak performance |
| Battery replacement | OEM-fit battery and proper disposal | When a battery fails load tests or shows physical damage |
| Towing & estimates | 24/7 towing and no-cost damage estimates | When the vehicle can’t be safely driven or after collision-related issues |
Why choose OEM batteries and I-CAR Platinum technicians?
OEM parts ensure correct fit, proper electrical specs, and compatibility with systems like battery sensors and charging algorithms — that helps keep warranties intact and systems working as designed. I-CAR Platinum certification means technicians have advanced training in collision repair and manufacturer procedures, which lowers the risk of secondary damage after electrical repairs. Together, OEM parts and certified labor give a more reliable result than generic parts or unverified repairs. If you care about vehicle integrity and safety after an electrical issue, certified service is a wise choice.
How does Prime Time handle 24/7 towing and insurance coordination?
We provide round-the-clock towing to bring vehicles disabled by dead batteries or collision damage to a certified repair facility, so you don’t have to attempt risky roadside fixes. Our free estimates and insurance coordination simplify claims and repair approvals so you can focus on getting the vehicle handled safely. By offering towing, diagnostics, OEM replacement, and insurance support in one place, we shorten repair time and reduce the paperwork burden for you. If you want a single point of contact for battery and charging-system repairs after a jump, our team can manage the whole process.
- Towing availability: On-demand recovery any time of day.
- Free estimates: Upfront evaluations to plan repairs.
- Insurance coordination: Help with claim paperwork and approvals.
These services give drivers a straightforward, managed path from roadside failure to completed OEM-quality repairs.
Frequently Asked Questions
What should I do if my car won’t start after a jump?
First, confirm the jumper cable connections are secure and correct. If they are, wait a minute and try starting again. If it still won’t start, don’t keep cranking — that can overheat the starter. The problem may be a failing battery, alternator issue, or something else that needs diagnostic testing. Call a professional for a full check.
Can I jump-start a car with a dead battery in the rain?
Yes, but take extra caution. Park on stable ground, wear safety gear, and avoid standing in puddles or touching wet metal while handling cables. A portable jump starter reduces exposure and risk. If you feel unsafe, wait for help or shelter.
How can I maintain my car battery to prevent future failures?
Keep terminals clean and connections tight, secure the battery mount, and drive regularly to let the alternator recharge the battery. Avoid lots of short trips that don’t allow a full recharge. Have the battery tested annually after about three years, or sooner if you notice symptoms.
What are the risks of jump-starting a car incorrectly?
Incorrect jump-starting can cause electrical shorts, battery damage, or even explosions if hydrogen ignites. Wrong cable order or loose clamps can spark near the battery and may damage electronics in either vehicle. Follow the correct connection and disconnection sequence to minimize these risks.
How can I tell if my battery is completely dead or just discharged?
A completely dead battery may show no dashboard lights or no clicking when you try to start. A discharged battery might show dim lights or weak cranking. If you’re unsure, have the battery load-tested by a pro to determine its health and capacity.
Is it safe to use a portable jump starter on any vehicle?
Portable jump starters are generally safe, but check the unit’s specifications to make sure it’s rated for your vehicle’s battery type and size. Follow the manufacturer’s instructions and ensure the jump starter is fully charged before use. Don’t try to use a portable starter on a damaged battery or compromised electrical system.
What should I do if my battery keeps dying after a jump start?
If the battery keeps dying, the issue might be a failing battery, a bad alternator, or a parasitic drain. Check the battery’s age and condition — replacement may be needed if it’s old or failing a test. If the battery checks out, have the alternator and charging system tested. Professional diagnostics will pinpoint the cause and the right fix.
Conclusion
Jump-starting a car can get you back on the road quickly when done safely. Follow the steps and precautions here to reduce risks and improve your chances of a successful restart. If problems keep happening, schedule a diagnostic with a certified technician to find the underlying cause. For trusted, OEM-quality repairs and battery service in Glendale, reach out to Prime Time Collision Center — we’re here to help you stay safe and get moving with confidence.


