


Complete Guide to Auto Body Repair: Everything You Need to Know
Auto Body Repair — A Complete Guide to Collision Repair and Vehicle Restoration
Auto body repair brings your vehicle back to safe, factory-aligned condition after a collision or wear. That can mean repairing or replacing structural parts, panels, and finishes, plus checking electronics and safety systems. Repairs combine frame and mechanical work, precise measurement, paint refinishing, and diagnostics so your car looks and performs the way it did before—protecting safety systems and resale value. This guide walks through the repair process step by step, explains common damage and repair choices, and shows why OEM procedures, certifications, and proper ADAS calibration matter. You’ll learn what to expect from initial estimates through final quality checks, how to weigh options like paintless dent repair versus panel replacement, and which warranties and certifications matter for long-term safety. We also include practical checklists and clear examples so you can make decisions with confidence. At the end, you’ll see how Prime Time Collision Center fits as a local, certified option for OEM-quality repairs.
What Are the Step-by-Step Processes in Auto Body Repair?
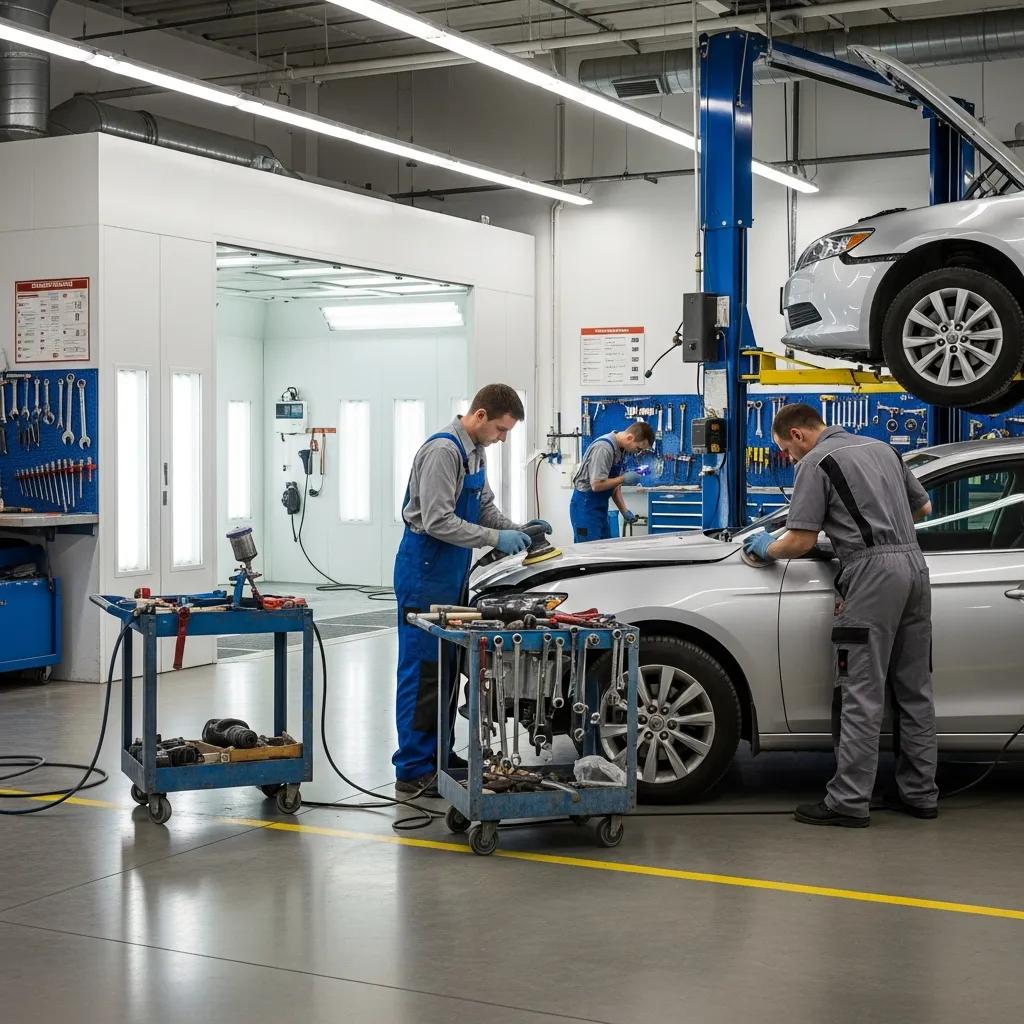
Collision repair follows a clear sequence designed to find all damage, restore structure, and return the vehicle to safe operation while preserving its appearance. The work starts with a visual and digital assessment, continues with controlled disassembly to reveal hidden problems, moves into structural repair or parts replacement following OEM guidelines, then paint prep and refinishing with precise color match, and finishes with reassembly and electronic calibration. Consistent documentation and open communication with customers and insurers keep expectations aligned when unseen damage appears. Below is a concise, numbered workflow for quick reference, followed by a summary table showing timelines and customer touchpoints.
- Initial damage assessment and estimate: Visual inspection, photos, and measurement tools produce an itemized plan.
- Disassembly and hidden damage detection: Remove panels to inspect for structural or mechanical issues not visible at first.
- Structural/frame repair and parts sourcing: Straighten the frame and order OEM or approved replacement parts as needed.
- Paint prep and refinishing: Repair surfaces, prime, apply basecoat and clearcoat, and blend color to match.
- Reassembly and systems diagnostics: Reinstall components and test mechanical and electrical systems.
- ADAS recalibration and final quality checks: Calibrate safety sensors, perform road tests, and complete final inspections.
- Delivery and warranty documentation: Walk through the completed work with the customer and confirm warranty coverage.
This order keeps each repair step verifiable and helps ensure safety systems are restored correctly. The next sections explain how estimates are created and how hidden damage is found during disassembly.
Introductory table: step, purpose, and timeline.
The following table outlines each major phase, how long it typically takes, and what customers should expect.
| Step | Purpose / What Is Done | Typical Timeline / Customer Action Required |
|---|---|---|
| Assessment & Estimate | Document visible damage, develop a repair plan, and notify the insurer | 1–3 days; customer provides incident details and insurance information |
| Disassembly & Hidden Damage Detection | Expose non-visible structural or electrical issues | 1–5 days depending on complexity; estimate may be revised |
| Structural Repair & Parts Sourcing | Straighten frame, replace or repair parts, and order OEM or approved components | 2–10 days; longer if parts are backordered |
| Paint Prep & Refinishing | Surface repairs, color-matching, and multi-stage painting | 2–7 days including curing and blending |
| Reassembly & Diagnostics | Reinstall parts, run system and electrical checks, prepare for ADAS calibration | 1–3 days; includes test driving as needed |
| Final QC & Delivery | Final inspections, paperwork, and customer walkthrough | 1 day; customer pickup and review |
This summary clarifies timelines and customer touchpoints so you can plan transportation and insurance interactions. Next, we explain how early estimates are produced and shared.
How Is Initial Damage Assessment and Repair Estimation Conducted?
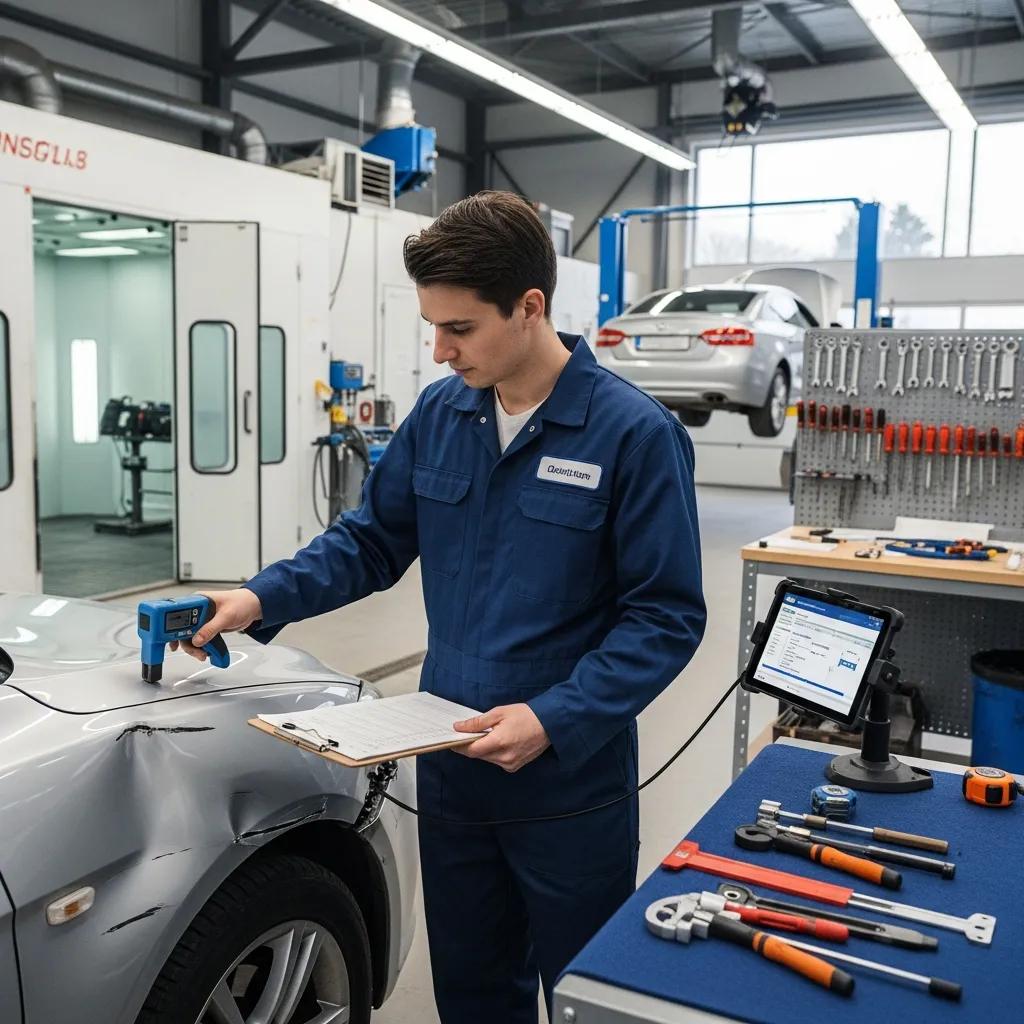
The initial assessment starts with a careful visual inspection and photos that capture panel damage, alignment issues, and any obvious mechanical concerns. Technicians use measuring tools and estimating software to itemize parts, labor, and potential repair steps while flagging areas where hidden damage may exist. Modern shops often add electronic scans to check airbags, chassis dimensions, and sensor status—this helps build a more accurate scope before disassembly. Estimates are usually provided as an itemized report that separates repair tasks, recommends OEM parts when appropriate, and lists required safety calibrations. Clear documentation at this stage reduces surprises later and sets expectations for the disassembly process.
What Happens During Disassembly and Hidden Damage Detection?
Controlled disassembly removes damaged panels, bumper covers, and trim so technicians can inspect the substructure, mounting points, and wiring that aren’t visible during the first look. This step commonly uncovers bent frame rails, damaged suspension mounts, broken reinforcements, or compromised wiring—issues that affect safety and alignment. Technicians perform frame measurements and follow OEM checklists to decide whether repair, straightening, or replacement is required. Finding hidden damage can extend timelines and often requires insurer approval for an updated estimate. For example, what looks like a simple rear bumper hit can reveal crushed inner supports or misaligned trunk mounts, which changes the scope of work. Proper documentation of these findings leads into parts sourcing and structural repair to restore factory tolerances.
Which Types of Auto Body Damage Are Common and How Are They Repaired?
Auto body damage typically falls into categories like dents and dings, scratches and paint damage, bumper and plastic damage, glass breakage, and structural/frame damage. Each type calls for a different balance of cost, appearance, and safety. Repair choices depend on the damage extent, whether OEM parts are required, and whether paintless techniques are possible. Minor dents may be fixed without painting, while deep scratches or structural damage will need replacement and refinishing. Understanding these categories helps you choose the right repair route and anticipate time and cost factors like parts lead time, paint blending, and ADAS recalibration. Below is a quick list of common damage types with a short repair summary.
Common damage types and short repairs:
- Dents and dings: Paintless dent repair (PDR) when paint is intact; otherwise panel repair or replacement and refinishing.
- Scratches and paint chips: Sand, fill if needed, then spot or full-panel repaint with color matching.
- Bumper damage: Plastic welding, reinforcement repair, or replacement depending on structural condition.
- Auto glass damage: Chip repair or windshield replacement to restore structural integrity and ADAS mounts.
- Structural/frame damage: Frame straightening or member replacement using OEM procedures.
Below is a comparison table that shows damage types, typical repairs, and complexity estimates to help guide decisions.
| Damage Type | Common Causes / Typical Repair Method | Estimated Time / Complexity / OEM vs Aftermarket |
|---|---|---|
| Dents & Dings | Parking mishaps, hail / PDR or panel repair and repaint | 1–3 days / Low–Medium / PDR preserves OEM finish |
| Scratches & Paint | Keying, curb scrapes / Sand, fill, color match, refinish | 1–4 days / Low–Medium / OEM color match preferred |
| Bumper Damage | Low-speed impacts / Plastic repair or replacement | 1–5 days / Medium / Aftermarket possible if structure unaffected |
| Auto Glass | Rocks, impact / Repair chip or replace windshield | Same-day–2 days / Low–High / OEM replacement recommended when ADAS mounts are present |
| Structural/Frame | Major collisions / Straightening or member replacement | Several days–weeks / High / OEM parts and procedures essential |
This table highlights that safety-related repairs often require OEM parts and certified procedures. Next, we compare paintless dent repair with traditional dent removal.
What Are the Differences Between Paintless Dent Repair and Traditional Dent Removal?
Paintless Dent Repair (PDR) pushes or massages metal back into shape without sanding or repainting, keeping the factory finish intact. PDR is faster and usually less expensive than traditional bodywork, but it only works when the paint isn’t cracked and the dent is shallow. Traditional dent repair uses filler, sanding, and repainting or panel replacement when the paint is damaged or the panel is deformed. That method restores corrosion protection and color uniformity when paint is compromised. In short: PDR preserves OEM paint and is quick, while traditional repair handles deeper damage but takes longer and can cost more.
Comparison table for repair method decision-making:
| Repair Method | Best For | Pros / Cons / Typical Cost Drivers |
|---|---|---|
| Paintless Dent Repair (PDR) | Small, shallow dents with intact paint | Pros: preserves OEM paint, quick, more affordable. Cons: not for cracked paint or deep creases. Cost drivers: technician skill and access. |
| Traditional Dent Removal | Deep dents, paint damage, or panel replacement | Pros: restores severe damage and paint defects. Cons: longer process, higher cost, blending required. Cost drivers: paint time, parts, labor. |
| Panel Replacement | Severely deformed or safety-critical panels | Pros: restores structural integrity. Cons: highest cost and part lead time. Cost drivers: OEM vs aftermarket parts, calibration needs. |
These distinctions help you decide whether to repair or replace a panel. Next, we cover common cosmetic and safety repairs like scratches, bumpers, and glass.
How Are Scratches, Bumper Damage, and Auto Glass Repairs Handled?
Scratch repairs depend on depth—clearcoat-only scratches can often be polished out, while deeper gouges need filler and repainting with blended color. Bumper repairs may be fixed with plastic welding or reinforcement repair if the structure isn’t compromised; cracked reinforcements or damaged sensor mounts usually require full replacement to preserve crash performance and ADAS function. Auto glass repair depends on chip size and location—small chips can be repaired, but windshield replacement is needed for long cracks, chips in the driver’s sightline, or when ADAS cameras are mounted to the glass. Using OEM or manufacturer-approved glass is important where ADAS mounts are involved so sensor alignment remains accurate during calibration. Correct handling of these items reduces the chance of future corrective work and helps long-term vehicle function.
Why Is OEM Certified Auto Body Repair Important for Vehicle Safety and Warranty?
OEM-certified repair means a shop follows the manufacturer’s published repair methods, uses approved parts, and performs required calibrations so structural integrity, crash performance, and safety systems operate as intended after repair. That reduces the risk of compromised crumple zones, misaligned suspension, or improperly calibrated safety sensors—all of which can increase injury risk in a future collision—and helps protect warranty coverage when applicable. Certifications and documented OEM procedures create an auditable repair trail that insurers and future buyers can rely on. OEM-focused repairs are especially important for modern vehicles with ADAS and high-strength steels that need controlled repair environments and correct welding or heat techniques.
- Safety: Manufacturer procedures restore crashworthiness.
- Warranty protection: OEM parts and documented processes reduce disputes.
- Value retention: Factory-quality repairs help preserve resale value.
The next sections describe industry certifications and how OEM certification supports factory-quality outcomes.
What Does I-CAR Platinum Certification Mean for Repair Quality?
I-CAR Platinum certification shows a facility has invested in technician training across collision repair disciplines and meets recognized training standards for modern vehicle repair. It means technicians receive up-to-date instruction on structural repair, welding, adhesives, and advanced systems—skills that directly affect how closely a vehicle is restored to factory specification. While certification alone doesn’t guarantee every outcome, it’s a strong indicator that a shop prioritizes training, documented procedures, and continuous education to keep pace with OEM requirements. Choosing a facility with this credential gives customers greater confidence that technicians understand manufacturer protocols and modern repair challenges.
Many countries recognize the value of standardized training and repair systems to support safe, high-quality automotive repairs as vehicles become more complex.
Global Auto Body Repair Systems & Technician Training
Recently, several advanced countries have updated repair regulations and training programs to prepare for eco-friendly and autonomous vehicles. This study compared the current systems in the United States, Germany, and Japan—finding that specialized repair businesses in the U.S., Germany’s Vehicle Technician Meister training, and Japan’s quality-recognition programs offer useful models for improving domestic repair standards.
해외 자동차정비제도 현황 분석을 통한 국내 제도 개선방안 연구, 2020
How Does OEM Certification Ensure Factory-Quality Repairs?
OEM certification means shops follow manufacturer repair steps, use approved parts, and complete required calibrations and quality checks so repairs meet factory tolerances for fit, finish, and safety. That includes following published repair manuals, using calibrated measuring systems for frame alignment, applying approved adhesives and weld parameters, and performing post-repair diagnostics and ADAS calibrations when required. Factory-quality repairs reduce variability that can come from non-OEM parts or improvised techniques and help preserve vehicle warranties. Following these processes is essential for vehicles with integrated safety hardware and advanced materials—and it prepares the way for smooth insurance and claims handling.
How Does the Insurance and Accident Claims Process Work with Auto Body Repair?
After an accident, the claims process typically starts with documentation, filing a claim, and an inspection that leads to an estimate and repair authorization. From there, the repair shop coordinates parts, approvals, and scheduling. Clear communication between the shop, the vehicle owner, and the insurer helps avoid delays—especially if hidden damage appears during disassembly and a supplemental estimate is needed. Shops that act as insurance liaisons can speed approvals, submit supplements, and help arrange rentals when appropriate, reducing hassle for vehicle owners. Below is a short checklist of immediate steps to take after an accident to protect safety and simplify later repair interactions with insurers.
Immediate post-accident checklist:
- Ensure everyone is safe and call emergency services if anyone is hurt.
- Take photos of the scene and damage, and collect witness details for claims.
- Notify your insurer and get a claim number to start the repair process.
- Secure the vehicle and arrange towing to a certified repair facility if needed.
- Keep damaged parts and follow instructions from your insurer and repair shop.
Following these steps preserves evidence for claims and helps a certified shop begin repairs quickly. Next, we explain how a local facility can assist with claims and towing logistics.
What Steps Should You Take Immediately After a Car Accident?
After confirming safety, take clear photos of all vehicle damage, gather contact and insurance details, and file your claim promptly—being careful not to admit fault at the scene. Keep copies of police reports, tow receipts, and any medical records, as these can affect the claim. If towing is needed, choose a reputable provider or a certified repair shop that offers towing to ensure the vehicle reaches a facility capable of proper diagnostics and evidence preservation. Promptly contacting a repair shop helps speed estimates and clarifies insurer expectations, especially when ADAS or specialized glass replacements may be required. These steps help the claims process run smoother and reduce the risk of delays or disputes.
How Does Prime Time Collision Center Assist with Insurance Claims and Free Towing?
Prime Time Collision Center helps customers by acting as an insurance liaison—streamlining estimates and approvals and coordinating with major insurers to present documented repair scopes and supplemental estimates when hidden damage is found. We offer free 24/7 towing to bring vehicles safely to a certified repair facility that follows OEM protocols and performs ADAS recalibration, reducing logistics for owners and speeding the start of repairs. Prime Time focuses on OEM-quality repairs and backs work with a lifetime warranty so customers can trust long-term safety and workmanship. We document repairs thoroughly to help with insurer reviews and to preserve warranty and resale records. For drivers in Glendale, Burbank, Pasadena, and Los Angeles, these services reduce friction during claims and keep the repair process focused on restoring the vehicle to factory specifications.
What Advanced Technologies and Services Are Included in Modern Auto Body Repair?
Today’s collision repair combines advanced diagnostics, precise structural measurement, OEM repair procedures, and electronic recalibration—especially for vehicles with ADAS or electric drivetrains—so repairs address both mechanical and software-driven safety systems. Shops use frame racks with precise measuring tools, computerized paint-matching systems for accurate color, and diagnostic scan tools to clear codes and verify system operation. ADAS recalibration, thermal and ultrasonic repair techniques, and controlled paint booths protect finishes and ensure consistent results. The next sections describe ADAS calibration and the special considerations for electric and hybrid vehicles.
Key services in modern repair:
- Precise frame and dimension measurement systems to restore factory tolerances.
- Computerized paint color matching and controlled curing environments.
- OEM-level diagnostic tools and ADAS calibration capabilities.
These capabilities are essential when modern safety and propulsion systems intersect with collision repairs. The following sections expand on ADAS calibration and EV/Hybrid challenges.
How Is ADAS Calibration and Post-Repair Diagnostics Performed?

ADAS calibration restores camera and sensor alignment to manufacturer specifications using static and dynamic procedures with precise vehicle positioning and specialized diagnostic tools. Static calibration uses alignment targets and controlled setups in the shop to set camera and radar angles; dynamic calibration relies on driving tests so systems can re-learn lane markings and other cues. Technicians follow OEM calibration instructions and record results in repair documentation to confirm systems like automatic emergency braking, lane-keep assist, and adaptive cruise control are working correctly. Post-repair diagnostics include clearing and verifying fault codes, applying software updates if needed, and road testing to ensure safety systems are fully operational before delivery.
What Are the Challenges of Repairing Electric and Hybrid Vehicles?
Electric and hybrid vehicles bring unique challenges: high-voltage safety, battery handling, specialized structures, and integrated thermal systems that demand certified training and special tools. Repairs often require isolating high-voltage systems, following strict lockout/tagout procedures, and using manufacturer-approved parts to protect battery integrity and thermal performance. Structural repairs may call for different welding methods and adhesives suited to lightweight or mixed materials, and battery or drivetrain parts can have longer lead times and specialized diagnostic needs. Technicians must ensure repairs don’t void warranties or harm battery performance, so documented OEM procedures and trained staff are essential to restore these vehicles safely and correctly.
Why Choose Prime Time Collision Center for Your Auto Body Repair Needs?
Prime Time Collision Center is a local shop focused on OEM-quality repairs, certified training, and transparent customer service. We combine recognized certifications with practical services—like free 24/7 towing and insurance coordination—to make repairs less stressful. As an I-CAR Platinum facility, we follow factory-aligned processes for both foreign and domestic vehicles, work with all major insurers, and back our repairs with a lifetime warranty on workmanship and materials. Serving Glendale and nearby communities including Burbank, Pasadena, and Los Angeles, we document repairs, provide ADAS calibration, and source OEM-specified parts when needed. If you prioritize safety, correct sensor calibration, and long-term value, a certified approach plus lifetime warranty and towing support reduces uncertainty after an accident.
Key business features to consider:
- I-CAR Platinum certification and an OEM-quality repair focus.
- Free 24/7 towing to a certified repair facility.
- Coordination with all major insurance companies and a lifetime warranty on repairs.
- Experience with foreign and domestic vehicles and ADAS calibration capability.
These practical strengths connect the technical topics above to local service and support. The next section outlines the specific expertise and equipment that make this work possible.
What Expertise and Equipment Set Prime Time Apart?
Prime Time invests in technician training and modern equipment—documented by I-CAR Platinum certification and shop tooling like frame measurement systems, calibrated paint-matching technology, and ADAS calibration rigs—to deliver OEM-aligned structural and electronic repairs. Our processes rely on published OEM procedures and diagnostic tools to restore structural geometry, safety sensor positions, and electronic systems accurately. Controlled-environment paint booths and established parts sourcing help produce consistent finishes and reduce delays, while insurance liaison work cuts administrative friction for customers. These technical investments are the foundation for reliable repairs and the lifetime warranty we provide on completed work.
How Do Customer Testimonials Reflect Our Commitment to Quality and Safety?
Customer reviews often highlight clear communication, thorough documentation, and dependable repair work without unnecessary upsells—signs of a shop that focuses on correct, honest repairs. Common themes include accurate estimates, transparent supplemental approvals when hidden damage is found, and confirmation that safety systems and ADAS performed correctly after calibration. Many customers also note the convenience of free towing and insurance coordination, plus peace of mind from lifetime warranty coverage. Aggregated feedback like this helps show that a facility follows certified processes and puts customers first, rather than relying on single anecdotal claims.
For anyone comparing repair options, documented procedures, certified training, transparent claims support, and warranty coverage point to a practical path for safe, factory-quality repairs.
Frequently Asked Questions
What should I look for when choosing an auto body repair shop?
Look for certifications, customer reviews, and experience with your vehicle make and model. I-CAR Platinum is a good indicator of ongoing technician training. Check whether the shop follows manufacturer repair procedures and uses OEM or approved parts. Clear, itemized estimates and consistent communication are important. Finally, confirm a warranty on repairs so you have ongoing protection and peace of mind.
How can I ensure my vehicle‘s warranty is protected during repairs?
To protect your warranty, choose a shop that follows OEM repair procedures and uses manufacturer-approved parts. Keep detailed documentation of all repairs—estimates, invoices, and warranty information—and consult your vehicle’s warranty policy or the manufacturer if you’re unsure about approved repair practices. Proper documentation helps prevent disputes with the manufacturer or insurer.
What are the benefits of using OEM parts versus aftermarket parts?
OEM parts are built to the vehicle maker’s specifications and typically offer the best fit, safety, and performance. Using OEM parts can protect warranty coverage and help maintain resale value. Aftermarket parts can be more affordable, but quality and fit can vary—making OEM the safer choice for safety-critical components and structural repairs.
How does the repair timeline vary based on damage severity?
Timelines depend on damage severity. Minor work like paintless dent removal or small paint jobs can take a few days. Major repairs—frame straightening, extensive paint blending, or parts replacement—can take several days to weeks. Factors include parts availability, repair complexity, and the need for calibrations or additional inspections (especially on vehicles with ADAS).
What role does insurance play in the auto body repair process?
Insurance typically covers repair costs after a covered accident. After filing a claim, an adjuster will assess damage and approve an estimate. Ongoing communication between the shop and insurer helps avoid approval delays, particularly if hidden damage requires supplements. Knowing your policy coverage and cooperating with your repair shop can help the process move smoothly.
What are the common safety features that need calibration after repairs?
Common systems that often need calibration include Advanced Driver Assistance Systems (ADAS) such as lane departure warning, adaptive cruise control, automatic emergency braking, and blind-spot detection. These systems rely on precise sensor alignment, so recalibration with specialized equipment and OEM procedures is critical after impacts or part replacement.
How can I prepare my vehicle for a successful repair experience?
Document damage with photos and notes, gather insurance and vehicle information, and share any prior repair history with the shop. Ask questions about the repair plan, timeline, and warranty. Remove personal items from the vehicle before drop-off and follow any pre-repair instructions the shop provides. Clear communication and documentation make the repair process smoother.
Conclusion
Knowing how collision repair works helps you make choices that prioritize safety, quality, and long-term value. Choosing a certified facility like Prime Time Collision Center means your vehicle is repaired using OEM-aligned methods, backed by trained technicians and clear documentation. That commitment restores your vehicle’s integrity and protects your investment. If you need repairs, contact us to learn how we combine certified processes, ADAS calibration, and lifetime warranty coverage to get you back on the road with confidence.


