


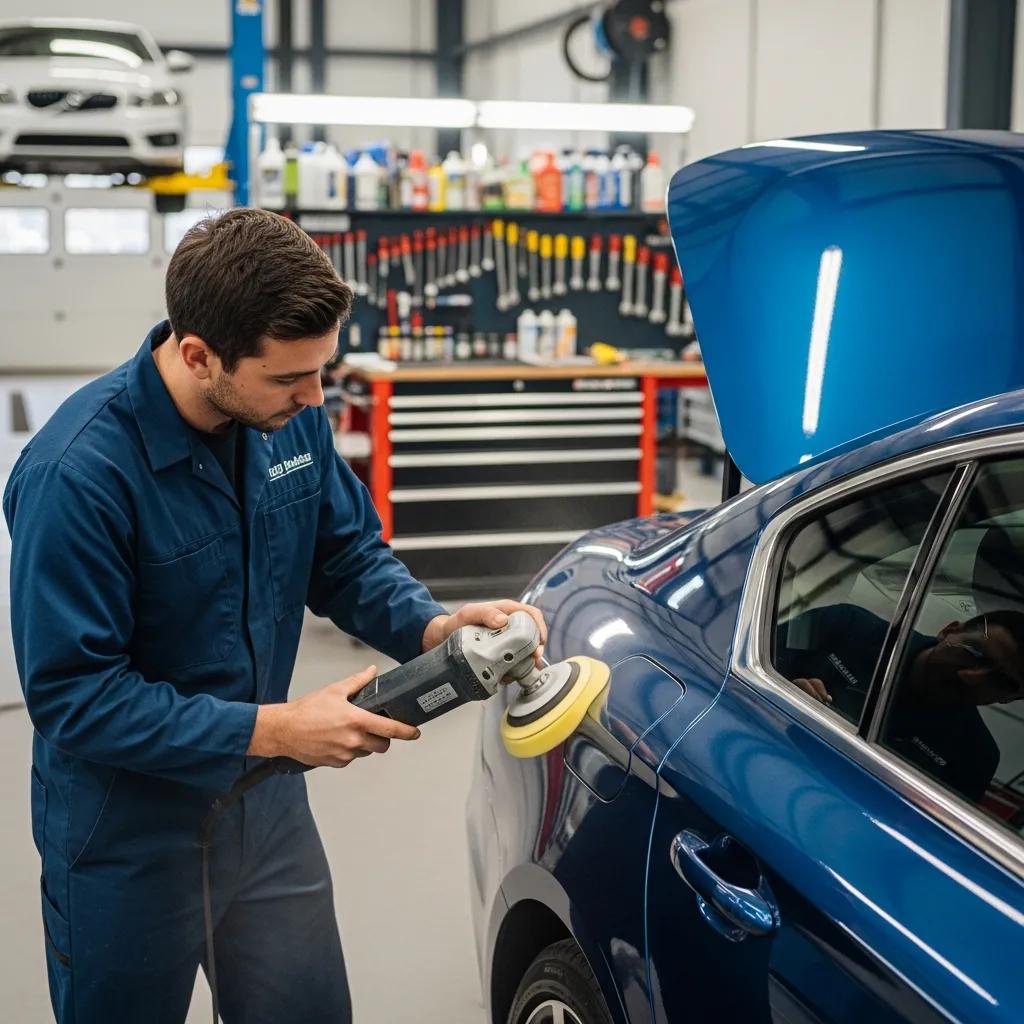
Expert Clear Coat Repair & Restoration — Professional Paint Correction & Scratch Removal in Glendale, CA
Clear coat repair restores the clear top layer that protects your car’s paint — bringing back shine, color depth and weather resistance while preventing further damage to the layers beneath. This guide explains what clear coat damage looks like, why it happens, and how professional paint correction and targeted re-clear techniques recover both appearance and protection using OEM-approved methods. You’ll learn how our technicians assess scratches, swirls, oxidation and peeling; the step‑by‑step repair workflow; and long‑term protection options like ceramic coatings and paint protection film. We also cover cost factors, how insurance usually handles these repairs, and where to see proof of successful restorations so you can choose the right path for your vehicle with confidence.
What Causes Clear Coat Damage and How Can It Be Repaired?
Clear coat wears down for a few common reasons: sunlight and heat break down the polymer, environmental fallout and acid rain embed contaminants, and rough washing or physical contact causes swirls and scratches that get worse over time. Knowing whether damage is chemical (UV and contaminants) or physical (abrasion and impacts) helps determine if paint correction is enough or if a re-clear (reapplying clear coat) is needed. Repairs focus on removing or smoothing defects with controlled abrasion and polishing, then restoring protection with sealants, ceramic coatings, or a new clear layer to reduce fading and corrosion risk.
The list below shows typical causes and straightforward fixes you can use when checking your vehicle.
- UV exposure: Breaks down the clear coat and causes chalking — fix with compounding and protective coatings.
- Environmental fallout: Iron deposits and tar can etch the surface — fix with chemical decontamination and a clay bar.
- Improper washing: Rough techniques create swirl marks — fix with correct wash methods and polishing.
- Mechanical scratches: Deep scratches can reach the basecoat and may need spot‑sanding and re‑clear — fix depends on depth.
- Acid rain and bird droppings: Chemical etching needs prompt cleaning and paint correction.
These causes line up with repair severity: light hazing or swirls usually respond to paint correction, while peeling or large clear coat loss often needs re‑clear and refinishing. Telling surface problems from penetrative damage is the first step to a repair that restores both looks and protection for the long term.
Common Clear Coat Problems: Scratches, Swirl Marks, Oxidation, and Peeling
Scratches, swirl marks, oxidation and peeling are different ways a clear coat can fail, and each has a different visual cue and repair path. Scratches are lines that can cut through to the basecoat; swirls are circular micro‑abrasions visible in direct light; oxidation shows as a dull, chalky haze from UV damage; and peeling is clear coat delaminating and lifting off the paint. Technicians judge severity by sight, depth checks and touch — surface defects polish away, while penetrative damage needs re‑clear or panel refinishing.
Whether a problem is fixable with polishing or requires repainting depends on how deep the damage goes. Accurate diagnosis avoids unnecessary repainting and ensures the selected method brings back gloss and protects the layers underneath.
How Does Clear Coat Damage Affect Vehicle Appearance and Protection?
The clear coat is the first line of defense against sun, water and abrasion. When it fails, the car looks dull, the color loses depth, and visible defects hurt curb appeal and resale value. Functionally, a compromised clear coat speeds up paint fading, allows moisture to reach metal, and raises the likelihood of rust and delamination.
Loss of that protective layer increases long‑term repair costs and can create structural and cosmetic issues. Restoring the clear coat improves how the car looks and brings back the barrier that preserves paint and resale value.
What Is the Professional Clear Coat Repair and Paint Correction Process?
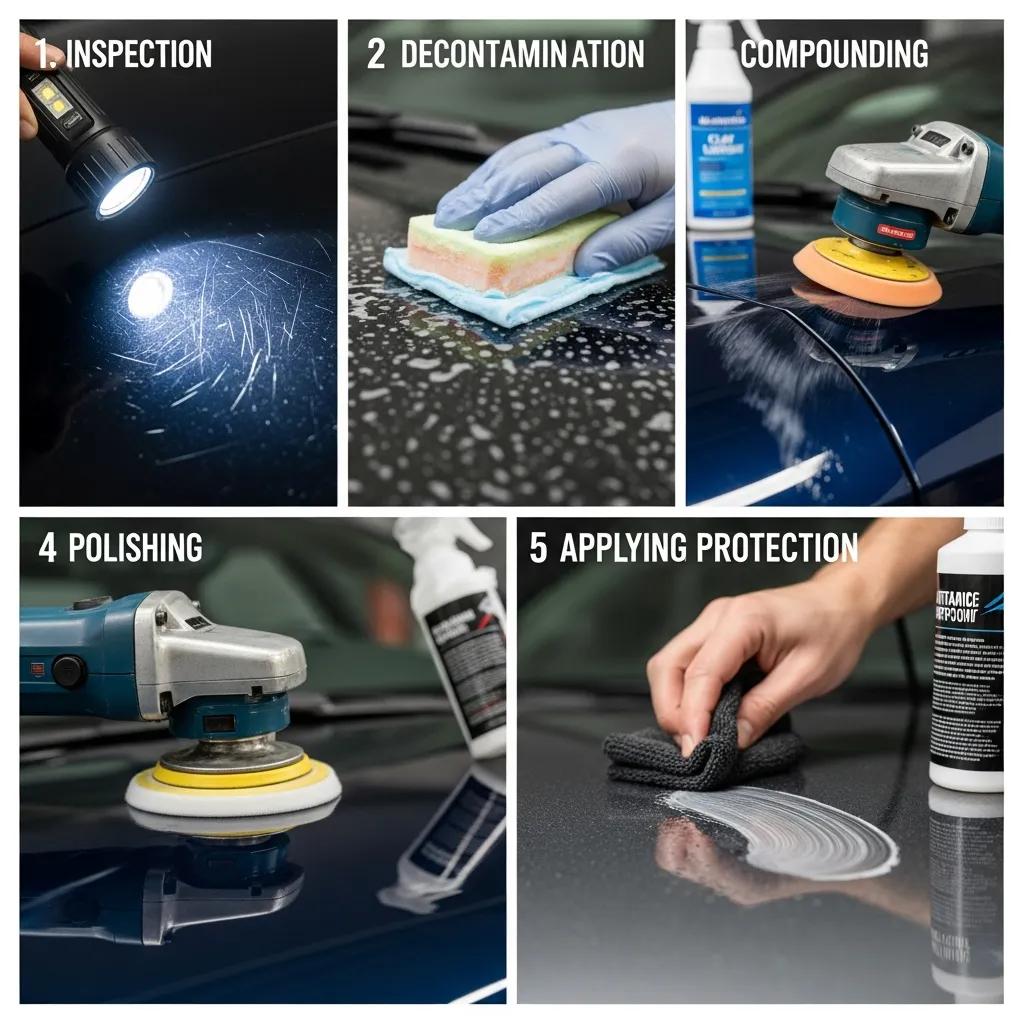
Professional clear coat repair and paint correction follow a staged process: inspection, decontamination, compounding, polishing and protection. Inspection determines defect type and depth and whether paint correction will do or a re‑clear is required. Decontamination removes embedded fallout and organic deposits that would interfere with polishing. Compounding uses abrasives and rotary or dual‑action polishers to remove defects; polishing refines the surface to high gloss. Final protection — sealant, ceramic coating or re‑clear — restores hydrophobic and UV resistance.
The table below compares the main steps, what tools are used and what outcome to expect.
| Step | Time / Tools | Outcome |
|---|---|---|
| Inspection | Visual check, depth gauges, photo documentation | Defines scope and records the car’s starting condition |
| Decontamination | Iron remover, tar solvent, clay bar, pressure wash | Removes embedded contaminants so polishing is even |
| Compounding | Abrasive compounds, rotary or dual‑action polishers | Eliminates swirls, light oxidation and shallow scratches |
| Polishing | Fine polish, soft pads, finishing polisher | Restores gloss and optical clarity |
| Protection | Sealant, ceramic coating, or re‑clear topcoat | Re‑establishes hydrophobic properties, UV resistance and durability |
This breakdown shows how each step addresses specific failures and sets realistic expectations for visual and protective results. Thorough inspection guides the work and helps preserve OEM paint where possible.
Prime Time Collision Center follows OEM‑approved repair standards, employs I‑CAR Platinum certified technicians, and documents repairs to support warranties and insurance claims. That approach keeps repairs aligned with manufacturer expectations without compromising safety or finish quality.
Here’s a concise workflow that often appears as a quick reference or featured snippet.
- Inspect and document defects and clear coat depth to decide correction versus re‑clear.
- Use chemical decontamination so polishing works on a clean, even surface.
- Compound to remove defects, then refine with polishing to restore gloss.
- Apply a protective sealant, ceramic coating, or perform a controlled re‑clear where needed.
- Complete final QA and photo documentation for your records and insurer review.
This sequence reflects how technicians work to deliver predictable, measurable improvements in gloss and protection and extend clear coat life.
Step-by-Step Paint Restoration: Inspection, Decontamination, Compounding, Polishing, and Protection
During inspection we photograph damage, measure clear coat thickness when needed, and note any color‑match concerns for adjacent panels. Decontamination — iron removers and clay bars — strips particles that would scratch during polishing. Compounding uses progressively finer abrasives to remove swirls and light scratches by taking off a thin, controlled layer of clear coat. Polishing smooths the surface with finishing products and pads to maximize gloss and color depth. Finally, protection with a polymer sealant or ceramic coating restores hydrophobicity and UV resistance.
Each step prepares the surface for the next, avoiding over‑cutting and preserving OEM paint layers when possible. Keeping clear photo and written records during the process also supports insurance claims and warranty requirements.
How Does Paint Correction Remove Scratches and Restore Gloss?
Paint correction fixes optical defects by reshaping the surface: compounding removes high spots around scratches and swirls, and polishing smooths micro‑abrasions so light reflects evenly. Technicians use the right grit progression and pad choice to remove only what’s necessary, avoiding over‑thinning. Restored gloss comes from a uniformly smooth surface that reflects light properly; color depth returns once hazing is removed.
Technicians monitor clear coat thickness to keep within OEM tolerances and use targeted spot repair where deep scratches can’t be corrected by polishing alone. Achieving high gloss and clarity requires the right tools and an understanding of how the paint layers — primer, basecoat, clear coat — interact during controlled material removal.
Why Choose OEM Certified Clear Coat Repair at Prime Time Collision Center?
OEM‑certified clear coat repair follows manufacturer sequences and materials so safety, appearance and warranty integrity are preserved. OEM procedures ensure proper prep, approved products and documented steps that lower the risk of color mismatch, premature failure or warranty disputes. Choosing OEM‑certified repair improves durability, helps maintain correct color match and protects resale value by keeping repairs aligned with factory standards.
Prime Time Collision Center backs this approach with clear trust signals: I‑CAR Platinum certified technicians, strict adherence to OEM procedures, a lifetime warranty on repairs, and hands‑on help with insurance claims. Together, those elements give you confidence that repairs will meet manufacturer expectations and deliver a durable finish that protects your vehicle.
- I‑CAR Platinum certified technicians have completed advanced training for complex repairs and industry best practices.
- Following OEM repair procedures reduces the chance of paint mismatch and ensures proper substrate preparation.
- A lifetime warranty provides long‑term assurance of workmanship and finish durability.
That combination explains why OEM alignment matters and how technician certification leads to better outcomes and lower long‑term cost.
Benefits of I-CAR Platinum Certified Technicians for Quality Repairs
I‑CAR Platinum certification shows a commitment to ongoing training and mastery of modern collision repair techniques, including paint and clear coat work. Certified technicians follow current manufacturer guidance, which lowers the chance of errors that could affect adhesion or finish quality. In practice this means fewer reworks, better color matching and safer repairs when cosmetic work overlaps with structural or safety systems.
Customers benefit from technicians who understand paint layers — primer, basecoat, clear coat — and how each must be handled to match manufacturer intent. Certification also smooths communication with insurers and OEMs, since documented training supports technical repair decisions.
How OEM Certified Repairs Ensure Durability and Warranty Compliance
OEM‑aligned repairs follow manufacturer specs for surface prep, paint layering, masking, drying times and environmental controls — all factors that affect long‑term durability. Using approved materials and documented sequences prevents issues like early delamination or color shift and helps preserve warranty eligibility by showing the repair met required protocols.
Compliance is usually shown with written procedures, photos and retained repair records. Those practices protect owners from unexpected failures and help maintain resale value by proving the vehicle was repaired to factory standards.
How Can Automotive Paint Protection Extend the Life of Your Clear Coat?
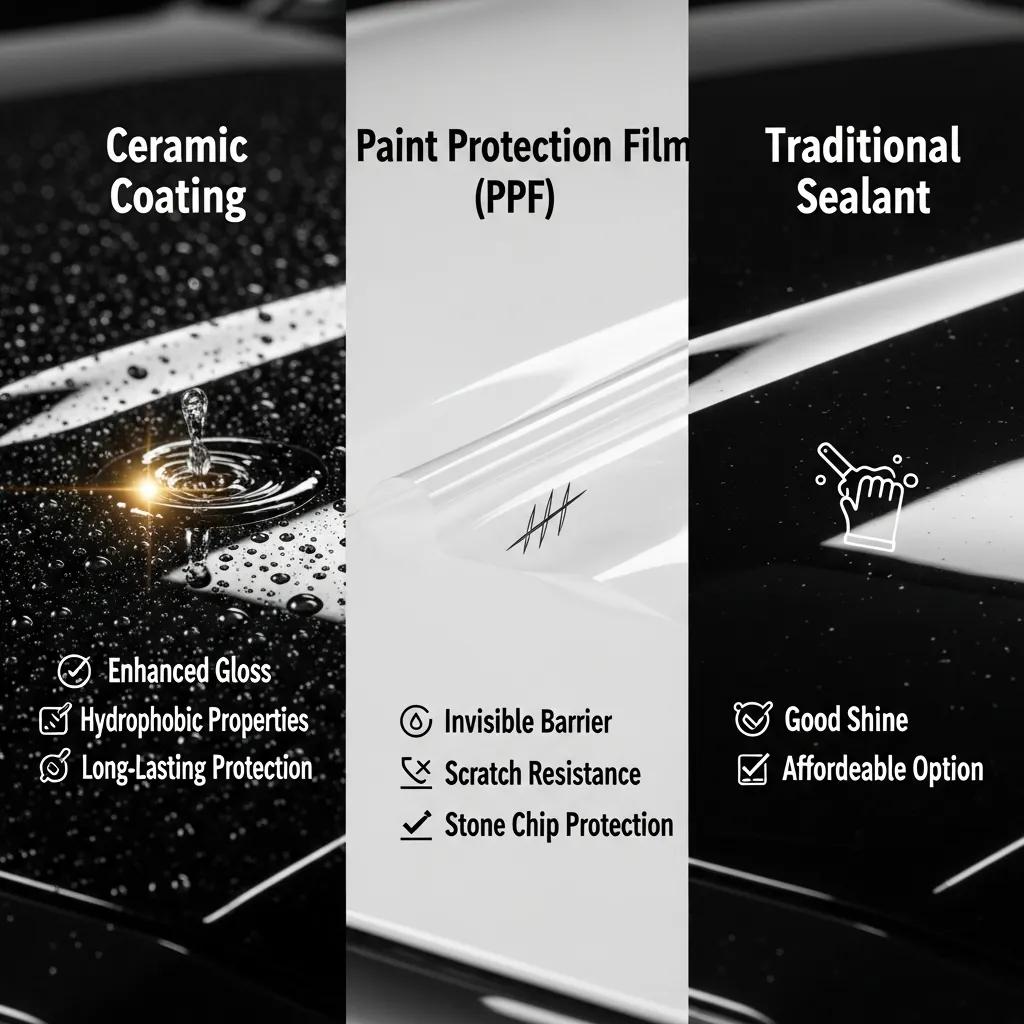
Paint protection options — ceramic coatings, paint protection film (PPF), and traditional sealants — extend clear coat life in different ways: adding surface hardness, repelling water and contaminants, or providing a sacrificial physical layer. Ceramic coatings bond chemically to increase hardness and repellency; PPF is a clear urethane film that absorbs chips and abrasion; sealants offer short‑term gloss and protection. The best choice depends on how you use the vehicle, how long you want protection to last, and your budget.
The table below compares benefits and typical lifespans so you can pick the right protection for your needs.
| Product | Protection Type | Typical Lifespan / Benefits |
|---|---|---|
| Ceramic Coating | Chemically bonded silica layer | Years of hydrophobicity, added hardness and easier maintenance |
| Paint Protection Film (PPF) | Physical urethane film | Multi‑year sacrificial barrier against chips and abrasion |
| Traditional Wax/Sealant | Polymer or natural wax layer | Short‑term shine and water beading; needs frequent reapplication |
The tradeoffs are clear: ceramic coatings offer chemical resistance and long‑lasting hydrophobicity, PPF protects against impacts, and waxes are a lower‑cost short‑term option. Your vehicle’s use — daily commuting, highway miles or show‑quality care — should guide the choice.
If you drive daily on debris‑prone roads, PPF is a smart pick for high‑impact areas; if you want long‑term gloss and easier maintenance, a professional ceramic coating is a great investment after paint correction.
Advantages of Ceramic Coatings for Long-Term Paint Protection
Ceramic coatings bond to the clear coat to form a hard, hydrophobic layer that resists chemical etching and makes contaminants easier to remove. Benefits include better resistance to fallout, longer‑lasting water beading that reduces spotting, and enhanced gloss that preserves the results of paint correction. Ceramic coatings slow UV degradation and help protect repaired clear coat from everyday wear.
Maintenance is simpler after application, though proper washing and drying still matter to preserve the coating. Ceramic coatings work best over professionally corrected finishes because they lock in gloss and protect the investment made during restoration.
How Paint Protection Film Shields Against Environmental Damage
PPF is a clear, durable urethane film applied to high‑impact areas to absorb stone chips, abrasion and light chemical exposure. It acts as a sacrificial layer — taking the hits that would otherwise damage the clear coat — and can be replaced without repainting the underlying panel. That makes PPF especially valuable on bumpers, hoods, mirrors and rocker panels where impact risk is highest.
PPF fits well into a paint correction workflow: correct the finish first, then apply film to protect the freshly restored surface. That sequence preserves appearance and function, making PPF a strategic choice for vehicles often exposed to road hazards.
What Should You Know About Clear Coat Repair Costs and Insurance Claims?
Costs for clear coat repair vary because work ranges from a simple polish to a full panel re‑clear or repaint. Labor, materials and blending requirements all affect price. Insurance coverage depends on your policy and the damage cause — collision‑related clear coat damage is often covered, while wear‑and‑tear or maintenance issues usually are not. Getting accurate estimates, photographing damage and working with a shop that follows OEM procedures improves the chance of insurer approval.
The table below clarifies common repair types, the main cost drivers and whether insurance is likely to cover them.
| Repair Type | Typical Cost Drivers | Insurance Likely Coverage |
|---|---|---|
| Paint Correction (polish/compound) | Labor hours, products used, number of panels | Usually not covered if wear‑related; covered if from a covered incident |
| Spot Re-clear / Local Refinish | Materials, blending, masking and labor | Often covered if damage is from collision or vandalism |
| Full Panel Repaint / Replacement | Paint materials, color match, parts and labor | Typically covered in collision claims; deductible applies |
| PPF or Ceramic Protection | Material cost, prep time and surface correction | Usually not covered; owner‑paid protection services |
This table helps you see where costs cluster and how insurers usually respond. Clear documentation and OEM‑compliant repair plans make approvals smoother.
Prime Time Collision Center works with all major insurers, provides free estimates and coordinates documentation to help streamline approvals and repairs. That support reduces paperwork for you and helps align repair plans with insurer expectations.
Below are the primary cost drivers that commonly determine clear coat repair pricing and timelines.
- Severity and area affected: larger or deeper damage needs more labor and materials.
- Need for blending or adjacent panel work: color blending increases complexity and time.
- Type of protection added afterward: ceramic coatings or PPF raise material and labor costs.
- Access to OEM materials or specialized products: factory‑grade materials and certified processes affect price.
Factors Influencing Clear Coat Repair Pricing
Price differences come from technical needs and material choices: how much clear coat must be removed, how many panels are involved, whether color blending is required, and what protective finish you choose. Labor rises with complex panel shapes or disassembly needs. Material cost varies — premium ceramic coatings and factory‑matched paints cost more than standard sealants.
Using OEM‑approved materials and following manufacturer sequences can increase upfront cost but typically lowers the risk of failure and rework. Knowing these cost drivers helps you weigh short‑term savings against long‑term durability and resale value.
How Prime Time Collision Center Assists with Insurance Claims
We assist vehicle owners by preparing detailed estimates, photographing damage and communicating directly with insurers to explain OEM‑compliant repair procedures. Prime Time Collision Center works with all major insurance companies, offers free estimates, and helps coordinate approvals to reduce delays and confusion. We’ll clarify the need for blending, re‑clear or OEM parts to support the claim.
This hands‑on assistance cuts administrative burden for customers and increases the chance insurers approve repairs that follow OEM standards, ensuring the finished work protects the vehicle and preserves warranty‑eligible procedures.
Where Can You See Before and After Examples of Expert Clear Coat Restoration?
Seeing before‑and‑after examples sets realistic expectations and demonstrates technical skill. Good case studies show the vehicle, the initial condition, the exact corrective steps and the final outcome — highlighting restored gloss, matched color and protection installed. Galleries and documented examples give tangible proof of our process and the effectiveness of paint correction plus protection.
Here’s what a helpful case study entry should include so you can judge quality:
- Vehicle type and initial condition: a clear description of the visible damage.
- Process summary: inspection, correction steps and protection applied.
- Outcome measures: gloss improvement, percentage of defect removal and protection installed.
- Photographic documentation: side‑by‑side images showing before and after.
Case Studies Showcasing Clear Coat Scratch Removal and Paint Correction
Short case studies focus on problem, process and result. For example, a daily driver with hood swirl marks and light oxidation received inspection, chemical decontamination, two‑stage compounding and fine polishing, followed by a ceramic seal to restore gloss and hydrophobicity. Another example: a bumper with rock‑chip scuffs received localized re‑clear and PPF to protect the basecoat and stop cracks from spreading. Each case explains why the chosen steps matched the damage and how protection extended the repair’s life.
These examples give realistic timelines and outcomes and show how repair choices support long‑term protection goals.
Customer Testimonials Highlighting Satisfaction with Our Services
Customer feedback often highlights clear communication, the quality of the finish and help with insurance as key satisfaction drivers. Common praise includes thorough inspection documentation, visible before‑and‑after improvements, and less hassle because we coordinate with insurers. Reviews that mention consistent color match, durable finishes and smooth claims handling point to a shop that delivers both cosmetic and administrative value.
Look for patterns in reviews—repeated praise for workmanship and claim support suggests a shop that reliably delivers great results; those customers then often request estimates or view our restoration gallery.
Frequently Asked Questions
1. How often should I have my clear coat inspected?
We recommend an inspection at least once a year, and sooner if your car spends a lot of time in sun or harsh weather. Annual checks catch early signs like oxidation or minor scratches so you can fix them before they get worse. If you notice dullness, color change, or recent exposure to extreme conditions, schedule an inspection right away — early action saves money and time.
2. Can I perform clear coat repair myself, or should I hire a professional?
Minor touch‑ups and light polishing can be done with DIY kits, but we usually recommend a pro for the best, long‑lasting result. Professionals have the right tools, products and experience to follow OEM standards and properly diagnose damage. Complex repairs attempted without experience can make things worse or lead to uneven finishes.
3. What are the signs that my clear coat needs immediate attention?
Seek prompt help if you see significant peeling, deep scratches that expose the basecoat, or widespread oxidation that makes paint look chalky. Other red flags: water spots that won’t wash off, a persistent rough or chalky feel, or swirl marks that don’t disappear after washing. If you notice any of these, contact a professional so the problem doesn’t get worse.
4. How long does the clear coat repair process typically take?
Time depends on the damage. Minor polishing and compounding can take a few hours; localized re‑clear or panel refinishing may take a day or more because of prep, drying and blending. The exact timeline depends on the extent of correction, the number of panels and any protective coating you choose. We’ll provide a realistic time estimate after inspection.
5. Are there any maintenance tips to prolong the life of my clear coat?
Wash your car regularly with a gentle, pH‑balanced soap and soft microfiber towels to avoid added scratches. Apply a quality wax or sealant every few months for extra protection. Whenever possible, park in the shade or use a cover to limit sun exposure. Finally, inspect the finish periodically and address small issues quickly — timely maintenance prevents bigger repairs.
6. What is the difference between ceramic coatings and traditional wax for clear coat protection?
Ceramic coatings form a durable, chemically bonded layer that increases hardness and hydrophobic properties and can last for years. They resist UV, chemicals and contaminants far better than wax. Traditional wax or sealant gives a short‑term shine and water beading but needs reapplication every few months. If you want long‑term protection and lower maintenance, ceramic coatings are the stronger option.
7. How can I find a reputable clear coat repair service?
Start with online reviews and testimonials, and look for shops with certifications like I‑CAR Platinum. Ask friends or family for recommendations and visit the shop to check cleanliness and professionalism. Review before‑and‑after galleries and ask for estimates and warranty details. A reputable shop will be transparent about process, pricing and guarantees.
Conclusion
Restoring your clear coat improves how your car looks and renews the protection that keeps paint, metal and resale value safe. By understanding what causes clear coat failure and the professional repair options available, you can make informed choices that protect your vehicle long term. If you’d like help, Prime Time Collision Center offers free estimates and OEM‑aligned repair options — contact us today and let our team restore your vehicle’s shine.


