


Professional Headlight Restoration for Clearer Vision and Safer Driving
If your headlights look yellowed, cloudy, or noticeably dim after years in the sun, it’s more than an eyesore—it’s a safety issue. Headlight restoration removes oxidation from polycarbonate lenses to recover beam output and cut nighttime glare. This guide explains what restoration does, why clear lenses matter for visibility and inspections, and why a professional process lasts longer than most DIY fixes. You’ll learn how oxidation and micro-abrasions scatter light, the step-by-step professional workflow, when OEM replacement is the safer choice, and how to handle insurance after collision damage. We’ll also compare costs and benefits between restoration and assembly replacement, outline what to bring to an estimate, and explain how certified technicians protect your vehicle’s value. Helpful search terms like yellow headlight fix, headlight oxidation removal, and UV protective coating headlights are included to make it easier to find the right service and understand the technical reasons behind our recommendations.
Why headlight clarity matters for safety
“Headlight clarity” describes the lens condition and how well your headlight projects usable light down the road. When lenses degrade, measured light output can drop dramatically—by as much as 60–70% versus a clear lens. Polycarbonate oxidizes and forms a cloudy surface that scatters light, shortening beam reach and increasing stray glare that reduces contrast for you and oncoming drivers. Lower beam intensity increases reaction times and stopping distance at night, raising the risk of collisions with pedestrians, animals, or obstacles. Restoring clarity improves nighttime visibility, reduces glare-related fatigue, and helps you meet inspection standards where they apply. Next, we break down how yellowing and fogging actually reduce light performance and what to expect from a professional assessment.
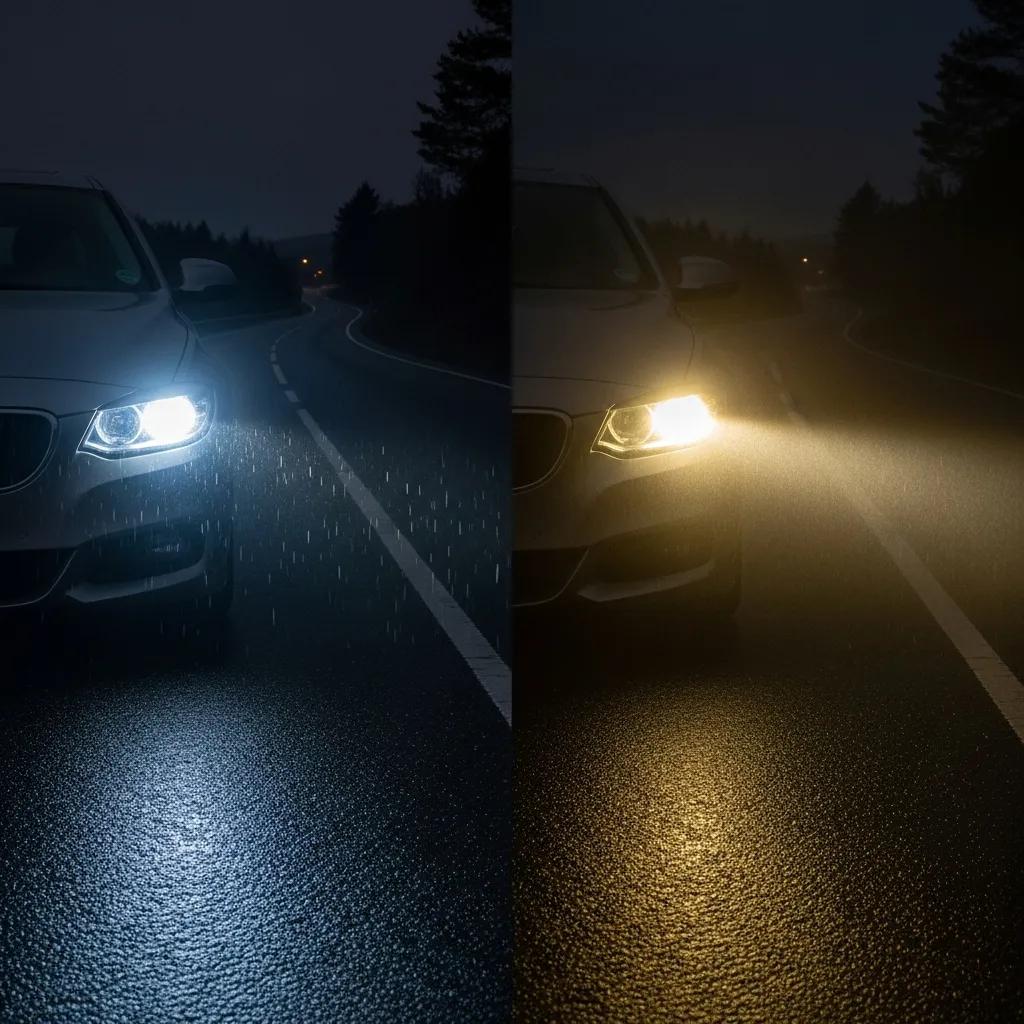
How foggy or yellowed headlights reduce nighttime visibility
Clouded headlights scatter and diffuse the light that should form a focused beam, dropping lux levels at common stopping distances. UV exposure and road wear create micro-abrasions and a yellow cast that attenuate blue-rich light and shift color temperature—making signs and lane markings harder to read. As light disperses, effective beam throw shortens and glare increases, which can double the time it takes to spot hazards in low light. Professional before-and-after lux measurements typically show noticeable gains after restoration, which translates into real safety improvements for drivers. Understanding this optical effect also highlights the inspection and legal risks of driving with cloudy headlights.
Legal and safety risks of cloudy headlights
Cloudy headlights can cause inspection failures or citations where luminosity and beam aim are checked, and they may complicate liability after an accident if poor illumination contributed to a collision. Beyond inspections, reduced lighting lowers your ability to detect hazards early, cutting the time available for evasive action—something insurers or courts may consider when determining fault. A documented professional inspection and restoration show you’ve taken reasonable maintenance steps, especially after collision repairs. We recommend a trained technician evaluate lens condition and either restore or replace parts to recover OEM-equivalent beam performance; the next section explains how professional restoration achieves that.
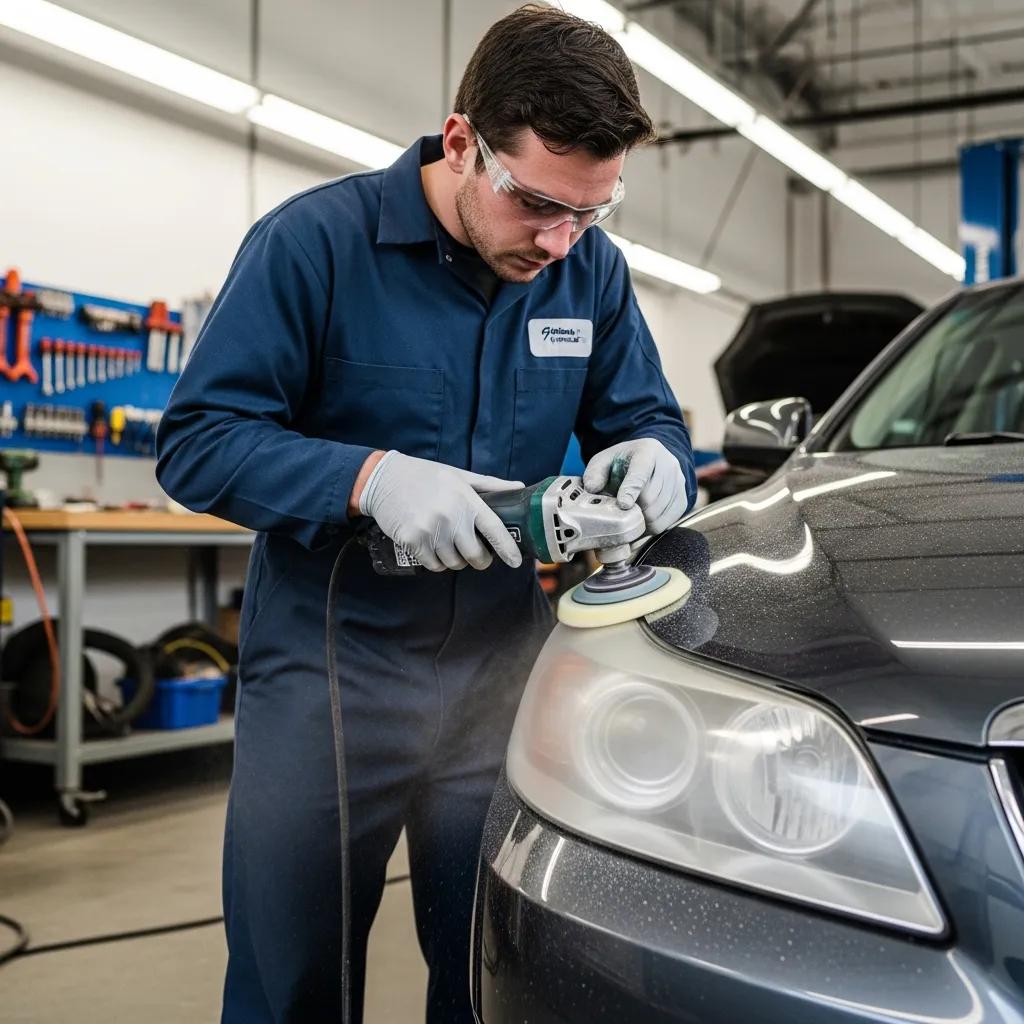
Prime Time Collision Center’s expert headlight restoration process
Professional headlight restoration is a controlled, multi-stage process that removes degraded surface material and returns the lens to a smooth, optically correct finish before applying a UV-blocking sealant to slow re-oxidation. We start with a detailed inspection to separate superficial oxidation from structural damage that needs replacement. Then we do progressive wet sanding to remove oxidized layers, precision polishing to restore clarity, and finally apply a durable UV protective coating. Technicians verify beam pattern, aim, and intensity after the work to make sure the assembly meets safe performance expectations. This sequence reduces scatter and restores usable lux levels while extending lens life versus untreated surfaces. Below is an itemized look at each step and its benefit.
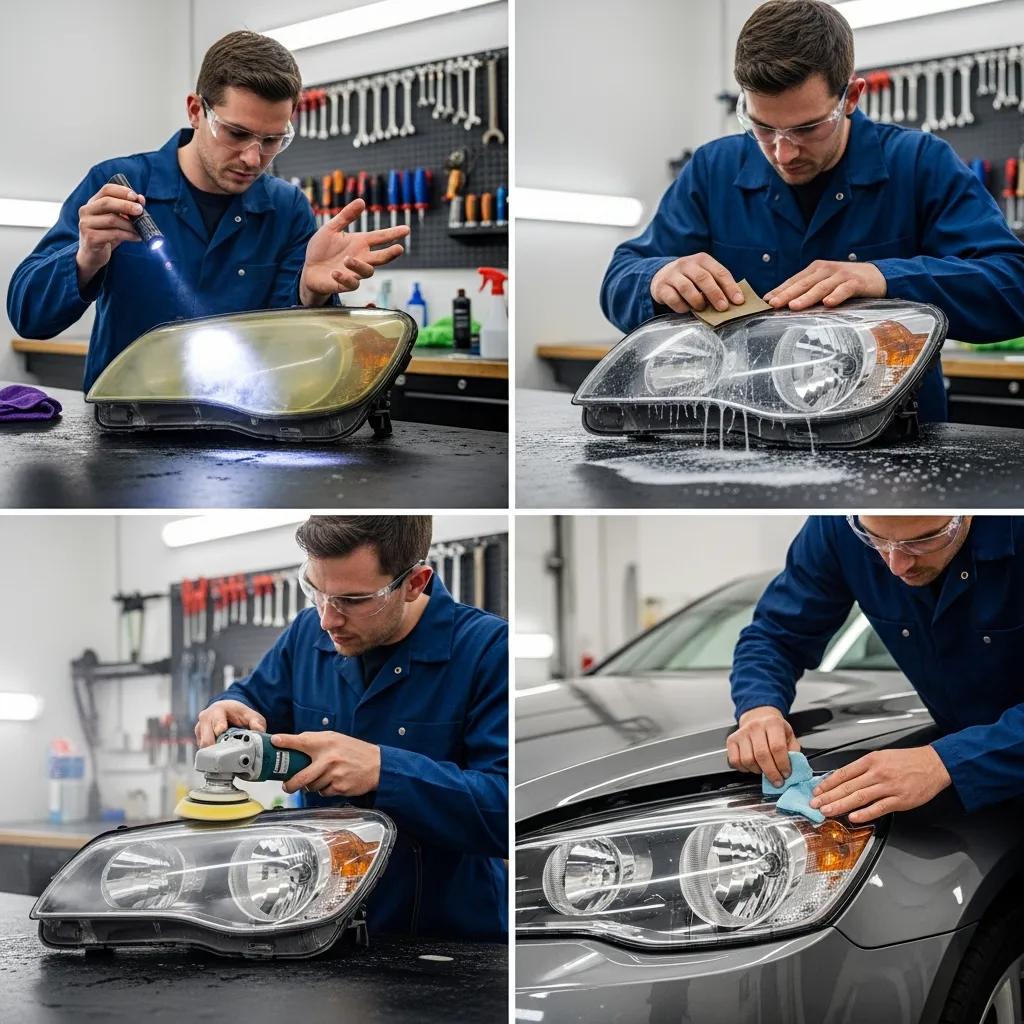
Steps involved in restoring headlight clarity
Our restoration follows a careful sequence designed to bring a clouded lens back close to factory optical quality while protecting surrounding trim and coatings. First, we inspect and clean the lens to determine the oxidation depth and verify housing integrity—this decides whether restoration is appropriate. Next, graded wet sanding removes oxidized and micro-scratched layers until a smooth substrate appears, followed by machine polishing with compounds that remove sanding haze and recover clarity. Finally, a UV protective coating is applied and cured to lock in the results. Jobs typically take one to several hours depending on severity. Knowing these steps sets realistic expectations for results and turnaround time.
| Process Step | Action | Outcome |
|---|---|---|
| Inspection & Cleaning | Hands-on assessment and removal of surface grime | Determines restoration eligibility and sets a clarity baseline |
| Progressive Sanding | Wet sanding with graded abrasives to strip oxidized layers | Removes haze and micro-scratches to expose clearer substrate |
| Precision Polishing | Machine polishing with fine compounds to restore optical finish | Recovers beam clarity and reduces light scatter |
| UV Protective Sealing | Apply UV-blocking sealant and allow proper curing | Slows re-oxidation and extends clarity lifespan |
Each stage matters: inspection prevents misdiagnosis, sanding and polishing bring back optical performance, and sealing preserves the work for longer.
How UV protective coating extends headlight life
A UV protective coating works as a barrier that absorbs or reflects ultraviolet rays and shields polycarbonate from the chemical breakdown that causes yellowing and micro-cracks. These coatings are formulated to adhere to a properly polished lens and can extend the interval between restorations by months to a few years, depending on sun exposure and local conditions. Correct application needs a clean, polished surface and controlled curing—otherwise the coating can fail early. Maintenance is simple: wash lenses with mild soap, avoid abrasive cleaners, and consider periodic protectants to preserve the sealant. Knowing how coatings perform helps you decide when OEM parts or certified technicians are the right choice for safety-critical repairs.
Why OEM parts and I-CAR Platinum techs matter for headlight repairs
Using OEM headlight parts and technicians with industry certifications ensures repairs preserve beam patterns, fitment tolerances, and safety-related performance after collisions or component replacements. OEM parts are built to factory specs, so lens geometry, reflector alignment, and integration with aiming/leveling systems match the original design. I-CAR Platinum certification shows technicians have the required training and follow validated procedures, reducing the risk of misassembly or misaligned optics that can cause glare or blind spots. Together, OEM components and certified technicians protect vehicle safety systems and resale value—and they reduce the chance of delays or disputes with insurers over part authenticity. These considerations matter when choosing restoration versus replacement after major damage.
Why choose OEM headlight parts over aftermarket options?
OEM assemblies match factory specifications for beam pattern, material properties, and electronic integration—helping you stay compliant and maintain correct headlight aim. Aftermarket parts can vary in lens curvature, reflector finish, and material quality, which may change beam distribution, create glare, or interfere with adaptive features. Choosing OEM lowers the chance of fitment problems, electrical mismatches, and warranty issues while keeping intended nighttime visibility and resale value intact. When the housing or aiming system is structurally damaged, OEM replacement is usually the safest path to restore full function instead of relying on restoration alone.
What I-CAR Platinum certification means for headlight work
I-CAR Platinum shows a shop’s techs have completed an industry-recognized curriculum covering collision repair fundamentals, specialized systems, and ongoing training to stay current with vehicle technology. For headlights, that means technicians understand how lighting ties into sensors, aiming systems, and vehicle electronics—so repairs keep systems functioning correctly. Certification promotes consistent quality, reduces rework, and gives owners confidence that the shop follows best practices. Ask about relevant certifications when choosing a repair provider—trained technicians make a measurable difference in safety and claims acceptance.
Navigating insurance claims for headlight restoration after an accident
Filing an insurance claim for headlight repairs follows a straightforward workflow: document the damage, get a professional estimate, notify your insurer, and coordinate the adjuster’s review and repair approval. Clear photos, an objective estimate, and notes about the incident speed adjuster decisions and reduce scope disputes. Professional shops provide itemized estimates, work with adjusters, and advise whether restoration or OEM replacement is the safer option for compliance. Prime Time Collision Center helps by offering free estimates, adjuster coordination, and towing support when needed—services that simplify the administrative side for vehicle owners. The checklist below outlines the practical steps.
- Document the damage with clear photos and notes about the incident.
- Get a professional estimate from a reputable shop to quantify needed repairs.
- Contact your insurer promptly and submit photos and the estimate for review.
- Schedule an adjuster appointment and provide any requested documents.
- Authorize repairs once the insurer approves work, confirming OEM parts if safety requires them.
Good documentation and a professional estimate reduce delays and help determine whether restoration or replacement is covered. The table below clarifies roles during the claims process.
| Claim Stage | Shop Action | Client Action |
|---|---|---|
| Initial Estimate | Provide a free, itemized estimate and damage assessment | Document damage and submit photos to the insurer |
| Adjuster Coordination | Discuss repair needs with the insurer’s adjuster | Allow adjuster access and provide vehicle history if requested |
| Repair Authorization | Present OEM part options and timelines | Approve repair scope and handle any deductible |
| Post-Repair Validation | Test beam pattern and provide written quality checks | Review completed work and keep documentation for records |
The shop helps with the technical side while you provide documentation and approvals so the claim can move smoothly to repair. Next, we review costs and ROI to help you decide between restoration and replacement.
How to file an insurance claim for headlight repairs
Start by photographing the damage from several angles and noting the incident details—clear visual records help define scope. Then get an itemized estimate that separates surface restoration, housing replacement, and any electrical work; submit those documents to your insurer and request an adjuster if required. Be aware of your deductible and whether the insurer prefers restoration or OEM replacement; if the housing is structurally damaged, the shop can document why replacement is needed. Once approved, schedule the repair and save before/after photos and repair records for warranties or resale. A clear, supported estimate usually shortens approval time and helps preserve safety-focused repair choices.
How Prime Time Collision helps with free estimates and claim support
Prime Time Collision Center offers free estimates and direct adjuster coordination, prioritizing OEM-quality repairs and clear communication across the greater Los Angeles area, including Glendale. Our team documents damage, prepares itemized estimates, and speaks with insurers to align repair scope with safety needs—cutting down back-and-forth for owners. If vehicle recovery is needed, 24/7 towing support can get your car to the shop quickly for assessment. These services are designed to reduce your effort and help you pursue OEM-compliant or restoration options that best protect safety and value. With claims support covered, the next section compares costs and benefits so you can make an informed choice.
Costs and benefits of professional headlight restoration
Professional restoration is usually more cost-effective than full assembly replacement and delivers meaningful safety and cosmetic benefits—but OEM replacement is the right call when structural damage affects beam aim or housing integrity. Restoration cost depends on severity, vehicle access, and labor; OEM replacement adds parts cost, possible recalibration, and more labor. Restoration’s long-term benefits include better nighttime visibility, reduced glare, improved appearance, and short-term savings—especially when followed by sealing and basic maintenance. The table below helps compare common options.
| Option | Typical Cost Range | Longevity / OEM Compliance |
|---|---|---|
| Professional Restoration | $75–$250 (varies by severity) | 6–18 months with UV sealant; preserves OEM assembly |
| Headlight Assembly Replacement (OEM) | $300–$1,200+ depending on model | Permanent fix for structural damage; full OEM compliance |
| Aftermarket Replacement | $150–$600 | Variable fit/performance; may impact beam pattern and warranty |
Restoration offers a strong ROI when lenses are cosmetically compromised but structurally sound. OEM replacement is the safer path when housing, aiming, or internal components are damaged. Consider the factors below when reviewing quotes.
- Vehicle model and headlight complexity affect labor and parts pricing.
- Severity of oxidation and depth of micro-scratches determines restoration time.
- Required beam aiming, sensor work, or adaptive lighting recalibration adds cost.
- Insurance coverage and deductible choices change your out-of-pocket expense.
Discuss these factors with a shop that provides a clear, itemized estimate so you can weigh restoration against replacement based on safety and value.
Typical cost for cloudy headlight repair
Professional restoration usually ranges from about $80 to $200 for most vehicles, depending on severity. Price drivers include how easy it is to access the lens, whether disassembly is needed, if multiple polishing and sealing passes are required, and whether recalibration is necessary afterwards. When housings are cracked, waterlogged, or internally damaged, OEM assembly replacement costs rise significantly and should be compared against safety outcomes rather than sticker price alone. The best way to know is a free, itemized estimate from a reputable shop that documents the recommended approach and expected longevity.
Long-term benefits of restoring headlight clarity
Restoring clarity improves safety by increasing usable beam output, which can reduce stopping distances and make hazard detection easier at night. Aesthetically, clear headlights improve vehicle appearance and suggest good maintenance—something buyers notice. With a proper UV seal and routine care, restoration delays the need for assembly replacement and lowers lifetime costs for cosmetic oxidation. Professional restoration also preserves OEM assemblies and avoids aftermarket changes that might alter beam pattern or cause inspection issues. These benefits make restoration a smart first step for eligible lenses.
| Service Option | Characteristic | Practical Impact |
|---|---|---|
| Professional Restoration | Restores clarity and applies UV seal | Better safety and appearance with medium-term durability |
| OEM Replacement | Replaces entire assembly to factory spec | Restores original performance and compliance; higher cost |
| Aftermarket | Varies by manufacturer quality | Possible fit or beam issues; cost savings with trade-offs |
This comparison reinforces restoration as the cost-effective first option for oxidized but intact lenses, while OEM replacement is the necessary choice when safety-critical parts are compromised. Next, find local services and schedule an estimate.
Find reliable headlight restoration near Glendale, CA
Drivers in Glendale and the greater Los Angeles area should pick a facility that combines certified technicians, OEM-quality practices, and solid claim and recovery support. Proximity reduces downtime and simplifies follow-up checks or beam re-aiming. Prime Time Collision Center is known locally for collision repair, OEM-focused work, and I-CAR Platinum-certified technicians; we also help with insurance claims, provide free estimates, and coordinate towing when needed. When comparing shops, look for certification, documented OEM part sourcing, and a clear written estimate that separates restoration from replacement.
Why choose Prime Time Collision Center for headlight restoration?
We focus on OEM-quality repairs and trained technicians so your headlights return to correct beam performance and keep your vehicle safe. Our services include collision repair, paintless dent repair, and general maintenance, all supported by free estimates and adjuster coordination to streamline insurance workflows. I-CAR Platinum technicians and an OEM-first approach reduce the risk of improper reassembly or noncompliant parts—important for both safety and resale value. For Glendale drivers, these factors make the repair decision straightforward after minor oxidation or accident damage. Below is how to schedule your free estimate.
How to schedule a free headlight restoration estimate
To schedule a free estimate, give us your vehicle make/model, a brief description of the visible damage, and photos if you have them—these help us assess scope before an in-person check. Expect the shop to confirm whether restoration is appropriate or if OEM replacement is safer, and ask for an itemized estimate separating parts, labor, and any recalibration. Bring maintenance records or notes about past repairs that might affect lighting systems, and request post-repair beam pattern validation. Clear communication about insurance, towing needs, and turnaround expectations helps us give you an accurate plan and timeline.
- Identify the issue: Photograph lenses and note how driving is affected.
- Request a free estimate: Ask for an itemized evaluation that shows restoration vs. replacement.
- Coordinate with insurance: Share the estimate and photos with your insurer for approval.
- Arrange recovery if needed: Use emergency towing if the vehicle isn’t safe to drive.
These steps move you from discovery to approval and scheduling, protecting visibility, safety, and vehicle value along the way.
Frequently Asked Questions
1. How often should I consider headlight restoration?
Consider restoration when you notice visible yellowing, fogging, or reduced brightness. For many drivers this appears every 1–3 years depending on sun exposure, weather, and driving habits. If you drive frequently at night or in harsh conditions, check more often—clear headlights are critical for safety and inspections.
2. Can I perform headlight restoration myself?
DIY kits exist, but professional services usually deliver better, longer-lasting results. DIY may not remove deep oxidation or fully restore clarity, and improper techniques can cause further damage. Professionals use multi-stage sanding, machine polishing, and UV sealing that are difficult to replicate at home—so for reliable visibility and safety, professional restoration is the safer option.
3. When should I replace my headlights instead of restoring them?
Replace the assembly when the housing is cracked, water is inside, or internal components (reflector, sockets) are damaged—restoration won’t fix those problems. If a lens is severely pitted or yellowed beyond repair, replacement is the only way to restore proper beam performance and compliance with safety standards.
4. How can I maintain my headlights after restoration?
Wash lenses regularly with mild soap and water and avoid abrasive cleaners or pads. Consider periodic UV protectants and park in shade when possible to reduce sun exposure. These simple steps help preserve the sealant and extend the life of your restored lenses.
5. Are there warranties for professional headlight restoration services?
Many shops offer warranties covering workmanship and restoration longevity. Warranties vary—commonly from 6 months to a few years—so ask about coverage before you proceed. A written warranty gives peace of mind and indicates confidence in the materials and process used.
6. What if my headlights cloud again after restoration?
If clouding returns, first check whether a UV protective coating was included—good coatings significantly extend clarity. If the coating failed or lenses continue to degrade, contact the provider about warranty options or a re-restoration. Following recommended maintenance also helps prevent premature clouding.
7. Does headlight restoration affect my vehicle’s resale value?
Yes—clear, well-maintained headlights improve appearance and suggest careful ownership, which can help resale value. Documenting the restoration with before/after photos and receipts also reassures buyers that the vehicle was properly maintained.
Conclusion
Professional headlight restoration improves nighttime visibility, reduces glare, and helps you meet inspection and safety expectations. Choosing expert service restores clarity and protects your vehicle’s value and appearance. Don’t wait—schedule a free estimate to explore restoration options and keep your drives safer. Trust Prime Time Collision Center for OEM-focused repairs and service that prioritizes your safety and satisfaction.


