


Tire Tread Depth & Patterns: Clear Safety Tips and How to Measure Them
Tire tread depth and tread pattern determine how your vehicle grips the road—especially in rain, snow, or after an impact. This guide breaks down what tread depth means, how different tread designs work, and why measuring depth correctly helps keep traction, reduce hydroplaning risk, and shorten stopping distances. You’ll learn simple at-home checks like the penny test, how to use a tread depth gauge, the differences between symmetrical, asymmetrical, and directional patterns, and the roles of grooves, sipes, and tread blocks. We also cover how grip affects braking and handling, practical maintenance and rotation tips to extend tread life, and a clear checklist for assessing tires after a collision. Throughout, we tie recommendations back to inspection and repair best practices and when OEM-level, certified service is the right choice to restore safe tire performance.
What is tire tread depth and why it matters for your safety
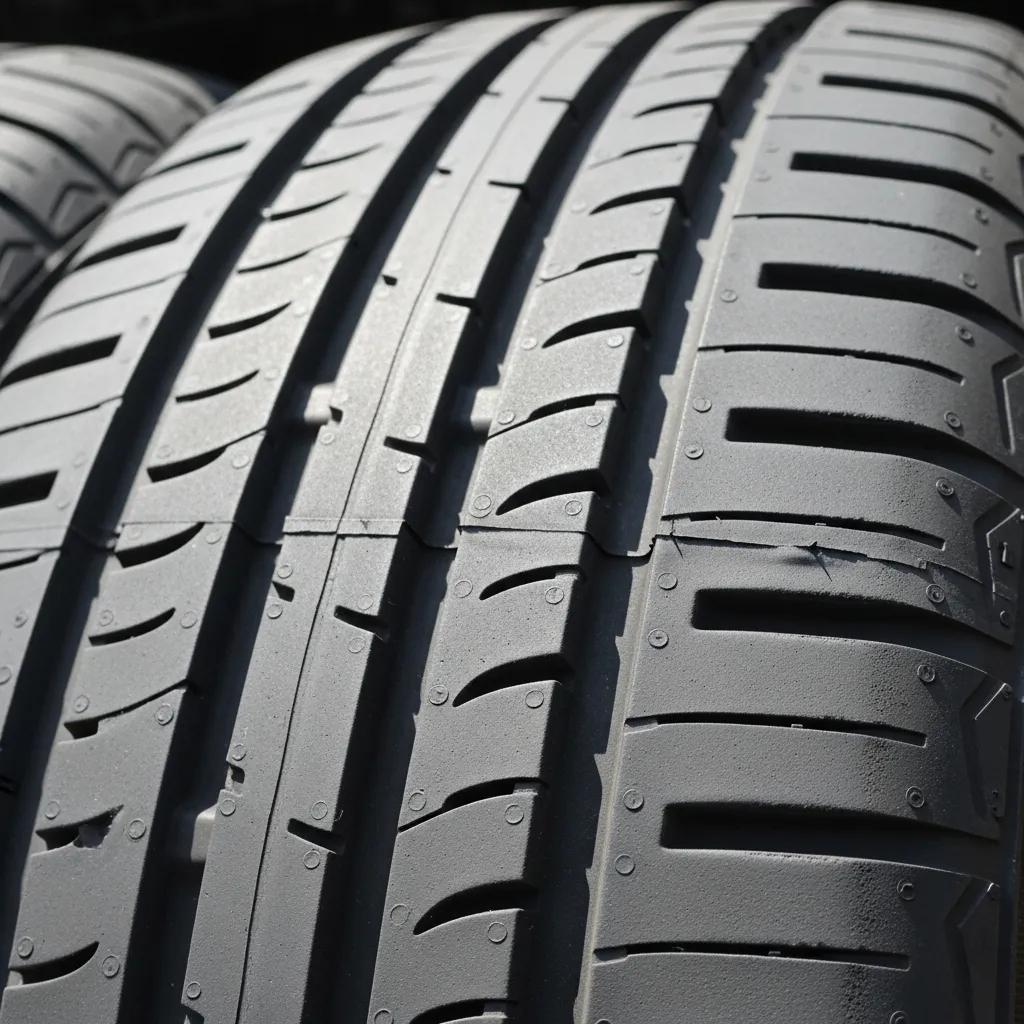
Tread depth is the vertical distance from the tread surface down to the bottom of the grooves, measured in inches or millimeters. Deeper grooves channel water away from the contact patch and keep the rubber biting the road. That water-evacuation helps maintain friction during wet braking and lowers hydroplaning risk. When tread wears down, groove capacity drops and wet performance suffers. Measuring tread depth gives you an objective way to judge safety and decide when to replace tires instead of guessing from appearance. The sections below explain how depth ties to traction and the common legal and recommended thresholds to guide replacement timing.
How tread depth affects traction and prevents hydroplaning
Tread depth matters because grooves and sipes create channels that move water out from under the tire, preserving the rubber-to-road contact that generates braking and cornering forces. As tread thins, a tire’s ability to eject water falls quickly; studies and manufacturer testing show stopping distances grow and hydroplaning can occur at lower speeds as tread approaches minimum limits. In short, shallow grooves mean a measurable decline in safety. That’s why replacing tires before wear bars sit flush with the tread is a practical safety step — and why legal thresholds exist to help you decide when to act.
Legal minimums and recommended tread depths
Many jurisdictions cite 2/32″ as the legal minimum tread depth — a level at which a tire becomes unsafe in wet conditions and more prone to hydroplaning and longer stops. For better wet-weather performance, safety-minded guidance recommends replacing tires at 4/32″. If winter traction matters, aim for 5/32″ or more because shallow winter grooves lose snow-to-rubber engagement quickly. Most tires have wear bars that show when you’re near 2/32″, but waiting for those bars can delay replacement and increase risk. The table below summarizes typical thresholds, safety implications, and recommended actions.
The table below outlines common tread depths, what they mean for safety, and what you should do next.
| Tread Depth | Safety Attribute | Recommended Action |
|---|---|---|
| New tire (~10/32″–12/32″) | Best resistance to hydroplaning and shortest stopping distances | Routine maintenance; monitor wear |
| 5/32″ | Good winter and wet traction | Consider replacing before winter or heavy rain |
| 4/32″ | Wet performance starts to decline; stopping distances increase | Plan replacement for optimal wet-weather safety |
| 2/32″ (legal minimum) | Poor wet traction and high hydroplaning risk | Replace immediately; unsafe for wet conditions |
In short: replacing tires earlier (around 4/32″–5/32″) improves stopping performance and lowers hydroplaning risk.
How to check and measure tire tread depth at home
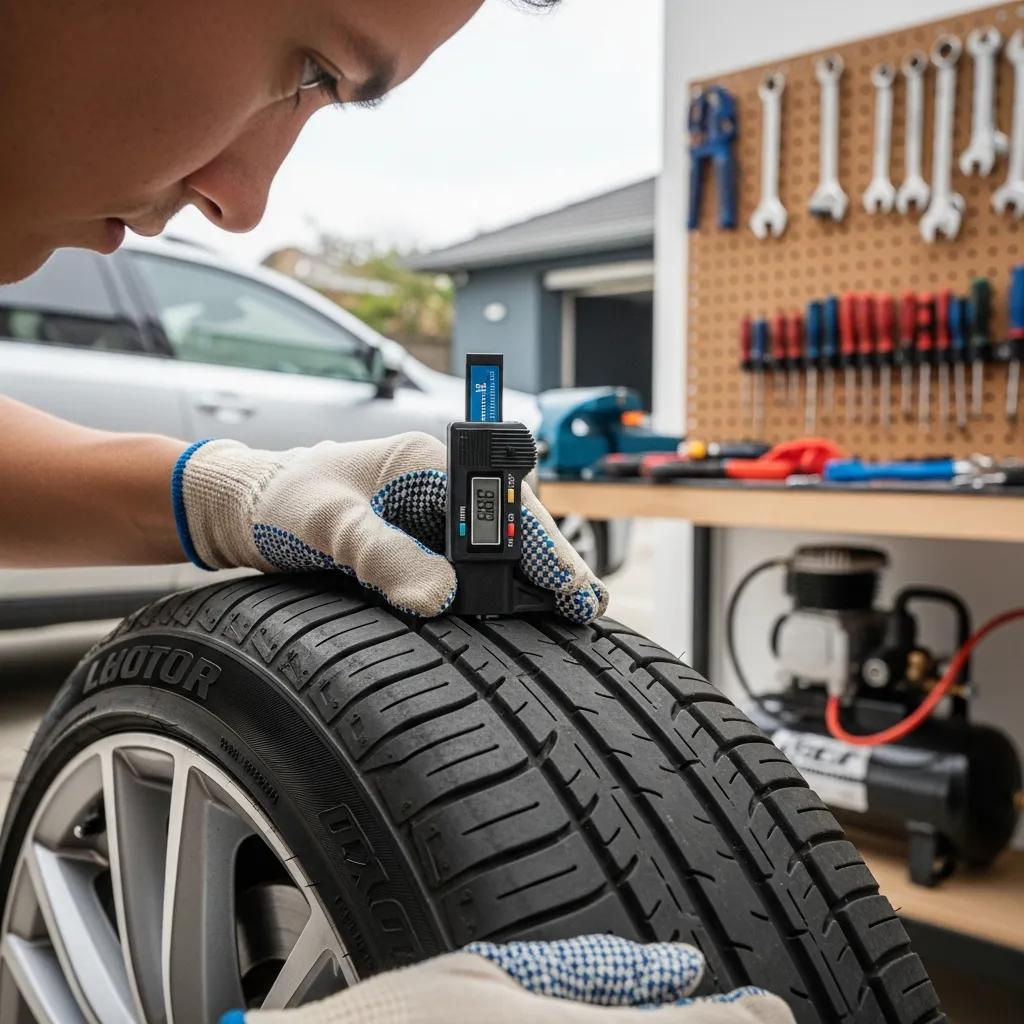
A reliable at-home check combines quick visual inspections with a precise gauge reading. Start with a visual sweep for uneven wear, exposed cords, bulges, or sidewall damage. Quick tests estimate groove depth, while a mechanical or digital tread depth gauge gives millimeter or 32nds-of-an-inch readings taken at several points across the tread to reveal cupping or edge wear. Average the readings and compare them to the thresholds above to decide if replacement or professional balancing and alignment are needed.
Below we explain the penny test and how to use a gauge, and when it’s time to call a pro for a full inspection.
What is the penny test and what it tells you
The penny test is a fast, tool-free way to check for critical wear: place a penny into a tread groove with Lincoln’s head facing you. If the top of Lincoln’s head is visible, the tread is about 2/32″ or less and the tire needs replacement. The penny test is useful for quick checks across multiple tires but it’s coarse and can miss uneven wear. Use it as a first screen — if results are borderline, follow up with a gauge or a professional inspection.
Do the penny test regularly to catch severely worn tires early and prompt more accurate checks when needed.
How to use a tread depth gauge for precise readings
A tread depth gauge gives repeatable readings in 32nds or millimeters. Measure at several points across the center and shoulder to spot uneven wear. For a mechanical gauge, press the probe straight into a groove until the base sits flat, note the reading, and repeat at three or four positions around each tire. Digital gauges work the same way but show the number on a screen. Record multiple readings and average them for each tire. Large differences across a single tire suggest alignment or suspension issues and warrant professional attention.
Check with a gauge monthly or before long trips to keep actionable data on your tires and plan maintenance.
Main tread pattern types and what they do for safety
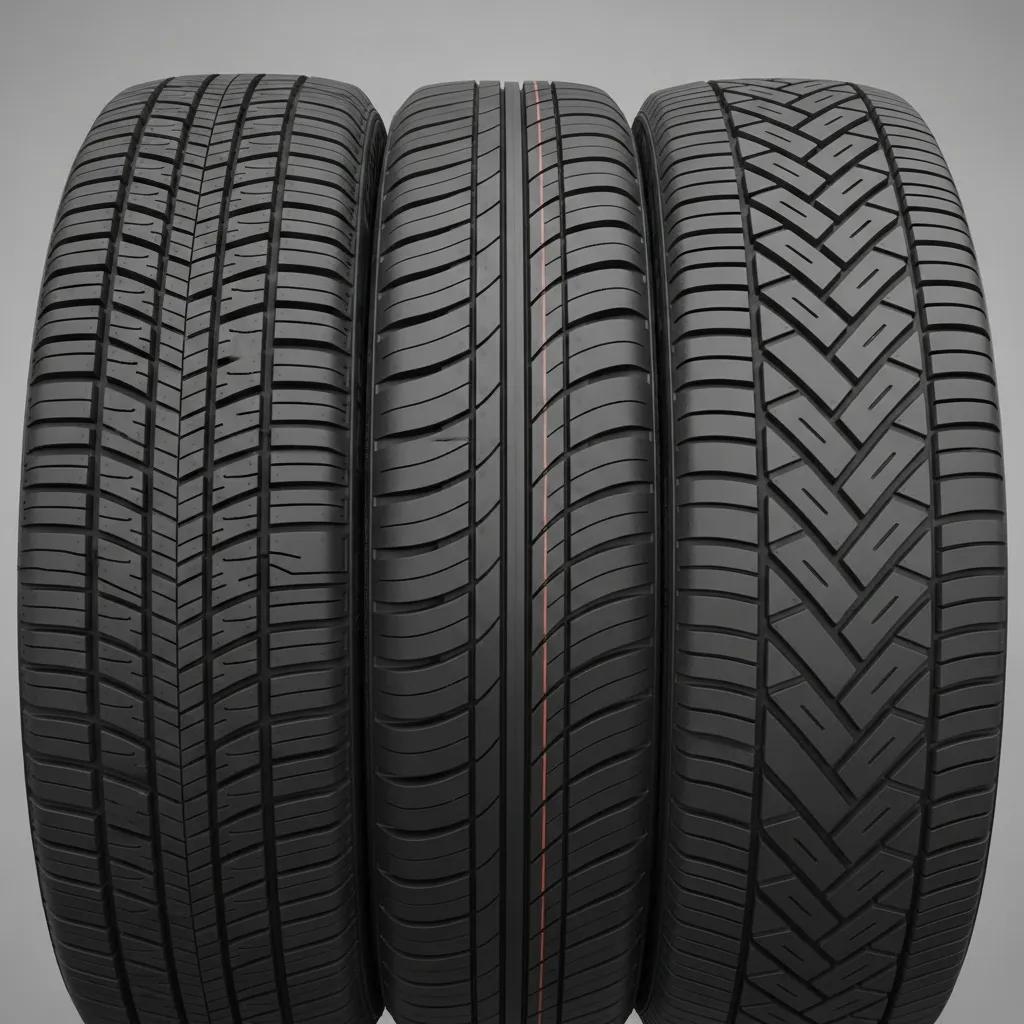
Tread patterns come in three main styles — symmetrical, asymmetrical, and directional — each balancing wet grip, noise, wear, and handling differently. Symmetrical treads wear evenly and are economical for everyday driving. Asymmetrical designs pair inner sipes for wet grip with outer shoulder blocks for cornering. Directional treads move water away quickly at speed, improving high-speed wet traction. Your best choice depends on vehicle, driving habits, and local weather: economy cars often use symmetrical patterns, performance models favor asymmetrical layouts, and sport or winter tires may be directional. The next sections compare patterns and explain how grooves, sipes, and tread blocks work together to create traction and evacuate water.
Use the compact comparison below to match tread patterns with your safety and performance needs.
| Pattern Type | Best Use | Wet Performance | Snow Performance | Wear Characteristics | Typical Vehicles |
|---|---|---|---|---|---|
| Symmetrical | Everyday driving with long tread life | Good | Limited | Even, long-lasting | Economy cars, sedans |
| Asymmetrical | Balanced wet/dry performance | Very good | Moderate | Balanced wear; improved cornering | Performance sedans, coupes |
| Directional | Quick water evacuation at speed | Excellent | Good (if designed for it) | Can wear unevenly if rotated incorrectly | Sports cars, some crossovers |
Match pattern selection to your driving priorities — wet grip, snow handling, and wear behavior should guide your choice.
How symmetrical, asymmetrical, and directional patterns differ
Symmetrical patterns repeat the same blocks around the tire for uniform wear and lower rolling resistance, which helps fuel economy and tread life. Asymmetrical tires put different designs on the inner and outer halves — inner zones focus on water evacuation and wet traction, outer shoulders increase lateral grip for cornering. Directional (unidirectional) treads use V-shaped or curved ribs to push water out from under the tire at speed, reducing hydroplaning and improving high-speed wet handling; they must be mounted in the correct direction and rotated according to the manufacturer’s pattern. Knowing these differences helps you pick tires that suit your roads, climate, and driving style.
Choose a pattern after considering typical routes, weather, and how you drive to get the right balance of safety and longevity.
The role of grooves, sipes, and tread blocks
Grooves are the main circumferential and lateral channels that move water away from the contact patch and directly reduce hydroplaning risk. Sipes are thin slits in tread blocks that add biting edges for traction on wet or icy surfaces, improving low-speed grip and braking. Tread blocks are the raised rubber segments that contact the road and provide the mechanical bite for acceleration, braking, and cornering; their size, spacing, and stiffness influence noise and handling. When these components wear down, the tire loses specific safety functions — less groove depth impairs water evacuation, fewer sipes reduce ice traction, and rounded blocks lower grip — so checking each element is important for safe performance.
Understanding how each part contributes to traction makes it easier to choose the right pattern and maintain your tires for safety.
Why tire grip matters for braking, handling, and safety
Tire grip sets the maximum forces the road and vehicle can exchange for braking, steering, and cornering. Lower grip means longer stopping distances, reduced cornering stability, and a higher chance of losing control in extreme maneuvers. Grip depends on tread depth, compound, temperature, inflation, and load — changes to any of these affect the friction between rubber and pavement and therefore vehicle control. In emergencies, well-maintained tires with good tread and proper inflation can be the difference between a near miss and a crash. The sections below explain how worn tread raises hydroplaning risk and list key factors drivers can control to preserve grip.
How worn tread raises hydroplaning risk
Hydroplaning happens when water builds under the tire and severs the rubber-to-road contact. Worn tread reduces the channels available to push that water away, so a water film forms at lower speeds. As groove depth falls, the critical hydroplaning speed drops — meaning worn tires will hydroplane at slower speeds than new tires under the same conditions. That’s why maintaining tread depth and choosing high-evacuation or directional patterns in rainy climates lowers hydroplaning risk. Slow down in heavy rain and keep tread depth appropriate for local weather to reduce exposure.
Knowing that hydroplaning is tied to both speed and tread capacity helps motivate regular checks and cautious driving in wet conditions.
Factors that influence tire grip
Several variables affect tire grip across driving conditions: tread depth and pattern, rubber compound and temperature sensitivity, correct inflation pressure, vehicle load and distribution, and wheel alignment and balance. Below are the controllable items drivers should monitor to preserve grip and safety.
- Tread Depth and Pattern: Preserve water evacuation and biting edges for traction.
- Inflation Pressure: Proper pressure ensures the full contact patch and even wear.
- Rubber Compound and Temperature: Compounds change grip as temperatures vary.
- Load and Distribution: Overloading increases wear and reduces available grip.
- Alignment and Balance: Misalignment creates uneven wear and harms handling.
Focusing on these control points with regular maintenance produces measurable grip improvements and lowers accident risk.
Dangers of worn tread and how to prevent them
Worn tread increases stopping distances, reduces directional control, and sharply raises hydroplaning likelihood in wet conditions — all of which increase crash risk. Prevention comes down to scheduled inspections, correct inflation, regular rotations, alignment checks, and timely replacement based on accurate depth measurements instead of visual guesses. Watch for irregular wear patterns that point to suspension or alignment problems and fix those quickly to avoid accelerated tread loss. The checklist below gives immediate steps you can adopt to reduce risk and extend usable tread life.
Use this routine checklist to prevent dangerous tread wear and keep traction reliable.
- Inspect tread depth monthly: Use a gauge and check multiple points.
- Maintain correct inflation: Check cold and follow your vehicle’s specs.
- Rotate tires regularly: Follow a recommended rotation schedule.
- Check alignment and balance: Address pulling, vibration, or uneven wear quickly.
- Avoid overloading: Reduce heavy loads that speed up wear.
Following these steps reduces unexpected tread failures and improves stopping and handling performance.
When in doubt or if you find cuts, bulges, or impact damage during checks, a certified shop should inspect the tire’s structure. Reputable collision and repair centers work to OEM guidelines for alignment, balancing, and proper tire fitment to maintain vehicle safety standards. A certified technician can advise whether repair or replacement is required to restore safe grip and handling.
How worn tread affects braking distance and vehicle control
Less tread depth increases braking distance because the tire evacuates less water and the effective friction between rubber and pavement drops in wet or mixed conditions. Tests show tires worn to 2/32″ can require significantly more stopping distance than new tires, especially at highway speeds and in wet weather — differences that matter in emergency braking. Worn tread also weakens lateral grip in corners, increasing understeer or oversteer and making handling less predictable. Replacing tires before they reach the legal minimum improves crash-avoidance margins and keeps steering and braking responsive.
Because of these effects, prioritize measurement and proactive replacement to maintain control and shorter stopping distances.
Best practices for maintenance and rotation to extend tread life
Follow these practices: rotate tires every 5,000–8,000 miles in a pattern suited to your drivetrain, keep inflation at manufacturer-specified pressures, check and correct alignment annually or when uneven wear appears, and balance tires when installing new ones. Inspect tread depth monthly and after impacts, watch TPMS alerts for pressure changes, and address suspension complaints quickly to prevent asymmetric wear. The short checklist below helps you maintain tires between shop visits and preserve even tread life.
Use this simple maintenace checklist to maximize tread life and keep handling balanced:
- Monthly tread and pressure checks: Log readings and note irregularities.
- Rotate tires regularly: Follow the vehicle maker’s interval and rotation pattern.
- Align and balance when needed: Fix pulling or vibration early to avoid uneven wear.
Consistent maintenance reduces premature replacement costs and keeps the traction you need for safe braking and maneuvering.
How to assess and manage tires after a collision
After a collision, prioritize safety in the first tire check: look for cuts, sidewall bulges, exposed cords, embedded objects, rapid pressure loss, and wheel damage. Any of these can make a tire unsafe to drive on. If you see structural damage such as sidewall creases or bulges, or if the wheel is bent, do not drive the vehicle — tow it to a certified shop for a full internal and structural inspection. Professional assessment usually includes demounting the tire to inspect for internal cord separation, pressure retention testing, wheel runout checks, and verifying balance and alignment. Those steps determine whether a repair is possible or an OEM-spec replacement is required. The table below outlines common damage types, inspection focus, recommended actions, and insurance notes to help guide immediate decisions.
This table helps prioritize post-collision tire actions and shows typical next steps with repair shops and insurers.
| Damage Type | Inspection Focus | Recommended Action | Insurance Consideration |
|---|---|---|---|
| Sidewall bulge or cut | Structural integrity of cords | Do not drive; replace tire | Usually covered if caused by collision |
| Visible cord exposure | Internal rubber/cord separation | Replace tire immediately | Document for claim support |
| Puncture in tread area | Location and size of puncture | Professional repair if within repairable area | May require inspection for claim approval |
| Bent or cracked wheel | Wheel structure and air retention | Replace or repair wheel; remount tire | Photo documentation aids claim processing |
This comparison clarifies immediate safety priorities and how inspection, repair, and insurance typically interact after an accident.
Process for assessing tire damage after an accident
Begin with a safety-focused visual check: inspect all tires for bulges, cuts, air loss, or separation and note any wheel deformation or vibration during low-speed movement. If you find signs of structural damage — especially sidewall bulges or exposed cords — don’t drive the vehicle and arrange towing to a certified facility for demounting and internal inspection. At the shop, technicians will look for internal belt separation, check bead seating, verify wheel integrity, and perform balance and alignment checks before returning the vehicle to service or recommending OEM-spec replacements. This step-by-step approach helps ensure hidden internal damage isn’t missed and tires meet safety standards before reuse.
Following these prioritized steps removes uncertainty and helps drivers take the safest immediate actions after a collision.
How OEM-certified repairs protect proper tire replacement and safety
OEM-certified repairs follow vehicle manufacturer guidelines for tire fitment, wheel torque, balancing, and alignment so replacement parts meet original specifications and preserve designed handling. Certified technicians follow manufacturer procedures and provide documentation to maintain warranty and safety compliance, including choosing tires that match load index, speed rating, and rim specs. Insurance companies often look for this documentation to approve OEM-compliant repairs and replacements. Choosing a shop that follows OEM standards reduces the risk of mismatched tires or improper installation that could compromise grip, braking, and stability.
Prime Time Collision Center supports drivers after collisions with OEM-quality repair processes and recognized certifications, working with major insurance companies to document repairs and restore vehicle safety. We provide free estimates and 24/7 towing, perform factory-quality repairs by I-CAR Platinum certified technicians, and offer a lifetime warranty on repairs. Drivers in Glendale, Burbank, Pasadena, and Los Angeles can schedule an inspection to confirm tire and wheel safety after an impact.
For urgent post-collision needs, our OEM-focused procedures, certification, insurance support, and towing services help ensure tires and related systems are returned to factory-level safety.
Prime Time Collision Center coordinates OEM repairs and supplies detailed inspection reports to support insurance claims while ensuring replacement tires and wheel work meet manufacturer specs. Our certified, customer-first approach restores vehicle safety and traction after collisions so drivers can trust that braking, handling, and warranty considerations are preserved.
This completes our guidance on post-accident tire assessment and how certified repair standards support safe tire management.
Frequently Asked Questions
1. How often should I check my tire tread depth?
Check tread depth at least once a month and before long trips. Regular checks reveal wear patterns and ensure your tires keep adequate tread for safe driving. Use a tread depth gauge or the penny test for a quick check. After any significant impact or collision, have a thorough inspection done to confirm tire safety.
2. What are the signs that my tires need to be replaced?
Look for tread wear indicators, uneven wear, sidewall bulges, cracks, or exposed cords. If tread depth falls below about 4/32″, or if tires frequently lose pressure, consider replacement. Vibration or pulling while driving can indicate alignment or tire damage and should prompt professional evaluation.
3. Can I mix different tire tread patterns on my vehicle?
Mixing tread patterns is generally not recommended because it can produce inconsistent handling, reduced traction, and faster wear. Ideally, use the same tread pattern and tire type on all four wheels. If mixing is unavoidable, keep the same type on each axle (front or rear) and check your vehicle manual for compatibility guidance.
4. How does temperature affect tire performance?
Temperature affects tire grip because rubber compounds respond to heat and cold. Cold can harden compounds and reduce grip; heat can accelerate wear or lead to blowouts. Tire pressure also fluctuates with temperature—colder weather lowers pressure, while driving heat increases it—so check pressure regularly and keep tires inflated to spec.
5. What should I do if I notice uneven tire wear?
Uneven wear often points to alignment, inflation, or suspension issues. Have a professional inspect the alignment, balance, and suspension. Fixing the root cause will extend tire life and improve handling and safety.
6. How can I extend the life of my tires?
Maintain proper inflation, rotate tires every 5,000–8,000 miles, and keep alignment and balance in check. Inspect tires often for wear or damage and avoid overloading the vehicle. Gentle driving habits—avoiding sudden stops and sharp cornering—also reduce wear and extend tire life.
7. What is the importance of professional tire inspections?
Professional inspections find hidden problems you might miss: internal damage, belt separation, or issues with alignment and balance. Technicians have the tools for thorough checks and can advise on repair vs. replacement. Regular professional inspections help prevent accidents and extend tire life.
Conclusion
Tire tread depth and patterns directly affect traction, braking distances, and hydroplaning risk. Regularly measuring tread depth and choosing the right tread pattern keeps your vehicle handling and stopping power where it should be. Follow proactive maintenance—monthly checks, correct inflation, regular rotations, and timely replacements—to extend tire life and improve safety on the road. If you need help, schedule an inspection with Prime Time Collision Center — we’ll help you restore safe performance and recommend the right tires for your driving needs.


